Afternoon peeps. I'm back in the room with this one whilst another project awaits some AM goodies.
After starting to build and paint some accessories last year, I got side tracked, as I often do

so the truck and trailer were relegated to a nice dust free storage box. Last year I got some inspiration from the most excellent ‘The Army that got away' publication of how 15 Army largely escaped from their Atlantic coast defensive positions after D-Day. Pursued without any real urgency they escaped via the Scheldt estuary pretty much intact. It is a great read with some fantastic clear period images that I’ve never seen before, and it gave me some ideas on how I could finish off this project. I got the basic scene mapped out, but it too ended up on the queenie shelf whilst more pressing matters were attended to! So, lets have a quick SBS run through of how the base and groundwork took shape starting from the beggining.
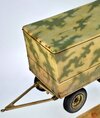
To build a base that I could display both vehicles pushed off the side of the road it had to be a lot longer than anything I have done before. I would display them abandoned with GI's rummaging over the booty.
Starting with a suitably long wooden picture frame and some polystyrene I began playing with ideas. Having only really fully painted three sides of each vehicle with time spent weathered the underside of the truck, the intention was always to display them tipped on their sides to some degree. I eventually had them both sat in a roadside ditch. The bank behind them would contain a hedgerow and some trees. The scene would be set in Northern France, north of the Seine on the long retreat to the West Wall
Initial mock up

I began laying down the groundwork contours with Sculptamold. Once the basic shapes had taken form, I framed the sides with Balsa wood. Once the Sculptamold had cured for a few days the final terrain layer was made up with mixes of AK Diorama series light and dark mud texture paste, and a few natural logs in the ditch were pressed into the wet surface. Wanting to test out AK's Diorama wet effects that was also laid down at the bottom of the ditch.

Happy that the grauduated colour change AK textured paste colours was dark enough at the base of the hedge line, various sizes from 3mm to 7mm of static grass were added in a couple of sessions with an applicator over PVA glue.

AK Diorama Asphalt paste was then added to the main road surface and smoothed out flat. It does look shiny, shiny but it does dry to a very impressive dried Asphalt looking texture.
Paste application

Paste fully dry. I did end up with a few imperfections but these should add a little interest rather than distract from the overall effect. Wheel markers helped keep the vehicle placement in check.

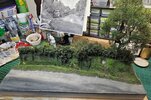
A recess was cut out for a resin telegraph pole base and much test fitting of the vehicles, bushes, and trees took place until final placement was made and futher bushes were marked out with cocktail sticks. More shorter grass has been applied to the road edge.

Over a few evenings the hedgerow slowly took shape. I used scenic products from Mininatur, MK35 and the beautifully hand-crafted trees and bushes from Robert Benasiewicz. A combo of both AK textured paste and PVA ensured it stayed where it was placed.


To combat the unnatural shine that many of these scenic materials exhibit, I always planned to
airbrush various mixes of diluted
Tamiya acrylics over them. I have in the past completely dark primed the whole scene once all the scenic planting were in place, as you can really up the final contrast. In this case the darker AK textured earth tones were a good starting point. I did however slightly enhance the shadow effects in places. Starting with a German Grey and Flat Earth mix, lightening to pure Flat earth, this was applied to the recessed areas of exposed earth in both ditch and on verge. This was followed by enhancing the grassy areas. The darkest shade being Dark green, through Nato Green and Light Green all the way to handmade mixes of Flat Yellow and Blue to create the most vibrant tones. Painting individual leaves and plants being quite therapeutic.
I much prefer the harmonising effect that this additional airbrushing creates.

Flat earth and Buff mixes were also airbrushed over the edges of the road where it attracted the least traffic, and a very diluted misted layer was airbrushed over all the vegetation to rid it of any remaining unnatural sheen. This will form the base of future dust effects.

More test fitting of vehicles.


Temporary marks have been made in the initial airbrushed dust layer to mark the likely areas where the tyres dragged along the road surface as they were pushed off the road by a dozer. The truck marks would show two straightforward parallel marks, but I suspect the trailer would have first pivoted on its draw bar dragging the front wheels in an arc before the rear wheels followed when pushed again by the dozer. I will test the theory with two sets of axles attached with a draw bar to see what marks would show if the truck was pushed off first. The dozer marks on both the vehicles and road surface will then also have to be added.
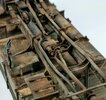
The truck and trailer contents are being slowly amassed and the truck will have a nice surprise being uncovered. The trailer also requires additional weathering work to the underside and both vehicles will eventually display dried camo foilage.
The next session will make a start to building up, painting, weathering and fitting of the telegraph pole and dropped wires.
Los


 Rick H.
") Los, I have that ref. as well.....have seen others with duals front and rear.....same class of trailer. guess they could go either way depending on load requirements. Rick H.
Los, I have that ref. as well.....have seen others with duals front and rear.....same class of trailer. guess they could go either way depending on load requirements. Rick H.
.jpg")