Monogram 1:8 scale "Big T" Hot Rod

Joined
Feb 15, 2019
Messages
30
Points
8
First Name
Scott
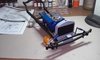
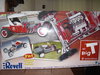
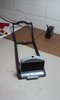
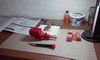
Picked this kit up at an antique shop recently. It's been roughly 25 years since I've even looked at a model. This is a 3 in 1 kit, Show car, Street Rod or Hot Rod. I decided to go with the Hot Rod version. This is the first kit I have made where the frame was not one piece so, getting the frame flat and square was my first hurdle. I have decided on a semi-gloss primer for the paint skeem, similar to the picture on the box. Most of the chrome will be stripped and painted, as I'm going for more of a 50's look. I got the basic frame and radiator done and decided to work on the engine while I strip/repaint the chrome parts for the remaining frame work. The engine seams were pretty rough and took me a number of hours over the past couple day to file/sand. I'm working on painting some of the small engine parts while the primer on the engine block dries. This build is going to be lengthy as I am relearning some old stuff and learning some new technics. I hope you will enjoy following along.
 

Attachments

  • CIMG1293.JPG
    CIMG1293.JPG
    132.4 KB · Views: 32
  • 0213191921.jpg
    0213191921.jpg
    54.3 KB · Views: 31
  • 0216191438.jpg
    0216191438.jpg
    62.1 KB · Views: 26

Tim Marlow

Little blokes aficionado
SMF Supporter
Joined
Apr 27, 2018
Messages
16,774
Points
113
Location
Somerset
First Name
Tim
Nice start Martin. Always good to have a plan as well :thumb2: If you get stuck or need advice, ask away....someone will have an answer...
 

JR

Member of the Rabble and Pyromania Consultant
SMF Supporter
Joined
May 26, 2015
Messages
17,275
Points
113
Location
lincs
First Name
John
Front row seat please Scott.
Looking fwd to seeing that engine appear, just take your time and enjoy it .
John .
 
Joined
Feb 15, 2019
Messages
30
Points
8
First Name
Scott
Thanks everyone. I got the engine block primed and painted yesterday as well as the starter and oil filter. All the front suspension pieces were stripped of chrome and will be glued together and sanded and will hopefully be ready for paint by this afternoon.
 

Mini Me

SMF Supporter
Joined
Jun 1, 2018
Messages
10,159
Points
113
First Name
Rick
Nice start Scott, and welcome to the crowd! This model was released back when I was a very young teenager. Not sure how old you are but if you are around 60-70 and were into modeling back then you might remember that a whole line of different models in this scale were released.
I don't remember exactly what I paid for mine ( Big Rod) but around 10- 12.00 U.S.
What are you using for chrome removal and does it effect the plastic in any way?
Cheers and welcome again, Rick H.
 
Joined
Feb 15, 2019
Messages
30
Points
8
First Name
Scott
Hi Rick. I am 56 but, remember some of the larger scale models from the 70's like the Mako Trike which had a Corvette body and chopper front end. I would love to find that kit but, the one's I have found sold for like $200 or more and I just don't have the pockets for that. I found this unopened kit at an Antique shop and was had for $46. I am using bleach which takes it off in 15 or 20 minutes, then a quick rise and wash with warm soapy water. As far as I can tell, no adverse effects. I got more pieces together and will post pictures tomorrow once my camera battery charges.
 

Mini Me

SMF Supporter
Joined
Jun 1, 2018
Messages
10,159
Points
113
First Name
Rick
Thanks for the info Scott, I look. Forward to your next update.
Rick H.
 
Joined
May 1, 2018
Messages
301
Points
63
Location
Australia
First Name
Ross
Scott

I'll pull up a pew as well mate and watch this come together.

cheers
Ross
 
Joined
Feb 15, 2019
Messages
30
Points
8
First Name
Scott
Just a quick update as I am putting on parts which are very fiddily such as the front shock supports and side stabilizer bars. I had the mounts on but when I went to put on the bars, they were to short so, pulled off the mounts and sanded the pins off of the backs and now need to reposition them slightly more forward which means I will need to sand the frame where the mounts were, fill the holes, reposition mounts and repaint. I also have a few other areas to touch up the paint where the glue touched the paint while trying to do the shock supports. I imagine the problem with the stabilizer bars is in part, because I painted both the front suspention and the mount for the suspension on the front of the radiator and the front suspension didn't seat properly. No bother, just a slight hassle. I also have some of the engine together but, tried using a wash for the first time on the manifold but, think it was to thick so, may just paint it over with aluminum paint and call it done. The engine isn't glued in place, just positioned for the picture. I'm working on the carbs and distribtor, hoses and wires. Here are a couple pictures showing my slow progress.
 

Attachments

  • 0219191752.jpg
    0219191752.jpg
    82.6 KB · Views: 7
  • 0219191753.jpg
    0219191753.jpg
    73.4 KB · Views: 8

Mini Me

SMF Supporter
Joined
Jun 1, 2018
Messages
10,159
Points
113
First Name
Rick
Scott, this is so typical of Monogram kits of that era and before! I can remember as a youngster being frustrated in the same way. Back up to go forward as
I remember. Cheers Rick
 
Joined
Feb 15, 2019
Messages
30
Points
8
First Name
Scott
Rick, I don't think it was the fit of the model so much. I think it was the fact that I put a painted piece onto a painted piece and the piece didn't sit where it was supposed to. If you look at the picture, there is a piece in the middle of the radiator. This piece should have been put on before I painted but, I somehow missed that step so, I painted it and put it on and closed the tolorence of the fit. Oh well, live and learn.
 

Mini Me

SMF Supporter
Joined
Jun 1, 2018
Messages
10,159
Points
113
First Name
Rick
Rule #1 when joining painted parts always remove the paint from the surfaces to be joined.
My older brother taught me this at an early age. Sometimes it worked and sometimes not.
Like the progress keep it going!
Cheers, Rick H.:thumb2:
 
Top