Oh dear it's a 1/72 Bristol Beveldere

rtfoe

SMF Supporter
Joined
Apr 29, 2018
Messages
7,539
Points
113
Location
Malaysia
First Name
Richard
Hi,
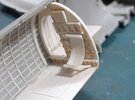
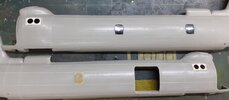
Today I finished the scribing and sanding down of the rivets, not all the way so there is some trace of it left.
20230803_221629.jpg
The bottom fuselage half was scribed later and I had glued the window on so it needed a masking before sanding.

I have to make a decision to really make this a much later version which calls for an enlarged chin and extended engine cowling bases with side mesh or just leave it. I intend to add the side pylons with yellow storage(fuel?)tanks so not sure if this was only on the later version. Anybody have a clue?

Cheers,
Wabble
 

Jim R

SMF Supporter
Joined
Apr 27, 2018
Messages
13,834
Points
113
Location
Shropshire
First Name
Jim
All very neat Richard. What do you use to scribe against? I have used that Dymo embossing tape but wondered what you use to get such neat results.
 

rtfoe

SMF Supporter
Joined
Apr 29, 2018
Messages
7,539
Points
113
Location
Malaysia
First Name
Richard
All very neat Richard. What do you use to scribe against? I have used that Dymo embossing tape but wondered what you use to get such neat results.
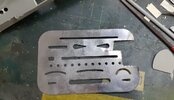
Thanks Jim, I use a draftsman aluminium template as a guide for my scribing tool. I basically work on fuselage halves to get a good lying surface and tape the template at both ends before scribing firstly very lightly and then with deeper strokes after there is a groove deep enough that I can just scribe without the template.
20230804_013815.jpg
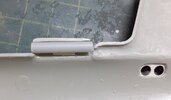
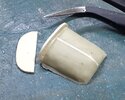
I added a tube that doubles up as an air scoop and outlet to prevent an empty hole that reveals the inside of the fuselage.
20230804_013515.jpg

Cheers,
Wabble
 

rtfoe

SMF Supporter
Joined
Apr 29, 2018
Messages
7,539
Points
113
Location
Malaysia
First Name
Richard
Hi Guys, todays progress are the following...
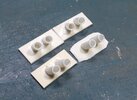
The exhaust tubes and backing with each marked A to D.
20230806_012217.jpg
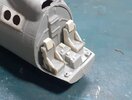
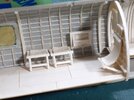
Then I over zealously did the cockpit seats without referencing and found after checking that they were rather rudimentary and simple without a head rest. I'm keeping mine on as it looks a little more sofisticated and wasn't going for 100% accuracy.
20230806_011813.jpg...just look at the gaps I will have to fill...
Then I made the canvas seat for the crew chief which is basically blutac'd in place for easy painting later.
20230806_012033.jpg
That's all for now and I haven't even started on the external detailing apart from the scribing. Hope you guys like what you see.

Cheers,
Wabble
 

Jim R

SMF Supporter
Joined
Apr 27, 2018
Messages
13,834
Points
113
Location
Shropshire
First Name
Jim
Thanks for the scribing method. I actually have a couple of those thin metal scribing templates somewhere. I bought them years ago but never used them. Daft as it seems I didn't think to tape them in place.
Seats do look a lot more interesting. As for the gaps - terrible but typical of an old kit.
 

rtfoe

SMF Supporter
Joined
Apr 29, 2018
Messages
7,539
Points
113
Location
Malaysia
First Name
Richard
Thanks for the scribing method. I actually have a couple of those thin metal scribing templates somewhere. I bought them years ago but never used them. Daft as it seems I didn't think to tape them in place.
Seats do look a lot more interesting. As for the gaps - terrible but typical of an old kit.
You're welcome Jim. I wanted the challenge and expected the bad fitting and gaps. Besides Airfix only made the Belvedere I think.
Coming on very nicely, Richard.
John.
Thanks John. And I have yet to tackle the exterior details.

Cheers,
Wabble
 

rtfoe

SMF Supporter
Joined
Apr 29, 2018
Messages
7,539
Points
113
Location
Malaysia
First Name
Richard
As usual wabble some great upgrades and details.
Thanks Scottie, as usual I've dug a deeper hole to fill...should have just done the exterior.

Here's one nightmare over...the folding seats, one folded and the other two open. Will detach them including the crew chiefs seat for painting.
20230807_191439.jpg
At least now there's something to see through the opened cargo door.

Cheers,
Wabble
 

Waspie

SMF Supporter
Joined
Mar 13, 2023
Messages
2,645
Points
113
Location
Portland - Dorset
First Name
Doug
Thanks Scottie, as usual I've dug a deeper hole to fill...should have just done the exterior.

Here's one nightmare over...the folding seats, one folded and the other two open. Will detach them including the crew chiefs seat for painting.
View attachment 487992
At least now there's something to see through the opened cargo door.

Cheers,
Wabble
Yes, seats look suitable uncomfortable to be a UK military flying machine!!!
Epic work Richard. :thumb2:
 

rtfoe

SMF Supporter
Joined
Apr 29, 2018
Messages
7,539
Points
113
Location
Malaysia
First Name
Richard
Great work Richard. All your modifications are probably going to double its weight. Thank heaven's for chunky Airfix undercarriage.
Thanks Colin, talk about chunky, I've got to add fairings to the struts.
Yes, seats look suitable uncomfortable to be a UK military flying machine!!!
Epic work Richard. :thumb2:
Thanks Doug, they were uncomfortably difficult to make too. Have added straps to the folded up seat.
Great looking seats.
Thanks Jim.
Great work so far Richard.
Thank you too Ian.

Am now struggling with the modifications to the extended engine vents and front bulge under the cockpit.

Cheers,
Wabble
 

rtfoe

SMF Supporter
Joined
Apr 29, 2018
Messages
7,539
Points
113
Location
Malaysia
First Name
Richard
There it is the ugly chin bulge and extended frame. To create the bulge I had a skeleton shape stuck to the frame and a spine that extended and curved to the front edge as a guide to shape the two part putty.
20230810_011202.jpg
In the end I don't think I need to sand much to shape.
IMG-20230806-WA0018.jpg
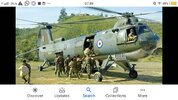
That's the bulge I'm trying to achieve. The wire mesh for the extended engine base will be a challenge but I've hot an idea how to do it.

Cheers,
Wabble
 
Last edited:

rtfoe

SMF Supporter
Joined
Apr 29, 2018
Messages
7,539
Points
113
Location
Malaysia
First Name
Richard
Well done creating the chin bulge, looks good. Interested to see how the mesh is achieved.
Thanks Jim I'm as anxious to see the outcome too.
Nice work Richard
Thanks Mick.

Building old Aifix kits are like building Vacform kits.‍:confounded: You get the basic shape...so much to modify. I've also found out the rotors were counter rotating but Airfix has them rotating the same direction. Lots to do for the exterior and becoming a real challenge.

Cheers,
Wabble
 
Top