rickoshea52
SMF Supporter
Started this the other night.


 Some assemblies built.
It will be a fishead kite but from the Pacific Area of Operations. I have an aftermarket paint mask set; first time I will attempt painted on markings.Nice , big old beast in 1/24 too. Which version are you leaning towards rick? ( fingers crossed its the Royal Navy one !)
 www.scale-models.co.uk
Already bookmarked and read, thanks.Rick
Will follow with interest......before you go much further you might want to check out Barry's build of this.....it went in the bin....there were a number of fit issues including a warped fuselage.....not sure if he got a dud kit though.
ATB
Andrew
Airfix 1/24 scale Hellcat.
So why this kit? This is a departure from my usual 1/32 scale aircraft, though a welcome return to WW2 subjects after a run of modern jets. I have little or no interest in the Hellcat, to me it just looks like an oversized Wildcat, a fat one at that and pretty ugly. That overall blue scheme...
This is the scheme I’ll use. I was hoping I’d get some tips from @BarryW in his build but it didn’t work out for him.Nice , big old beast in 1/24 too. Which version are you leaning towards rick? ( fingers crossed its the Royal Navy one !)


Shelving it would be a shame considering the effort you have put in and the actual detail. Hope you manage to salvage the situation Rick.The cockpit is almost ready for closing up the fuselage. All painted, decals applied and a wash.
View attachment 499482View attachment 499483
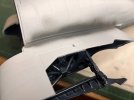
Now...the fuselage. It fits together nicely with the exception of the underside just in front of the access panel; there’s a big gap. No amount of squeezing or clamps would close this, not even filing off a large area of the frame behind the cockpit bulkhead. My best option was to cut out a section of the frame so I could squeeze it close enough for the fuselage halves to be glued. That will be for another night.
View attachment 499488View attachment 499489View attachment 499490View attachment 499491
I’ve also been building the wings and centre box section, these too are not the best fit.
This kit is flirting with the shelf of doom.


 Engine assembly and painting has progressed. The MIG Ammo paint I used is so fragile and needs touching up here and there.
Firmly echoed!This is looking very good even with the fit issues your having Rick, a testiment to your building skills.
For FULL Forum access you can upgrade your account here UPGRADE