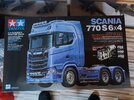
Scania 770s 6X4 Tamiya R/C 1/14

Ian M

Administrator
Staff member
Administrator
Moderator
SMF Supporter
Joined
Dec 14, 2008
Messages
19,727
Points
113
Location
Falster, Denmark
First Name
Ian
20230708_165806.jpg

Sorry to disappoint but no in depth blow by blow account of this one. :disappointed: It is just a bit complex and I couldn't be stopping and starting taking pictures all the time, so insted you will get an up date as things progress.
The basic build is, for the most part, finished. Now the real fun begins. Paint, electronics install then getting it all to work.
The plane, from the start, has always been to get to this point then start the paint up. Some will build and paint step by step but to be honest far to much time cleaning up. So as normal for me I build all what I can befor I can see problems painting.
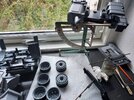
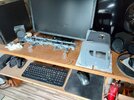
With a more 'normal' kit, 1/35 armour or a 1/48 aircraft not a problem. But something this large.... I need a bigger desk!
20230721_131654.jpg
Tuff neighbourhood! lol The amount of screws picked up from the floor is beyond belief! Oh Mr Tamiya if your reading For the money we pay for these could you not consider giving us a properly sized JIS (?) screwdriver to make screwing the 500 screws in a little more fun and not a challenge.
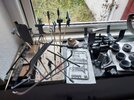
20230721_131714.jpg
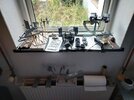
The thing on the letter scales is the battery holder that has The 'filter unit' one side and diesel tank (?) the other. The wheels are only the outer most of the rears and the two front ones. Most of the other bits here had chrome on of some sorts. After several different baths, the one that did the trick was drain cleaner.
20230721_131739.jpg
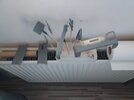
Bits of body.
20230721_131743.jpg20230721_131752.jpg
The bottom of the cab, the lightbars and a few tread plates.
20230721_131754.jpg
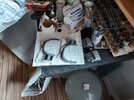
more bits of bodywork!
20230721_131759.jpg
And here as well...
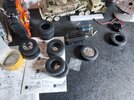
20230721_131810.jpg
A few tyres ! Annoyingly the rear tyres all have Tamiya as the brand ON BOTH SIDES, even though the instructions say that they are blank on the one side!
The motor is not the one in the box, way to fast. This one is a motor for a rock crawler and is much slower and has a LOT more torque. The big black thing it is attached to is the three speed gearbox!
The Scammel in the background IS 1/35 by the way.
The big orange thing is the new Radio, my old one only had 6 channels, this one has 16 and S-bus! That should be fun to learn to set that up.

Why strip the chrome. Well we all know that chrome on models is naff and look 'orid. (This however was actually very good and looked very nice). No I wanted to paint it a different way.
Still going for the baby blue pearl but to 'toughen it up a bit' All the chrome will be replaced with Metallic grey aka Gunmetal.
Comments and Questions welcome.
'Til next time
 
Last edited:

Mini Me

SMF Supporter
Joined
Jun 1, 2018
Messages
10,160
Points
113
First Name
Rick
Wow Ian, looks like you have every horizontal surface covered! Will you be scratch building a garage to park this in when it's done? ;)
 

Gern

'Stashitis' victim
SMF Supporter
Joined
May 17, 2009
Messages
9,705
Points
113
Location
Stourbridge
First Name
Dave
I like this!

I've bought Tamiya kits with that naff little screwdriver so I know what you mean. You'd be better off with a set of jewellers screwdrivers - even if you only use one of the set, you'll save yourself a lot of frustration and scrabbling around on the floor.
 

Ian M

Administrator
Staff member
Administrator
Moderator
SMF Supporter
Joined
Dec 14, 2008
Messages
19,727
Points
113
Location
Falster, Denmark
First Name
Ian
Wow Ian, looks like you have every horizontal surface covered! Will you be scratch building a garage to park this in when it's done? ;)
LOL 100% correct Rick. Its everywhere!
Once the finish paint goes down I can start to assemble.
I like this!

I've bought Tamiya kits with that naff little screwdriver so I know what you mean. You'd be better off with a set of jewellers screwdrivers - even if you only use one of the set, you'll save yourself a lot of frustration and scrabbling around on the floor.
I do have a set but a Phillips or Pozi-drive head are more pointy than a JIS and that means they hop out and do not fit squarely in the top.. Have found a set with JIS bits...
As for the scabbling around on the floor, that's more down to my sausage fingers!
 

Ian M

Administrator
Staff member
Administrator
Moderator
SMF Supporter
Joined
Dec 14, 2008
Messages
19,727
Points
113
Location
Falster, Denmark
First Name
Ian
Not much to report today, Had a few bits that needed primer that I forgot yesterday. Well Forgot to wash them, this Tamiya is one of the slippery ever. Add to that the greasy fingerprints, and thread locker, and you know how that goes if you spray onto that. Not good. So they got a bath in warm soapy and dried off overnight.
Today they got primer and a few of the bits from yesterday got a few touch ups here and there.
Soon the real paint goes down!
Pale blue Candy sprayed over either Titanium silver or Titanium gold. Which do you recon? I will have a play with that over the next few days and see which looks best.
All the chrome bits are going to be Gunmetal grey.
The inside of the cab will be done to match but just in ordinary matt and semi matt Black, Grey and Blue. Looking at lighting the cab. Also those position lamps along the sides and in the radiator mounted light bar and the sun shade are just asking for a light!
 

Mini Me

SMF Supporter
Joined
Jun 1, 2018
Messages
10,160
Points
113
First Name
Rick
If it were me, I would choose the base that most compliments the trim color (Gunmetal) in this case, you will be the final judge once you have tried each base color under the top coat. Good luck.......and I would be interested in seeing the test results. :thumb2:
 

BattleshipBob

Bob, bob, bobing along!
SMF Supporter
Joined
Apr 28, 2018
Messages
6,212
Points
113
First Name
Bob
Can I join in the fun sir, never worked on Scanias!

The unit you have on the scales is fuel tank and opposite looks the exhaust box which contains a very expensive SCR, selective catalytic reduction unit. This uses Addblue injected into the exhaust gases to reduce Nox. Like being back in front of a class lol.

Next to it is probably the Addblue tank, paint the cap blue.

Boring but over !!
 

JR

Member of the Rabble and Pyromania Consultant
SMF Supporter
Joined
May 26, 2015
Messages
17,275
Points
113
Location
lincs
First Name
John
Can't advise on the colour , afraid only 4BO ;)
 

Andy T

SMF Supporter
Joined
Apr 26, 2021
Messages
1,966
Points
113
Location
Sheffield
First Name
Andy
Pale blue Candy sprayed over either Titanium silver or Titanium gold. Which do you recon? I will have a play with that over the next few days and see which looks best.
I've a good feeling the gold base will give you a green tinge. Yellow reflecting back from the gold, filtering through the blue candy.

Definitely worth testing first!
 

Mini Me

SMF Supporter
Joined
Jun 1, 2018
Messages
10,160
Points
113
First Name
Rick
I had the same thought Andy, but thought it worth a try with both bases just to be sure. I also have the feeling that the Gold based would come out much darker than the Silver based top coat.
 

Ian M

Administrator
Staff member
Administrator
Moderator
SMF Supporter
Joined
Dec 14, 2008
Messages
19,727
Points
113
Location
Falster, Denmark
First Name
Ian
I was going to buy a Tamiya silver spray then I saw the price. DOUBLE the price of all the others. (Gold was the same!) Are they made of real silver and gold?!?!

I've a good feeling the gold base will give you a green tinge. Yellow reflecting back from the gold, filtering through the blue candy.

Definitely worth testing first!
I had the same thought Andy, but thought it worth a try with both bases just to be sure. I also have the feeling that the Gold based would come out much darker than the Silver based top coat.
My hope it that the Titanium gold base will just give it a little warmth not sure I fancy a green truck....snigger snigger.

I will try and find the obligatory plastic spoons (which are getting harder to find these days)! and
do a batch of tests. Base colours up for the jury:
Titanium silver
Titanium gold. Both a nice gloss but not to vibrant a colour.
Metallic Gunmetal (same as the trim).
Thinking that the Vallejo model colour metallics with their (for once) nice large metal pigment might be a good "flake" substitute. I can buy real flake for airbrushes but I want subtle lol.
If The pearl can be sprayed over the Vallejo without burgering it up, I might try the silver, Aluminium, steel oily steel, gunmetal; both grey and blue! LOL I also have some metallic additive that can make any colour a metal. even a clear colour..... Hmm.
 

Andy T

SMF Supporter
Joined
Apr 26, 2021
Messages
1,966
Points
113
Location
Sheffield
First Name
Andy
My hope it that the Titanium gold base will just give it a little warmth not sure I fancy a green truck....snigger snigger.
Having had a quick Google it seems that name covers a wide variety of shades in modelling paints, some near the silver end, some much more golden, so you may well be right if it's not one of the yellow ones.

Good luck with all the testing. That'll probably take longer than the actual paint job lol, but worth it.


I did a couple of custom jobs some months ago with the same red candy. I put it over a fine silver on a Lambretta and over gold for a Triumph Bonneville. They came out quite differently, showing how important the base colour is.
 

BattleshipBob

Bob, bob, bobing along!
SMF Supporter
Joined
Apr 28, 2018
Messages
6,212
Points
113
First Name
Bob
Forgot Ian the exhaust will either have a chrome heat shield or be behind a grill/frame etc
 

Ian M

Administrator
Staff member
Administrator
Moderator
SMF Supporter
Joined
Dec 14, 2008
Messages
19,727
Points
113
Location
Falster, Denmark
First Name
Ian
Dudes. There sure is umph in those Tamiya rattle cans not a fan. Might have to try decanting and put it through the airbrush!
Any tips?
 

Mini Me

SMF Supporter
Joined
Jun 1, 2018
Messages
10,160
Points
113
First Name
Rick
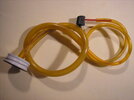
Yes Ian......I can safely say there is a WRONG way to decant.......found out the hard way. I learned that in order to get it into a jar and not every where else, one has to slow down the spray stream to a manageable velocity. I swapped out the spray nozzle on the rattle can with an old needle tip from a WD40 can. Then I purchased some clear vinyl tubing 2-3 feet works and you need the inside diameter to be able to slip over the outside diameter of the spray nozzle tip, secure it with elec. tape, real good....you do not want this to come apart. Then you need to make some loops in the remaining vinyl. I went so far as to go to the next size of tube that slips over the first one to give a greater volumetric area inside to further reduce the final pressure at the exit port........add as many loops as you feel are necessary, I got away with one, but it all depends on the pressure in the rattle can. I then went a step further and cut a hole in the jar lid the exact diameter of the last tube as well as a tiny vent hole to allow any air pressure to escape the jar. Make sure you have a jar large enough to hold all the paint you wish to decant. Finally, I recommend you do this outdoors and away from anything you don't want paint on......a card table in the middle of the lawn covered with newspapers will do just fine. make sure all your joints are securely taped together, spray can in upright position, vinyl loops laid down on their side and stacked with a brick on top to keep them in place and your jar in upright position with fill tube snuggly in place. Note: when you decant use intermittent pressure on the spray nozzle once it has reached the bottle, this will prevent excess pressure build up and prevent your tape joints from blowing apart. here is an example of a scaled down version of what I'm referring to. Good luck. :thumb2: ;) P1012784.JPG
 

Scratchbuilder

SMF Supporter
Joined
Jul 2, 2022
Messages
1,943
Points
113
First Name
Mike
Such a shame that on the real truck they moved the bunk from over the forward upper section of the cab and made it into a double bunk affair - all that storage space lost.
 

Mr Bowcat

SMF Supporter
Joined
Dec 29, 2016
Messages
3,647
Points
113
Location
London
First Name
Bob
Dudes. There sure is umph in those Tamiya rattle cans not a fan. Might have to try decanting and put it through the airbrush!
Any tips?

A short length of straw (couple of inches) over the nozzle does the job just fine. Personally I use shrink wrap, heat it where it goes over the nozzle and it stays in place. Just make sure you leave the jar open for a good few hours so it can off-gas the propellant.
 

Ian M

Administrator
Staff member
Administrator
Moderator
SMF Supporter
Joined
Dec 14, 2008
Messages
19,727
Points
113
Location
Falster, Denmark
First Name
Ian
Thanks Bob. I saw a couple on YouTube that did just that. My biggest problem now though is to find a straw. Plastic straws have been banned here for ages. The only ones I have are the huge, straight Mc D plastic ones. I might see if I can scrounge a few up from around the family and neighbours.

A small update.
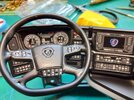
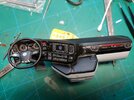
20230724_175145.jpg20230724_175014.jpg
I dont recall Tamiya paints being so fragile befor. I always thought they where quite tough. Have I over thinned it. Scratches and rubs all ready!
Anyway. dash done. Why stickers and not waterslides I have no idea. Still it looks OK considering its on the inside.

Not to much done today either. I had 6kg Gooseberries to sort out. 2kg into jam. the rest in the freezer. Also got about 2kg Blackcurrant too!
Guess who is having tea and toast for breakfast tomorrow.

C&C and all that.
 
Top