T-28 medium tank by Zvezda 1/35

  • Thread starter Deleted member 7181
  • Start date
D

Deleted member 7181

Guest
Calling time on this one. I really enjoyed building it, even though there were a couple of sticky patches. I'd love to have taken the weathering further with mud and stuff but since I don't have any suitable products as yet that will have to wait for future builds. It still needs a final matt coat but I've learnt that trying to rush along with oils is a recipe for disaster.

I made a huge mistake and ended up stripping all my hard work from one area by going too far too soon. In the end I've had to fudge that part heavily and try and make it look like one of the return rollers has a bad oil/grease leak. Not great but better than it was! :smiling5:

My seventh completed model, and my first real tank. I certainly feel like I'm improving and the more new skills I learn the more I enjoy it. Looking forward to what the future brings and I hope that trend continues :smiling3:

And I'm still very much learning so any constructive criticism of what I could have done better (given my limited experience & equipment/products) is more than welcome.

Cheers,
Andy.

w6OPH61.jpg

a7m9fNs.jpg

GfwxtAM.jpg

N55V2Z1.jpg

tgBsjn1.jpg

cmQQOJW.jpg

l7U2YmV.jpg

kPhEc87.jpg

ce7kg4m.jpg

Build log here
 

Si Benson

SMF Supporter
Joined
Apr 27, 2018
Messages
3,322
Points
113
First Name
Si
Hi Andy,
I think you’ve made a cracking job despite having a few issues. I’d be very happy with that:thumb2:
 

Dave Ward

Still Trying New Things
SMF Supporter
Joined
Apr 27, 2018
Messages
8,643
Points
113
Location
South Gloucestershire
First Name
David
Andy,
that's good! As your first real tank, you should be pretty happy! Now you have the assembly, and basecoating sorted, then weathering will be your next task. and I don't mean local weathering/dirt. Tanks pick up all sorts of dirt/dust - the Summer Russian Steppes will throw up all sorts of dust - that will be all over the tank ( and over leaks/streaks ). As a part of your matt varnish, I would add a slight tint of dust colour ( anything from yellow to red through brown ). You will have to do many coats, gradually building up the overall effect. Allow each coat to dry to gauge the effect - a gradual fall off from bottom, most dirt, to top - least, but an overall softening of the colours. It can take ages, but loads of thin coats, rather than overdoing it with one heavy coat. I would mist the coats on with the airbrush a bit further from the surface tn usual. Thin the matt vanish, and add a few drops of the dust colour and gently does it!
Dave
 
D

Deleted member 7181

Guest
Thanks guys.

I agree with you Pete, definitely needs more crud.

Dave, I'll give that a go, thanks. I might not have any powders and potions but a tinted varnish can soon be rustled together.
 

Steve Jones

Steve Jones Scale Modelling Site
Joined
Apr 27, 2018
Messages
6,698
Points
113
Location
Plymouth
First Name
Steve
Hi Andy

This has been a fantastic build and I have enjoyed sharing your journey of learning new processes and techniques. You have hit the nail on the head about building up your tool collection and products. I wish I had the equipment that I have now for builds that I did two or three years ago as they would be so much better. I am eternally grateful to those people who gave me hints and tips along the way to help me improve my next build. So I would like to give you some ideas for future AFV's. If you are going for a worn out look then I nice addition is to run some graphite down edges that would be worn more than others to show the base metal on the vehicle.

IMG_0283.JPG

As for the tracks I am not a fan of rusty tracks. This is not a criticism but rather a preference. The centre teeth on some tracks run through the drive wheels which would cause the teeth and the inside of the metal rims of the wheels to be worn down to bare metal so you may want to consider painting these areas Steel. The same applies to the teeth on the sprockets.

Looking forward to seeing your next project. Great stuff
 

scottie3158

SMF Supporter
Joined
Apr 27, 2018
Messages
12,687
Points
113
Location
Spalding
First Name
Paul
Andy,
If this is your first real tank you should take a bow mate. The points Steve and the other guys are all good ones and will help your builds go to a whole new level.
You don't need to go mad on expensive after market pigments a good set of pastels can be ground on fine emery and mixed as you need them.
 
D

Deleted member 7181

Guest
Thanks Fernando, glad you like it.

Steve, thanks for that. I know there's more to come and I'm hoping if I can learn and add one new effect or process on each model I'll soon build up to the kind of multi-layered finishes I see on here. Great tips like yours can only help me get there, thanks again.

I bet you've got some mud in your garden though!
Pete
Ah yes, of course! I need to speak to my son really as he's always ferreting around the garden for stones, sand, earth etc. for his Warhammer stuff. He mixes them with PVA and a bit of colour for some pretty nice effects, I'm sure something like that would work.

Cheers Paul. I've seen a couple of videos of people mixing their own pigments from pastels but haven't tried it out myself yet. So many things to try I'm like a kid in a sweet shop! Am I right in thinking soft ones are the best choice?
 

Dave Ward

Still Trying New Things
SMF Supporter
Joined
Apr 27, 2018
Messages
8,643
Points
113
Location
South Gloucestershire
First Name
David
Andy,
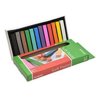
soft pastels - I got a box from Amazon for less than £3 - They will last a long time, as you don't need a lot
Some of the colours I'll never use, but you can really mix up anything from these sticks.
soft pastels.jpg
I use water & washing up liquid mixed with shaved pastel for panel washes. or fixed with thinned varnish for staining effects. Browns, mixed with talcum powder & varnish can give you lumps of mud - it's just a matter of experimenting..........
Dave
 
D

Deleted member 7181

Guest
Thanks again Dave. I was hovering over a set last weekend. The Range near me has a huge craft section (and is much cheaper than the Hobbycraft store next door!), but as I'd just treated myself to a couple of decent W&N brushes and a pot of their Galleria matt varnish, I thought I'd better leave them on the shelf.
 

JR

Member of the Rabble and Pyromania Consultant
SMF Supporter
Joined
May 26, 2015
Messages
17,275
Points
113
Location
lincs
First Name
John
Andy.
What a stunning model ,take all that advice on board about the weathering and you'll be producing winners.
Your painting skills certainly take you far, as I've said before what will you be like in a couple of years :thumb2: :thumb2: :thumb2: :thumb2::thumb2:
 
D

Deleted member 7181

Guest
Thanks John.

Still so much to learn and so many things to experiment with, but I know I'm in safe hands here :smiling3:
 

JR

Member of the Rabble and Pyromania Consultant
SMF Supporter
Joined
May 26, 2015
Messages
17,275
Points
113
Location
lincs
First Name
John
Thanks John.

Still so much to learn and so many things to experiment with, but I know I'm in safe hands here :smiling3:
Ha , just don't take any advice from me on model building ! Dioramas maybe .
 
D

Deleted member 7181

Guest
With so many cracking Diorama by yourself, Paul and others to look at I'm itching to start down that road too, but I'm trying not to get too far ahead of myself!
 

rtfoe

SMF Supporter
Joined
Apr 29, 2018
Messages
7,507
Points
113
Location
Malaysia
First Name
Richard
Cracking job on your first tank Andy, that mistake has turned out well I think...I believe in non comformity as not everything wears out the same so that massive oil leak makes it unique.

The guys have given you some fantastic tips and one of the ways is to learn from scratch basics like making your own weathering stuff and how it works. This takes time but that's part of the hobby. If you want quick results then the latest AM stuff speeds it up a bit since they're all pre-mixed for the new generation of hobbyist.

Cheers,
Richard
 
D

Deleted member 7181

Guest
Thanks Richard, I thought it was a decent fix myself but of course we don't all view things the same way.

Where possible I'd like to make up my own products from what I have lying around or cheap craft supplies. The convenience and consistency of ready made is very tempting, especially for someone quite new to the hobby like me as it removes one potential source of errors, but I do enjoy doing things myself if I can.

I guess the main sticking point for me is that after spending so much time building and painting a model I don't want to ruin it at the final hurdle with a failed experiment. I suppose I should be looking for a cheap easy build kit or two to use as test mules, or maybe I'll raid my sons toy box. He hates throwing anything away so I'm sure he'll have a few plastic vehicles I can practice with.
 

yak face

Wossupwidee?
Staff member
Moderator
SMF Supporter
Joined
Jun 13, 2009
Messages
12,394
Points
113
Location
sheffield
First Name
tony
Looks great to me andy , perfectly weathered as far as my tastes go. I suppose it comes from being an aircraft builder but i dont like to see excessive weathering , i know these vehicles got covered in all sorts of crap but its nice to see the model underneath sometimes! Cheers tony
 

Dave Ward

Still Trying New Things
SMF Supporter
Joined
Apr 27, 2018
Messages
8,643
Points
113
Location
South Gloucestershire
First Name
David
Andy,
sounds like a good plan.................but are they the same scale? Working in 1/72 is a whole different ballgame to 1/35! Hunting grounds for cheap models - charity shops - ebay - amazon - retailers 'specials'. Tamiya & Italeri tend to be the cheapest, with Academy third. These are generally well fitting kits ( Tamiya best ), but may be simplified, or inaccurate - ideal things to experiment on. I have a trial 1/48 Bf-109 that is either harlequin, or piebald, depending on your point of view!
Dave
 
Top