The Border Models 1/32 Lancaster BI/III

BarryW

SMF Supporter
Joined
Jul 23, 2011
Messages
5,042
Points
113
Location
Dover
First Name
Barry
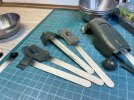
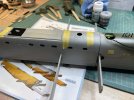
i have been working on various nose detail parts.
IMG_7834.jpeg
IMG_7835.jpeg
I have a bit more work on the above before I fit them.

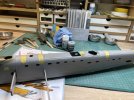
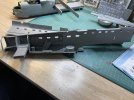
I have also test fitted the rear fuselage.

I am pleased with the fit.
IMG_7830.jpeg
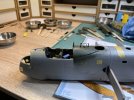
Below you can see some of the work behind the ‘pit.
IMG_7831.jpeg
Below you can see a bit of a gap between the front and rear fuselage halves. It’s not too bad and it will be sorted in due course. Others have pointed out that there should be a strengthening strip around the fuselage in this position for which WNW probably intended to provide an etch strip. I will see if I can reproduce such a strip using Mr Surfacer 500 which will also sort the gap.

IMG_7832.jpeg
 

boatman

SMF Supporter
Joined
Nov 8, 2018
Messages
12,926
Points
113
Location
NORFOLK UK
First Name
christopher
COR Barry the lanc is lookin great an gonna be a biggee an it looks a strong build but how do you intend to glue the canopy framein to the glass wont it smudge on the glass ?
chrisb
 

BarryW

SMF Supporter
Joined
Jul 23, 2011
Messages
5,042
Points
113
Location
Dover
First Name
Barry
COR Barry the lanc is lookin great an gonna be a biggee an it looks a strong build but how do you intend to glue the canopy framein to the glass wont it smudge on the glass ?
chrisb
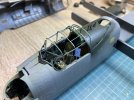
The frame will glue to location holes on the fuselage. The transparency will cover it and be cemented to the fuselage as well, so no smudging.
 

boatman

SMF Supporter
Joined
Nov 8, 2018
Messages
12,926
Points
113
Location
NORFOLK UK
First Name
christopher
The frame will glue to location holes on the fuselage. The transparency will cover it and be cemented to the fuselage as well, so no smudging.
OH right oh Barry should look great keep it comin
chrisb
 

BarryW

SMF Supporter
Joined
Jul 23, 2011
Messages
5,042
Points
113
Location
Dover
First Name
Barry
I have been fitting the cockpit frame. This need a lot of patience as it needs to be done slowly. The windscreen is cemented firmly into position and I have started with the centre piece. The first step is to cement the piece sticking out of the front to the top centre of the windscreen. This is done and it needs to dry thoroughly before I attempt to cement the two ‘shoulders’ to the windscreen part. Then it’s the turn of the two ‘verticals’ each side, then the separate rear part.
IMG_7841.jpeg

Incidentally. I left off the ammo cases from under the front turret and slightly trimmed a couple of pieces at the front. None of this can be seen but it will enable me to fit the turret as a final fitting.

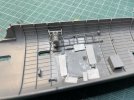
I have also been working on the inside of the rear fuselage. The rear door concerns me as I there is a risk that it might be pushed in should I pick it up with my finger on it. As a heavy model I won’t exactly be holding it with a light touch. So I used plastic sheet to reinforce it. None of this will be seen. I will paint it all soon. IMG_7843.jpeg
IMG_7844.jpeg
 

SteveT

SMF Supporter
Joined
Jan 18, 2024
Messages
277
Points
93
Location
Lancashire
First Name
Steve
That's looking really nice indeed and that cockpit looks super cool, well done.
 

Steve-the-Duck

SMF Supporter
Joined
Jul 3, 2020
Messages
1,155
Points
113
Location
Medway Towns
First Name
Chris
That structure just forward of the Elsan, is that meant to be the flare chute because it looks a bit huge? Most of the photos I've seen only show a singler compartment with a big curved lid
 

BarryW

SMF Supporter
Joined
Jul 23, 2011
Messages
5,042
Points
113
Location
Dover
First Name
Barry
That structure just forward of the Elsan, is that meant to be the flare chute because it looks a bit huge? Most of the photos I've seen only show a singler compartment with a big curved lid
It’s the late style flare chute. The smaller round earlier one is an option.
 

Jim R

SMF Supporter
Joined
Apr 27, 2018
Messages
13,737
Points
113
Location
Shropshire
First Name
Jim
Fine progress Barry. The canopy frame looks very nice - your patience in fitting it has paid dividends. Your idea of recreating the strengthening rib on the fuselage with Mr S 500 sounds like a plan. Hope it works.
 

Steve-the-Duck

SMF Supporter
Joined
Jul 3, 2020
Messages
1,155
Points
113
Location
Medway Towns
First Name
Chris
It’s the late style flare chute. The smaller round earlier one is an option.
Right. All my pics and references are of the early one, for my 'first in service' still incomplete partwork build. Nice to know this kit has options for other marks. Does it also have both late and early nose blisters? I couldn't see the transparencies in the parts pics

"Can't see the transparencies? Well, that's because they're TRANSPARENT!"
 

BarryW

SMF Supporter
Joined
Jul 23, 2011
Messages
5,042
Points
113
Location
Dover
First Name
Barry
Right. All my pics and references are of the early one, for my 'first in service' still incomplete partwork build. Nice to know this kit has options for other marks. Does it also have both late and early nose blisters? I couldn't see the transparencies in the parts pics

"Can't see the transparencies? Well, that's because they're TRANSPARENT!"
There are two different nose blisters Steve.
 

Steve-the-Duck

SMF Supporter
Joined
Jul 3, 2020
Messages
1,155
Points
113
Location
Medway Towns
First Name
Chris
Serious Question. Did they have 'Chaff' then? (Horrid stuff!!) Mr Google time!!!!!

Mr Google wins. 1942 it was invented. That surprised me!
Yes, but back then it was called 'window,' by us, and 'duppel' by the Germans. Or, whatever is the German word for 'where did all this tinfoil come from?"
 
Top