Window with ugly joint in the Middle

Supabuild

SMF Supporter
Joined
Jan 8, 2020
Messages
29
Points
3
First Name
John
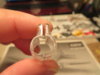
Hi Folks, I'm building an ACADEMY MINICRAFT B17-G 1/72 scale.

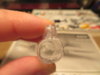
The back section where the rear gunner sits, has an ugly seam running right down the middle of the window.(Cheyenne Tail section)

I've had this model in the cupboard for over 22 years and decided recently to build it, so, its a bit of a vintage.

Does anybody have any ideas as to how I can get rid or reduce the presence of this ugly seam on this section of the plastic clear part.

If you guys want, I can post a picture of what I am going on about if it helps.........Thanks a lot
 

AlanG

Moderator
Staff member
Moderator
SMF Supporter
Joined
Dec 2, 2008
Messages
7,494
Points
113
Location
Scotland
First Name
Alan
Have you got a few different grades of sanding sticks/micromesh?
 

Jim R

SMF Supporter
Joined
Apr 27, 2018
Messages
13,732
Points
113
Location
Shropshire
First Name
Jim
Hi John
A ridge down the centre of a clear canopy. Like this ....
P1060104.JPG

Scrape the seam down with a sharp blade and then polish the canopy with very fine sanding/polishing sticks or cloths. I prefer to use Tamiya Polishing Compound - comes in Coarse, Fine and Finish. The canopy can then be dipped in Klear for extra sparkle but that is not essential.

This is the same canopy after scraping and polishing .....
P1060105.JPG

Jim

Tamiya Polishing Compound is not easy to find and is quite expensive but will last for ages. I use it on a cotton bud.
 

MikeC

Has left the Building
Joined
Apr 27, 2018
Messages
1,758
Points
113
First Name
Michael
If you want a cheaper option to the Tamiya compound..... toothpaste ;)
I was just about to say that or Autosol metal polish, use with card first and then polish with tissue and when happy wash in soapy water to get rid of any excess left and then dip in a cup of Kleer and let dry.
Mike.
 

Jakko

Way past the mad part
SMF Supporter
Joined
Apr 28, 2018
Messages
10,814
Points
113
First Name
Jakko
Also: you may want to practice on a spare part first — or the mould part line on the side of the sprue if you don’t have any suitable spare parts.
 

Supabuild

SMF Supporter
Joined
Jan 8, 2020
Messages
29
Points
3
First Name
John
Hi John
A ridge down the centre of a clear canopy. Like this ....
View attachment 371578

Scrape the seam down with a sharp blade and then polish the canopy with very fine sanding/polishing sticks or cloths. I prefer to use Tamiya Polishing Compound - comes in Coarse, Fine and Finish. The canopy can then be dipped in Klear for extra sparkle but that is not essential.

This is the same canopy after scraping and polishing .....
View attachment 371579

Jim

Tamiya Polishing Compound is not easy to find and is quite expensive but will last for ages. I use it on a cotton bud.
Man that looks great. Your method of achieving this would be greatly appreciated. Thanks a lot
 

Supabuild

SMF Supporter
Joined
Jan 8, 2020
Messages
29
Points
3
First Name
John
Here are a few photos of the problem clear part with the join right in the middle.
 

Attachments

  • IMG_0760.JPG
    IMG_0760.JPG
    60 KB · Views: 9
  • IMG_0761.JPG
    IMG_0761.JPG
    73.5 KB · Views: 9
  • IMG_0762.JPG
    IMG_0762.JPG
    104.5 KB · Views: 9
  • IMG_0760.JPG
    IMG_0760.JPG
    60 KB · Views: 9
Top