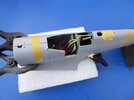
1/24 Airfix Spitfire (the new one)

stona

SMF Supporter
Joined
Jul 22, 2008
Messages
11,485
Points
113
First Name
Steve
Coming on nicely Steve and good to see you back at the the bench,!!
Yep. Temporary halt in proceedings this week, but should be back on Thursday. I'd like to get the cockpit done but I'm not in a rush.
 

stona

SMF Supporter
Joined
Jul 22, 2008
Messages
11,485
Points
113
First Name
Steve
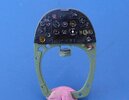
I found myself with a spare hour this afternoon, so I stuck on 'Blow by Blow', in honour of the passing of the great Jeff Beck and decided to do the instrument panel. Three hours and several albums later I've ended up with this (terrible photo, sorry):

IP.jpg

Airfix have decided the best way to do this is to have every single dial and placard as an individual decal. That can be fun. I definitely prefer the 'sandwich a pre-printed film of the instruments' method.
I floated each decal onto a drop of Klear (other varnishes are available) and let that suck them down as it dried. I've never been able to get such small decals to adhere reliably with their own adhesive. I've applied a drop on top to simulate the glass, but another is probably needed.
I could have built a 1/72 scale Spitfire in the time it has taken me to do this!
 

adt70hk

I know its a bit sad but I like quickbuild kits!!!
SMF Supporter
Joined
Sep 4, 2019
Messages
9,526
Points
113
First Name
Andrew
I found myself with a spare hour this afternoon, so I stuck on 'Blow by Blow', in honour of the passing of the great Jeff Beck and decided to do the instrument panel. Three hours and several albums later I've ended up with this (terrible photo, sorry):

View attachment 471533

Airfix have decided the best way to do this is to have every single dial and placard as an individual decal. That can be fun. I definitely prefer the 'sandwich a pre-printed film of the instruments' method.
I floated each decal onto a drop of Klear (other varnishes are available) and let that suck them down as it dried. I've never been able to get such small decals to adhere reliably with their own adhesive. I've applied a drop on top to simulate the glass, but another is probably needed.
I could have built a 1/72 scale Spitfire in the time it has taken me to do this!
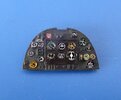
Worth the work though Steve! Looks good!!
 

Tim Marlow

Little blokes aficionado
SMF Supporter
Joined
Apr 27, 2018
Messages
16,854
Points
113
Location
Somerset
First Name
Tim
Looks great to me. Bit of a ticklish job though…..
 

tr1ckey66

SMF Supporter
Joined
Mar 6, 2009
Messages
3,686
Points
113
First Name
Paul
Great start Steve. I’m looking forward to this, I’ve got a couple in the stash myself.
It will be great to get your thoughts on the build.
Cheers
Paul
 

flyjoe180

Joe
SMF Supporter
Joined
Jan 18, 2012
Messages
12,439
Points
113
Location
Earth
First Name
Joe
That's looking very nice Steve, worth the time taken so far
 

stona

SMF Supporter
Joined
Jul 22, 2008
Messages
11,485
Points
113
First Name
Steve
Slow progress, but I now officially retract my faintly negative comments about Airfix's solution for the instrument panel. Now installed on the relevant frame it looks pretty good to me.

IP Frame.jpg

Those pipes/wires on the lower left of the frame they would have you paint in a brass colour, but not for me.

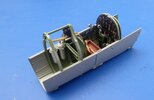
The ease with which you can pop the cockpit sides on and off makes it really easy to keep everything straight as you glue it in to the bottom of the cockpit, another nice one.

sides.jpg

It's also worth mentioning that ALL the parts used so far, essentially to build the cockpit, with the obvious exception of clear parts, have come off ONE sprue. This is not always the case and one of my pet hates is having to rummage through three or four sprues that contain parts for one sub-assembly. That's another point to Airfix!
 
Last edited:

BarryW

SMF Supporter
Joined
Jul 23, 2011
Messages
5,044
Points
113
Location
Dover
First Name
Barry
This is great Steve you are doing a typically great job.

All credit to Airfix as well, they certainly seem to have got their act together on this one (and the recent Bucc). If they keep producing kits like these then a lot of people will have to review their opinion of them, including me. Now, if only they start producing in 1/32…..
 

stona

SMF Supporter
Joined
Jul 22, 2008
Messages
11,485
Points
113
First Name
Steve
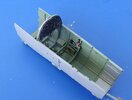
Close of play and the port side cockpit is almost done.

port side.jpg

The sharp eyed will notice the absence of the control column/yoke. This is because it had a hole in it that I assumed was part of the construction until I'd constructed it...and it isn't. I've had to fill that and am now waiting until I can touch up the paint.

I'm deducting a point from Airfix for this!

The rest of it all fits very nicely.

Having built a few Spitfires, I think there is a part missing, and I mean missing, I can't find it anywhere, it's not just been left off the instructions. It's just a rod that should run from below the control yoke, under the seat, to one of the frames. You could easily make your own if you wanted, but in the spirit of 'out of the boxness' I have not. Nobody is going to know it's not there when the model is complete, well, except anyone reading this...obviously. I'm not making a deduction for this because, frankly, I don't care!
 

Jim R

SMF Supporter
Joined
Apr 27, 2018
Messages
13,815
Points
113
Location
Shropshire
First Name
Jim
I've heard quite a few good things about this kit Steve. You experiences so far seem to confirm that view. You're off to a fine start. Very neat, thoughtful work. At the price the kit deserves no less :smiling:
 

tr1ckey66

SMF Supporter
Joined
Mar 6, 2009
Messages
3,686
Points
113
First Name
Paul
Great looking cockpit Steve. Airfix really have done a great job with the detail and it looks as though it comes together with no dramas. Or maybe that’s you just making it look easy! I agree the IP looks excellent OOB. Interestingly, Airscale announced their detail set today and I’ve ordered a couple of sets. Time will tell whether the investment is worth it as the detail in the kit is excellent. I was quite prepared to build OOB with just the addition of a set of seatbelts from HGW and possibly a set of masks. Anyhoo, I follow your build with interest as I value your opinion on the kit.
Cheers, P
 

stona

SMF Supporter
Joined
Jul 22, 2008
Messages
11,485
Points
113
First Name
Steve
I was quite prepared to build OOB with just the addition of a set of seatbelts from HGW and possibly a set of masks. Anyhoo, I follow your build with interest as I value your opinion on the kit.
Cheers, P
If I build another one I would go with an after market harness. I do like that Airfix have included one, which is why I have used it, but it could be improved.

I think there is room for after market improvements on just about any kit. After a better harness I'd be looking for better exhausts on this one. The kit's offerings look pretty basic.

I'm going to use masks. It might be cheating, but I don't see why we should use decals for anything but the little stencils and the like at this scale. Roundels and fin flashes are so easy to mask and spray and always look better than decals.
 
Last edited:

tr1ckey66

SMF Supporter
Joined
Mar 6, 2009
Messages
3,686
Points
113
First Name
Paul
If I build another one I would go with an after market harness. I do like that Airfix have included one, which is why I have used it, but it could be improved.

I think there is room for after market improvements on just about any kit. After a better harness I'd be looking for better exhausts on this one. The kit's offerings look pretty basic.

I'm going to use masks. It might be cheating, but I don't see why we should use decals for anything but the little stencils and the like at this scale. Roundels and fin flashes are so easy to mask and spray and always look better than decals.
I think you’re right about aftermarket and kits, most can be improved. I’m as guilty as anyone for buying AM bits and bobs but it’s funny, of late I really do put a great deal of thought into whether a particular piece Is worth it or not. I think a really good paint finish is far more important. I take your point about the exhausts though, those hollow backs let them down.
 

yak face

Wossupwidee?
Staff member
Moderator
SMF Supporter
Joined
Jun 13, 2009
Messages
12,438
Points
113
Location
sheffield
First Name
tony
Brilliant cockpit so far steve , the IP looks perfect . I like the plastic seat harness , Fine Molds do them as an aftermarket accessory in smaller scales i think , a good idea although as you say maybe in this scale Airfix could have made these a bit thinner . Cheers tony
 

tr1ckey66

SMF Supporter
Joined
Mar 6, 2009
Messages
3,686
Points
113
First Name
Paul
BTW Steve - masks (in my opinion) aren’t cheating at all. The build is OOB, painting is really up to the individual -right? :thinking: Otherwise they’d have to include the paint in the box too! :smiling4: The decals - well, they’re just optional!!!!
Cheers, P
 

stona

SMF Supporter
Joined
Jul 22, 2008
Messages
11,485
Points
113
First Name
Steve
Quick update as 'disappearing in the back' is apparently not on the agenda today, so says the Fuhrerin anyway.

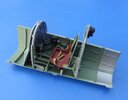
I did manage to get the control column fixed and fitted and attach the other side of the cockpit, giving this.

two sides.jpg

I have done a light pin wash and a bit of dry brushing, but the aircraft as I'm attempting to reproduce it was, literally, factory fresh, so no meaningful weathering.

For others building this, it fits very well and is clearly well engineered. I have left the final (rear) frame off for the moment as it doesn't index/locate with anything and I want to make sure that I fit it 'square'. To be fair, it won't be difficult, but it is possible to get it wrong, which means there's a good chance that I might :smiling3:
 

stona

SMF Supporter
Joined
Jul 22, 2008
Messages
11,485
Points
113
First Name
Steve
I've heard that some people have had difficulty fitting the fuselage together over the cockpit. Anyone who has put together WW2 aircraft models knows that the join over the instrument panel can be...errrr...problematic. I've decided to make sure I don't have any such issues at a time when I still have access to fix them, so I jumped ahead with tape and clamps to see how everything will fit.
The cockpit 'tub' has some positive location at the front and gets pushed up to a line at the back, hence the clamps. The fuselage frames help too. The good news is that mine seems to fit okay!

fuse_join.jpg

The gap visible on the nose pulls together easily with minimum force, I just didn't tape it very well. The only material I have removed is the remnants of what looked like molding for another locator pin/hole, just in front of the instrument panel, which was subsequently deleted by Airfix. I'm not sure that was necessary but better safe than sorry!

I will now disassemble this lot and think about how exactly I'm going to rebuild it...with glue this time :smiling3:
 
Top