Neil Merryweather
SMF Supporter
Cracking paint, Gromit!


Thanks Tim. I hope soLooking very good. That will be a great canvas for showing off weathering techniques.
It is frankly outstanding the level of detail that can be acheived but it also immediately apparent that recreating stuff like this perfectly to scale means that even in 1/35 many of the parts are extremely small and fragile. I would love to be able to build this in 1/16th. I think that is possible a scale where I could acheive much better results with this medium simply due to my random bouts of clumsiness and crappy eyesightNever dreamed that you could get this level of detail from 3D printing and to be honest the only experience I've had with the process has left me completely underwhelmed, this is a relevation.

Cheers paul. Glad you like itBeautifully executed.


Thanks for the kind words Hong.Amazing! The detail on the build is absolutely mind-boggling, Los.
May I know what resolution a printer should be set to, in order to produce such fine parts?


Great work ,Los, that looks the business!As the weather has been way too hot in the mancave (32 degrees C) for any paintwork over the last week I figured it might well be worth starting on a base instead. I had always intended the vehicles to be displayed on a North Italian mountain road and had already sketched out some ideas. Now to put it into practice.
As for materials, Hobbycraft in the UK currently make an excellent product for diorama purposes. They are called 'Art Panels' and although they look like a deep picture frame with a removable rear cardboard cover, it has solid integrated wooden base. This makes them ideal for using heavier constructed items that may include resin or plaster as the rear panel does not require any additional reinforcing. This size just squeezes into my display cabinet too.
View attachment 461016View attachment 461017
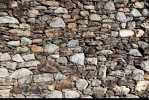
My main inspiration was this photo. It shows a road surface that hasn’t been resurfaced for some time and the walls look suitably worn in places. Rockfall and water had also carved out new contours down the mountain side. I imagine there were many such roads that required navigating whilst retreating northwards towards the Brenner pass in 1945.
View attachment 461027
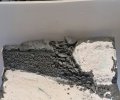
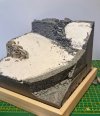
Styrofoam is used to construct the main body of the base. As this in effect will be on a mountainside this will measure around 20cm above the frame at its highest point. Although I would love a foam cutter, I simply don’t have the space at present, so a large and deep razor saw, and knife are employed for now. The edges are a bit rough & ready, but it will all be framed neatly in Balsa wood.
Unfortunately, I didn’t have one block that could be cut to fit inside the frame, so a few pieces were glued together. PVA glue will work for this purpose, but I like the reassuring adhesive qualities of UHU POR for the main groundworks. PVA is great for everything else.
After carving the Styrofoam until I had the basic contours Sculptamold is used to add further layers to more define the road surface. I plan to cut up a mountainside grass matt for the steep sided areas and will add additional scenic product vegetation. In the pic below which shows similar sized vehicles, you can see I have carved the upper stetch of road far too narrow. This has now been reworked and continuously placing the vehicles on the base will help with aid final placement. Having them sat on the bend is also going to be tricky in having the halftrack sit naturally and it might be that it will end up 'cocking' its front wheel in the air.
View attachment 461030
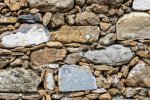
Turning to the retaining walls which lined the road I used some ref images of Italian walls for guidance. As for the actual stones I was going to try two methods. One was with real stones and the other to carve them out of Styrofoam. Getting a sense of scale is important and looking at progress so far, the roughly carved examples appear to work much better IMO. I might replace the real stones yet once I complete the two other carved sections. I still need to soften the appearance of all the rock joints and hide a visible line between two glued blocks on the lower wall.
View attachment 461028
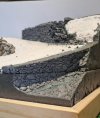
I also carved into the mountainside next to the uppermost wall to show damage by falling rocks and flowing water. Again, this still requires more work. The tops of the walls have yet to be worked on. They will have damaged top stones on which I need to make out of thinly sliced foam. Another far easier process with a foam cutter
View attachment 461023
Critique is most welcome as this is my first attempt at any actual carving with foam.
Los


Wow! fantastic ref pics Andrea. Much appreciated. I was wondering whether the top of the walls would have been initially capped. As well as old images I have been wandering the mountain roads via Google Earth and although the roads are now updated with modern materials it still gives an idea of what the terrain is like. Not sure I could warrant a road sign without any visable junction but you never knowLos, hoping to be of some use, here are some pics (for discussion use only) of the National Road 12 that leads to Brenner Pass as it was
View attachment 461031View attachment 461032
and a pic of a Nashorn in the alps (but I think it is referred to July - September 1943)
View attachment 461033
At that time even the main National Roads (Strada Statale or S.S.) were dirt or macadam roads.
Here is a picture that depicts how the Italian mountain roads were built. In the left lower corner you can see the difference between the old fashion stone wall and the new one (stone-lookalike concrete).
View attachment 461035
Just in case you decide to insert some road signs, the German Army in May 1945 was withdrawing mainly using S.S. 12 towards Tyrol (Innsbruck) through Brenner Pass and S.S. 13 towards Karnten (Klagenfurt) through Tarvis pass. The secondary road net leading North, at that time (there was still snow) were not really a choice for an Army.
Andrea

With that, do you mean true macadam roads that consist only of different grades of stones, or do you mean the type that includes tar to hold them together? (I ask because in Belgium, it means the latter, but not everyone might realise that — or that it can also mean a road of loose stones, for that matter.)macadam roads.
For FULL Forum access you can upgrade your account here UPGRADE