Thanks for the comments. Andrea, sorry to hear about your accident. That must have been quite traumatic but thankfully all concerned were ok. I would probably say red is the best suited colour for a mk3 Capri but that’s purely a subjective point of view. Red is a striking colour but I can imagine the bright copper and bronze versions looking awesome. I’m so jealous, really wish I was born 20 years earlier and driving these cars in the 70s and up to mid 80s.
You are using an out of date browser. It may not display this or other websites correctly.
You should upgrade or use an alternative browser.
You should upgrade or use an alternative browser.
1985 UK car park (1/43 scale)
- Thread starter mg ork
- Start date
Mark1
SMF Supporter
Back in the day the mk3 2.8i was the capri people wanted,that was my era, mk1/2 escorts,lowered of course ,r5 Gouldini turbos and minis.not to mention mk1 golf gti. Then came the mk1 astra gte and opel manta, Ford xr2,xr3.always loved the mk3 cortina and mk2 granada 2.8 ghia x,those where the days.
So here is the Citroen CX 2000, a 1975 model finished in metallic silver. I think the model makers here are atlas editions. Considering it's a budget model, the model makers did an excellent job as very little had to be done to make it look more realistic. The shape and size of the model is spot on, and the wheels very accurate too. I particularly like the way the curved bonnet has been captured, and the bottom-heavy side wings especially the rear wheel arches partially covering the wheels.
Changes then:
- Front headlights were awful looking, much like the allegro they had the pin/holes visible. So what I did was initially break the pin and sand the lenses, and replace the actual sockets with the minichamps rover sd1 version! Now the headlights look much more realistic, with a nice shine to them.
- Inside of rear lights sanded and painted matt white to exaggerate the colours slightly.
- custom made windscreen wiper.
- custom front and rear number plates.
- custom exhaust replacing initial one which wasn't detailed enough.
 1/43 citroen cx 1975 1 of 5 by mg-ork, on Flickr
 1/43 citroen cx 1975 2 of 5 by mg-ork, on Flickr
 1/43 citroen cx 1975 3 of 5 by mg-ork, on Flickr
 1/43 citroen cx 1975 4 of 5 by mg-ork, on Flickr
 1/43 citroen cx 1975 1 of 5 by mg-ork, on Flickr
next up will be the Sierra XR4i.
Changes then:
- Front headlights were awful looking, much like the allegro they had the pin/holes visible. So what I did was initially break the pin and sand the lenses, and replace the actual sockets with the minichamps rover sd1 version! Now the headlights look much more realistic, with a nice shine to them.
- Inside of rear lights sanded and painted matt white to exaggerate the colours slightly.
- custom made windscreen wiper.
- custom front and rear number plates.
- custom exhaust replacing initial one which wasn't detailed enough.
1/43 citroen cx 1975 1 of 5 by mg-ork, on Flickr
1/43 citroen cx 1975 2 of 5 by mg-ork, on Flickr
1/43 citroen cx 1975 3 of 5 by mg-ork, on Flickr
1/43 citroen cx 1975 4 of 5 by mg-ork, on Flickr
1/43 citroen cx 1975 1 of 5 by mg-ork, on Flickrnext up will be the Sierra XR4i.
Mark1
SMF Supporter
Excellent  I had a bx years ago loved it but not sure why! Probably very comfortable. I remember seeing video clip of a ds which the car was driven at 60 mph over a dirt road with 4 adults on 3 wheels,one rear wheel was removed! To show off how good there suspension was.
I had a bx years ago loved it but not sure why! Probably very comfortable. I remember seeing video clip of a ds which the car was driven at 60 mph over a dirt road with 4 adults on 3 wheels,one rear wheel was removed! To show off how good there suspension was.Wow that would have been impressive! Didn’t think a four wheeled car would have been able to move with a wheel missing. I do like the designs of these, especially from that era rarely did cars have a curved bonnet of that nature, the rover sd1 was awesome and a little later the jelly mould.
Mark1
SMF Supporter
It was there party trick,there's videos on u tube.
Last edited:
Andy the Sheep
SMF Supporter
It was the hydraulic suspension system which made the difference. Even De Gaulle survived an armed attack thanks to Citroen peculiar hydraulic system. link


Citroen DS (in French it is spelled DE ESS, which sounds just like déesse, goddess ), SM and CX are cars I always loved.
Andrea
Citroen DS (in French it is spelled DE ESS, which sounds just like déesse, goddess
), SM and CX are cars I always loved.Andrea
Last edited:
I briefly owned a DS19 in the 1960s. It had a number of small hydraulic leaks, so nothing much worked, even the seat adjustment. The guy who owned it after me changed all the hydraulic hoses and their unions, without success.
Pete
Pete
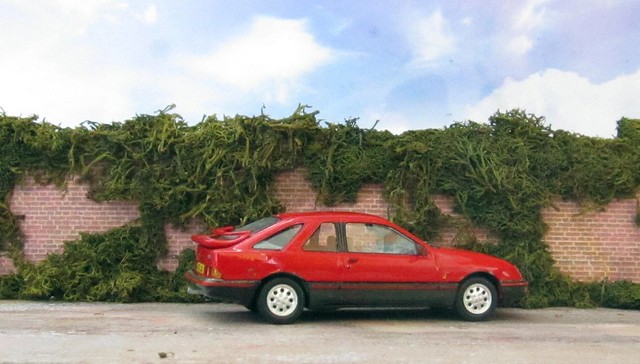
So here is the Sierra Xr4i then, resprayed in the original cardinal red colour.
A mammoth amount of work had to be done on this model to make it look like the real thing.
Surprisingly, when you consider the amount of work which had to be done, vanguards actually got the main body almost spot-on. By that I mean the wheel arches were a tad low (or exaggerated) hence using a swan morten blade I got rid of the excess and the wheels now show up nicely.
Vanguards have captured the jelly-mould style superbly IMO.
So all the changes then, gotta start somewhere so I'll start at the front...
- the front nose for it to fit flush needed the side edges filed/sanded so as to make it a bit smaller.
- as for the headlights, they were pretty poor; too thin and not pushed back far enough. On the real model I'm sure the nose would go over the headlights, eg if a new headlight lamp had to be put on you'd take the nose off? Well with the vanguards model the nose goes on first and then you place the headlight in, which didn't look good as headlight wasn't positioned behind nose so to speak and this showed. So the actual headlight lenses I've made are from thin acetate paper sitting behind nose, sanded slightly for hazy effect and touched up with black pen. Back of the nose was filed/sanded to make nose thinner so headlights not appearing to be positioned too far back and are slightly bigger than original vanguards version. The sockets behind lens needed drilling, and for the shine I've used boco kitchen foil, the inner lights blunted after being touched up by grey/black pens and outer lights purposely left untouched for the exaggerated shine from foil.
- as mentioned above, wheel arches corrected by getting rid of excess.
- what ruined the initial model mainly was the bumpers; all four were too big, very clumsy and not the correct shape, particularly the front bumper which had the most amount of work done to it. The side bumpers had to be reduced height-wise. The red strips were not thick enough hence corrected after a couple of layers of waterslide strips were added for each bumper.
- side indicator lights got rid of using dremel and replaced with slightly bigger more accurate looking one.
- the grille panel just below front window was initially too low so it was cut off from dashboard unit which it was attached to, and repositioned slightly higher.
- custom made wipers and numberplates to sync in with rest of collection.
- reason I didn't retain original reg number A123 SFB was because I got rid of sunroof as I fancied one without it! Not rear bootlid log missing.
 vanguards ford sierra xr4i resprayed red 1/5 by mg-ork, on Flickr
 vanguards ford sierra xr4i resprayed red 5/5 by mg-ork, on Flickr
 vanguards ford sierra xr4i resprayed red 3/5 by mg-ork, on Flickr
 vanguards ford sierra xr4i resprayed red 2/5 by mg-ork, on Flickr
 vanguards ford sierra xr4i resprayed red 4/5 by mg-ork, on
A mammoth amount of work had to be done on this model to make it look like the real thing.
Surprisingly, when you consider the amount of work which had to be done, vanguards actually got the main body almost spot-on. By that I mean the wheel arches were a tad low (or exaggerated) hence using a swan morten blade I got rid of the excess and the wheels now show up nicely.
Vanguards have captured the jelly-mould style superbly IMO.
So all the changes then, gotta start somewhere so I'll start at the front...
- the front nose for it to fit flush needed the side edges filed/sanded so as to make it a bit smaller.
- as for the headlights, they were pretty poor; too thin and not pushed back far enough. On the real model I'm sure the nose would go over the headlights, eg if a new headlight lamp had to be put on you'd take the nose off? Well with the vanguards model the nose goes on first and then you place the headlight in, which didn't look good as headlight wasn't positioned behind nose so to speak and this showed. So the actual headlight lenses I've made are from thin acetate paper sitting behind nose, sanded slightly for hazy effect and touched up with black pen. Back of the nose was filed/sanded to make nose thinner so headlights not appearing to be positioned too far back and are slightly bigger than original vanguards version. The sockets behind lens needed drilling, and for the shine I've used boco kitchen foil, the inner lights blunted after being touched up by grey/black pens and outer lights purposely left untouched for the exaggerated shine from foil.
- as mentioned above, wheel arches corrected by getting rid of excess.
- what ruined the initial model mainly was the bumpers; all four were too big, very clumsy and not the correct shape, particularly the front bumper which had the most amount of work done to it. The side bumpers had to be reduced height-wise. The red strips were not thick enough hence corrected after a couple of layers of waterslide strips were added for each bumper.
- side indicator lights got rid of using dremel and replaced with slightly bigger more accurate looking one.
- the grille panel just below front window was initially too low so it was cut off from dashboard unit which it was attached to, and repositioned slightly higher.
- custom made wipers and numberplates to sync in with rest of collection.
- reason I didn't retain original reg number A123 SFB was because I got rid of sunroof as I fancied one without it! Not rear bootlid log missing.
vanguards ford sierra xr4i resprayed red 1/5 by mg-ork, on Flickr
vanguards ford sierra xr4i resprayed red 5/5 by mg-ork, on Flickr
vanguards ford sierra xr4i resprayed red 3/5 by mg-ork, on Flickr
vanguards ford sierra xr4i resprayed red 2/5 by mg-ork, on Flickr
vanguards ford sierra xr4i resprayed red 4/5 by mg-ork, onMark1
SMF Supporter
Nice, 2.8i v6.
Here is the mk1 fiesta then, an X-reg 1.1L, finished in dark blue.
The original model from minichamps is not far off from being spot-on. They've got the size and shape of the model 100% correct and the wheels being delightful, not far off from being perfect. The only thing I had to do to the wheels was exaggerate the holes with a dart.
Changes then:
- I got rid of the sunroof which was just a personal preference. Did this by putting original sunroof back on, and then filling the surroundings using filler, and sanding appropriately until roof smooth flush.
- unfortunately the back was a separate unit with the back window integrated as one which was annoying for respray purposes. Also, the back lights were attached to the back unit so they had to be carefully taken out. Then I attached the back unit back onto the model, filling the holes, most noticeably just under the rear lights which was a small error from minichamps, and sanded/smoothed accordingly. Holes not visible anymore, just like on the real thing. The edges of the lights were smoothed out aswell by filing/sanding as they became a little bit rough after taking them off the back unit.
- front headlights are from vanguards as I just prefer these over minichamps; just think on this particular model vanguards version has more detail.
- bumpers are thicker ones, compulsory on the later mk1 Fiestas.
- custom made wipers and plates, to sync in with rest of collection.
- notice again bootlid logos missing as not had them made yet.
 minichamps ford fiesta 1981 by mg-ork, on Flickr
 minichamps ford fiesta 1981 by mg-ork, on Flickr
 minichamps ford fiesta 1981 by mg-ork, on Flickr
 minichamps ford fiesta 1981 by mg-ork, on Flickr
 minichamps ford fiesta 1981 by mg-ork, on Flickr
 minichamps ford fiesta 1981 by mg-ork, on Flickr
The original model from minichamps is not far off from being spot-on. They've got the size and shape of the model 100% correct and the wheels being delightful, not far off from being perfect. The only thing I had to do to the wheels was exaggerate the holes with a dart.
Changes then:
- I got rid of the sunroof which was just a personal preference. Did this by putting original sunroof back on, and then filling the surroundings using filler, and sanding appropriately until roof smooth flush.
- unfortunately the back was a separate unit with the back window integrated as one which was annoying for respray purposes. Also, the back lights were attached to the back unit so they had to be carefully taken out. Then I attached the back unit back onto the model, filling the holes, most noticeably just under the rear lights which was a small error from minichamps, and sanded/smoothed accordingly. Holes not visible anymore, just like on the real thing. The edges of the lights were smoothed out aswell by filing/sanding as they became a little bit rough after taking them off the back unit.
- front headlights are from vanguards as I just prefer these over minichamps; just think on this particular model vanguards version has more detail.
- bumpers are thicker ones, compulsory on the later mk1 Fiestas.
- custom made wipers and plates, to sync in with rest of collection.
- notice again bootlid logos missing as not had them made yet.
minichamps ford fiesta 1981 by mg-ork, on Flickr
minichamps ford fiesta 1981 by mg-ork, on Flickr
minichamps ford fiesta 1981 by mg-ork, on Flickr
minichamps ford fiesta 1981 by mg-ork, on Flickr
minichamps ford fiesta 1981 by mg-ork, on Flickr
minichamps ford fiesta 1981 by mg-ork, on FlickrMark1
SMF Supporter
Looks good,there used to be so many of these on the road, I had an xr2 in black.
I had an XR2 in metallic dark grey…..later swapped it for a three series BMW.Looks good,there used to be so many of these on the road, I had an xr2 in black.
Mark1
SMF Supporter
Mine went sideways into a central reservation at 60!I had an XR2 in metallic dark grey…..later swapped it for a three series BMW.

That is superb build. FHB!. With the right "grainy" filter on the photos, I would really believe those were the actual 80s cars taken with a film camera.
Thanks for the comments. This was actually quite a straightforward conversion as model-makers originally did a very good job, the only annoying thing was the integrated back window, had it not been for that it would have been a far easier conversion. Wouldn’t mind doing another one of these in nordic blue or red...
My sister had one of these when I was little, it was rough like no tomorrow and often wouldn’t go into 3rd gear, but then again she was driving on an L plate taking lessons.
My sister had one of these when I was little, it was rough like no tomorrow and often wouldn’t go into 3rd gear, but then again she was driving on an L plate taking lessons.
Here is the Triumph TR7 then, finished in an awesome metallic pharaoh gold. Really love this colour especially on this particular model, the metallic paint really clings on to the bodywork and it's almost got a pearlescent type look to it.
Vanguards have done a really good job on this model, so much so that on the actual body I did nothing - oh, apart from adding chromed surroundings at the rear window as for whatever reason this was missing.
A couple of other very minor changes:
- custom front number plate to sync in with rest of collection; unfortunately vanguards had number plate painted on bumper which didn't look good.
- custom made windscreen wipers.
- front foglights replaced by better detailed ones taken from sierra xr4i front bumper!
- initial wingmirrors were a tad too small so replaced by more suitable to 1/43 scale larger ones.
 vanguards triumph tr7 gold 5/5 by mg-ork, on Flickr
 vanguards triumph tr7 gold 4/5 by mg-ork, on Flickr
 vanguards triumph tr7 gold 3/5 by mg-ork, on Flickr
 vanguards triumph tr7 gold 2/5 by mg-ork, on Flickr
 vanguards triumph tr7 gold 1/5 by mg-ork, on Flickr
Vanguards have done a really good job on this model, so much so that on the actual body I did nothing - oh, apart from adding chromed surroundings at the rear window as for whatever reason this was missing.
A couple of other very minor changes:
- custom front number plate to sync in with rest of collection; unfortunately vanguards had number plate painted on bumper which didn't look good.
- custom made windscreen wipers.
- front foglights replaced by better detailed ones taken from sierra xr4i front bumper!
- initial wingmirrors were a tad too small so replaced by more suitable to 1/43 scale larger ones.
vanguards triumph tr7 gold 5/5 by mg-ork, on Flickr
vanguards triumph tr7 gold 4/5 by mg-ork, on Flickr
vanguards triumph tr7 gold 3/5 by mg-ork, on Flickr
vanguards triumph tr7 gold 2/5 by mg-ork, on Flickr
vanguards triumph tr7 gold 1/5 by mg-ork, on Flickr