Airfix 1/12 4.5 Litre Bentley Blower

Bigfoot57

SMF Supporter
Joined
Jun 24, 2015
Messages
860
Points
93
First Name
Colin
Hello again been a few weeks since I last posted as I had to move and set up everything again which has taken up most of my time so now I can relax and restart my modelling again
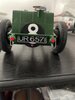
So what have we got well as the title says it’s an Airfix 1/12 Bentley Blower which I know has been done to death on numerous occasions with some builders literally scrapping most of the model to scratch build more accurate parts
Mine will not be like that I will add detail where I think it makes the model look better but this will not be a rivet counters model I do not sand off nuts and bolts etc just so I can then glue on more accurate ones only to have them fall off several months later as the glue dries out and losses it’s ability to hold the part I've been there before with my DB5 build as of now it has lost at least 4 of those acorn nuts I purchased for the head cover whereas if I had left the moulded ones on they would still be there as there would be nothing to come unstuck
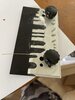
So with that thought in mind here are the obligatory sprue shots
9D8CFFD9-1930-4987-B173-744C8E27569D.jpegCDCAA7E0-88EF-4599-BD93-A9608C909999.jpeg473122A9-A064-4062-893E-288D541DC343.jpegABCB13C3-232D-4E82-B67A-7FADF3D6612F.jpeg7F5DF418-DE12-47D9-8E58-9B65B01B4499.jpeg16271E34-0AE4-4DBD-B493-ACE78AB55D31.jpegCAFEB669-48AA-4102-A242-D36107F306DB.jpeg7BE7481D-DEBF-40D6-935F-4B13D6588DDA.jpeg
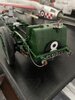
I won’t bore you with the engine construction as you can see it’s very basic and will need a lot of work to make it look like and engine so where do we start
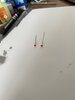
1st off spark plug leads there ain’t any so that will be my next task which after several attempts using cloth covered wire i abandoned as the cloth kept unravelling so it was pvc wire painted in matt white to simulate the old style type of wiring that would be in use at that time
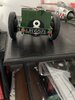
Next I made some fuse / junction boxes to attach the leads from the spark plugs to the distributors this was a small piece of blockboard with holes drilled to accept the incoming & outgoing leads
8219C22B-610D-44B0-87BC-E8EE64A2B541.jpeg8219C22B-610D-44B0-87BC-E8EE64A2B541.jpeg27C016F7-8116-4286-A800-53F5AB037506.jpegB3695378-876E-4047-B643-FA0F35BEA2E4.jpeg
And for the end of this stage I painted various pipe work and engine parts to make a more representative look to the engine

Regards

Colin
 
Last edited:

Jim R

SMF Supporter
Joined
Apr 27, 2018
Messages
13,743
Points
113
Location
Shropshire
First Name
Jim
Hi Colin
Perhaps one of the most iconic kits out there. I know it goes for silly prices.
Nice start. The engine is looking great.
Jim
 

Tim Marlow

Little blokes aficionado
SMF Supporter
Joined
Apr 27, 2018
Messages
16,792
Points
113
Location
Somerset
First Name
Tim
Not seen one of these built before. Should be good…..
 

Bigfoot57

SMF Supporter
Joined
Jun 24, 2015
Messages
860
Points
93
First Name
Colin
Airfix 1/12 4.5 Litre Bentley Blower Part 2

My next part was the construct the main fuel tank so I could assemble the main chassis in which the supercharger engine & gearbox could be fitted so further work could be undertaken with additional detailing
The fuel tank itself I’ve left as is I know people who sand off all the detail to add their own strapping pipe work & wire meshing all I’ve done is added some additional fixings along the the top using some 2 mm long pieces of wire to resemble catches
I then attached the circular racing number plate before adding the decal & used microsol’s setting solutions to make the decal adhere to the surface when it had dried then hand painted over the decal just for additional realism as this covered over the decal film that is usually prevalent especially on black backgrounds
The number plate took hours & several retouches to get to the state seen here
55023B79-C75F-4F8F-86B8-84F72AE366F6.jpeg70ED7981-D3C6-4E65-9251-884316ED1C09.jpeg029DEEBA-DC11-4620-B1B0-40985E53496C.jpeg9BABB011-3780-4DBD-BD86-6E4117B3869A.jpegC55EC2FB-EA18-4CCE-88E7-6E111EE439CE.jpegDC188DC8-9500-487B-847B-4D5C6BE71F2F.jpegA56CD795-7709-4DBF-A148-268F6C5BB06C.jpegDC6C712C-661F-4D99-90D9-9B5C960485E8.jpeg

Next up the 2 front seats the backs of these were made of some sort of compressed material fabric and as such had a completely different texture to the leather on the other parts
To simulate this I covered the backs in 180 grit sandpaper then painted it green it gave a different sort of texture just what I wanted
D16D6C7F-5F0A-4455-ABFB-EE92F089CF75.jpegA3777FC1-0CDC-4881-8EE6-F3FCE82DA413.jpeg41226ED7-3574-4A5B-B32C-A395A0A43BA0.jpegF47ED618-8EB1-4ECA-AD25-7531E3858396.jpeg

The final bit tonight was to wrap cotton around the suspension leaf springs to simulate what they actually did to the race cars in an attempt I presume to stiffen the suspension
There’s about 100ft of cotton on each spring
CEEB0283-14A4-4C7D-9618-EF04EDC3F94B.jpeg
617E9DC5-0E34-40C5-A3E6-4893B5FEBC67.jpeg5AB09CAC-4FEB-4951-BDD8-453638C2F99F.jpeg73312F5E-33F6-421C-87C4-1764BE4308F1.jpeg3DC40E96-5835-47FA-8D03-B315D10732EA.jpeg494EC037-0243-436A-AE79-21D824685474.jpeg0F6C535C-7B4B-472E-9A0B-6C121D360122.jpeg
And finally for good measure I picked out all the nuts on the chassis & differential in aluminium just for a bit of contrast in reality they would probably been blackish from the dirt & oil
I also added the tachometer cable from the front of the engine where it would be driven by a cogged arrangement and the wire that you can see is an old guitar string as it has nickle wound around it which resembles the sort of cable that would be used to power the tachometer this piece of wire will be terminated at a latter stage and go into a connector on the engine firewall

Regards

Colin
 

Attachments

  • 0251E3FF-AB30-4CBB-841F-794CF16469BA.jpeg
    0251E3FF-AB30-4CBB-841F-794CF16469BA.jpeg
    122.8 KB · Views: 10
Last edited:

Tim Marlow

Little blokes aficionado
SMF Supporter
Joined
Apr 27, 2018
Messages
16,792
Points
113
Location
Somerset
First Name
Tim
Good progress Colin. Interesting about the springs as well. Great thing about a build like this is you get to see how the real thing was designed and built.
 

Steve Brodie

SMF Supporter
Joined
Sep 17, 2014
Messages
3,734
Points
113
Location
Shropshire
First Name
Steve
Now thats a trip down memory lane, didnt they do a version of this with working headlights ?
 

adt70hk

I know its a bit sad but I like quickbuild kits!!!
SMF Supporter
Joined
Sep 4, 2019
Messages
9,506
Points
113
First Name
Andrew
Great work so far Colin.

Love the sandpaper idea. A great solution.

ATB.

Andrew
 

Bigfoot57

SMF Supporter
Joined
Jun 24, 2015
Messages
860
Points
93
First Name
Colin
B797D1B5-A7AC-4890-A800-C5AF3E9C38E7.jpeg3777A9AC-EFDD-424F-8FC2-EB94A58136FB.jpeg805565C7-6443-4841-9FDE-D7846CC81071.jpeg6F55C6A7-37B0-43D3-8DD1-830848B20202.jpegA54976C7-BAF8-44FF-A83C-52E30D6F293D.jpegAirfix 1/12 4.5 Litre Bentley Blower Part 3

Next up the rear lights which I did not like the way Airfix just stuck them on the back of the fuel tank
My idea after a bit of research was to make a angle bar to which the lights could be mounted on and after several attempts I came up with this
1st off a rough sketch of what I wanted to achieve 002B0C1D-6808-4E89-BEF8-C78A165D41EB.jpegFF5ADE15-ABFF-4504-AE40-F7837E224C19.jpeg9996AADB-9FF1-42BD-85FF-82207BF9D6B4.jpeg714AFD1B-F2DD-4F65-8C03-E937EAAD8419.jpeg3361788D-94C4-47FB-BEEA-23B8D48BE4F8.jpeg2D10FFF9-612C-411B-A4A2-37B4D8DBE1EF.jpeg8913BFC6-7842-40F7-A1F8-B813619E2FDE.jpeg3F2499FB-CF04-44FE-85E4-60D4FAB343C8.jpeg1DD77B06-7076-40C3-A963-0490D697CBCD.jpeg0DB84077-BCE6-4641-9A35-39C45D8A72BC.jpeg
A small piece of brass bent into a square u shape to which I added a couple of cut cable ties and I then used the fastening end of the ties as the mounting point for the lights
Added some wire to simulate cabling and then glued the assembled part onto the rear of the chassis and added a couple of small wood off cuts to represent the bolts there actually the tips of a cocktail stick suitably trimmed and painted with aluminium paint
After this I again used a small piece of brass suitably bent to allow me to add the reflectors as per the photo’s the red rear lens were made from a punched out piece of plastic card then painted
I also retouched the number plate to make it look more presentable
Sorry for the photos being out of sequence but I hope you get the gist of what I’m doing

Regards

Colin
 

Attachments

  • F3F3D5F2-5ACA-414D-8147-800183C0D104.jpeg
    F3F3D5F2-5ACA-414D-8147-800183C0D104.jpeg
    95.7 KB · Views: 9
  • 0939E62E-C5A9-4D5E-BCE7-F21FA56B424C.jpeg
    0939E62E-C5A9-4D5E-BCE7-F21FA56B424C.jpeg
    48.8 KB · Views: 7
  • 8AF9FAA9-92D2-4918-A8E2-75A2B9C5FBE5.jpeg
    8AF9FAA9-92D2-4918-A8E2-75A2B9C5FBE5.jpeg
    104.9 KB · Views: 5
  • 04EE7862-C04A-46F5-83D9-34863170E111.jpeg
    04EE7862-C04A-46F5-83D9-34863170E111.jpeg
    113.2 KB · Views: 5
  • 774E0F2A-E6CE-4E35-9C50-BCA7617800F0.jpeg
    774E0F2A-E6CE-4E35-9C50-BCA7617800F0.jpeg
    103.1 KB · Views: 9
Last edited:

PaulinKendal

SMF Supporter
Joined
Jul 13, 2021
Messages
1,065
Points
113
Location
The Lake District
First Name
Paul
Loving this build! Clever idea to use sandpaper for the seat-backs - I'd never have thought they'd come out looking like that - so good!
 

Bigfoot57

SMF Supporter
Joined
Jun 24, 2015
Messages
860
Points
93
First Name
Colin
Thanks to all for comments we’re getting there as British Rail or British Airways used to say anyway next will be moving back to the engine to finish off the additional detailing

Regards

Colin
 

Bigfoot57

SMF Supporter
Joined
Jun 24, 2015
Messages
860
Points
93
First Name
Colin
Airfix 1/12 4.5 Litre Bentley Blower Part 4

Finishing the engine and attaching the wheels

So here we are back at the front of the car to add more detail to the engine & the firewall this will be adding some bits to connect to the supercharger to the engine via that large black and silver pipe 2 circular type ducts which I don’t know what to call them and the steering column along with some additional wiring & piping to enhance the look
So 1st assemble steering column then take some small circular cut outs the they are made again from a cross section of a tooth pick I then drilled holes into the centre of these there are 3 incidentally then glued them into position on the circular depression on the firewall I then painted them black for the 2 uppers & red for the lower the tachometer cable which I ran from the front of the engine goes into the red socket and the the 2 remaining slots are used by a cable on the right going straight down this does not terminate on anything it’s merely for show bling call it what you will the other cable attaches to the bottom of the distributor so I’m assuming it’s the throttle cable or something similar
Below the circular assemble is a u shaped bracket to which another cable is attached and runs back up to the circular assembly on the firewall
Attached to the bracket also is a spring type cable that goes from the bracket and attaches to the throttle cable 3/4 of the way down where the brass fittings occur phew I think that’s it for that side of the engine
Next I attached the steering column in the correct place this time as 1st off I didn’t put it through the hole in the firewall and wondered why the firewall was to high and didn’t fit well that’s the reason see we all make stupid mistakes never mind I corrected that and have moved on to adding a small girder like fitting to the other side of the firewall to hold another tank no idea what it’s used for possibly screen wash etc.
And finally I’ve attached the front wheels so now at least the car has 4 wheels to rest on a word of caution to anyone contemplating building this kit the struts along the side of the chassis are very fragile and easily broken which I have done on several occasions some so bad I’ve replaced them with whittled down tooth picks which are far stronger than the original plastic ones
So that’s it for tonight send more tomorrow

Regards

Colin
39B15B9C-A241-461C-B9D4-5D3A3CE53804.jpeg7D0E12AC-26B6-4B28-8A19-62DB800EE9E0.jpeg915DA672-EF00-41DC-BA43-683B6E379C30.jpegDB151F95-0670-40C7-B2C5-70021FD7E1E4.jpeg20AE73D0-4FF2-46E0-9409-AF75E87CFD0C.jpeg8485EF4E-EE0A-4C40-8454-3E17DDD183D5.jpeg3FA4B167-871C-41EC-BCE5-0071D32719E1.jpeg83BF8B14-BC50-449D-AA50-9CBDC874DC3E.jpegBDA95931-9302-4616-93C2-A626AEBE87AE.jpegC4FF756E-E681-4877-B20B-568BA48C9672.jpeg3EF1FAEA-DC0B-43D5-BCB8-15F7891E733B.jpeg15005448-7962-453B-BEA9-D90E2D3E88CE.jpeg
 

Snowman

We come in peace, so shoot to kill!
SMF Supporter
Joined
Oct 20, 2014
Messages
1,996
Points
113
First Name
Gavin
AWESOME!!

Wow, what an eye for detail. I really like what you are doing.

This makes me want to dive into my Revell made Bentley!
 

Bigfoot57

SMF Supporter
Joined
Jun 24, 2015
Messages
860
Points
93
First Name
Colin
Airfix 1/12 4.5 Litre Bentley Blower Part 5

Radiator Dashboard and Snapped Front Wheel Axle Broken Spokes

So next up is the radiator the grill and the chrome surround 1st off painted the back grill black then tried using a template of the no 8 cut out to paint directly onto the grill this was a total disaster I’ve seen somebody do it on site on the web but I couldn’t match their skill so I’ve cheated and applied the decal again using several coats of microsol to make the decal bed down into the grills after this was achieved I then again hand painted over the number 8 to give a more realistic affect
Next came the dashboard this was painted in aluminium then all the dial facias were painted gloss black I also added an additional cylindrical switch near the top by again using a whittled down piece of a dowel this time and a small copper bead from a necklace to represent the nob this was also painted gloss black to match the rest of the dials
After this was dry I applied the decals to the clear plastic panel again using microsol to make them adheare to the plastic
Next I made up the body panels and painted them the same green as the rest of the car I was going to mat varnish it as the main body of the Bentley was made from ash coated with a resin to which the clothed exterior was added then dope was applied giving it a different texture the the metal of the rest of the car but Airfix in it’s wisdom or accident moulded these parts with a matt finish which when painted resembled what I was trying to achieve so I’ve left them unvarnished
In fitting the body panels in managed to snap off the drivers front wheel clever eh! oh well out with my favourite go to namely a tooth pick to which I fashioned out a new axle and in so doing when fitting it to the wheel managed to break a couple of spokes more toothpick whittling as you can see when painted they blended into the background along with the rest of the spokes
So as not to repeat the same happening again I’ve made my body panel detachable it has a false floor made from thick card painted black this whole unit then just rests on the chassis requiring no force to make it fit as previously which led to the broken axle to this the interior then slides into place and the whole thing is locked by the rear seat which also just pushes in
Not as it should be but as you can see from the photo I had gap issues requiring filler and sanding to resolve once I done the body panel wouldn’t attach to the correct points without splitting it seems the chassis is slightly to wide so that’s why I made up the false floor which is wide enough to allow everything to align without any undue force being applied
Finally with that resolved I moved to fitting the exhaust system basically 3 parts I also added some shielding mesh made from a piece of rolled around a ball pen flyscreen which was then slid onto the exhaust system before attaching to the chassis and finally adding the black undertray to the bottom of the car which in so doing snapped off another bracing strut on the side of the chassis like I said these are a particular weak spot on this model so with repaired I next moved onto the rear of the body panel and fitted the folding mechanism for the rear cover which I painted a slightly darker green to represent the green leather / tarpaulin it was made from and then suitably detailed the folding mechanism

Sorry folks no more pictures as the new server won’t accept them in their current state which now seems pointless continuing the posting without pictures to illustrate the wording

I will still keep a build diary and post it just to let you know how the build is progressing and any pitfalls that occur but apart from that not much else I can do

Ok after reading about file sizes on the forum I have reduced mine on the iPhone by emailing them to myself which gives you the choice of a reduced file size in some cases up to 90 percent smaller so the photos won’t have the resolution as before but at least I can still post them to illustrate my build texts see below I hope they are viewable they appear ok to me

Regards

Colin

E63099AA-97EB-4FEA-AF6A-DAA87C337EE4.jpeg1C3AD1F3-168D-4B22-A718-2A0173EAE122.jpeg440A9FF9-84F0-4E2A-A842-9201B2C99104.jpegDF8E448F-F110-4FD1-9C94-5C1950DC3743.jpegEAC99A14-C2EA-43F9-B989-02042FB3C5EF.jpeg13DC0D51-49EA-4D27-94BE-80869ACC9B0F.jpeg86CF8B35-6393-49DD-AF84-5EC64DAD2538.jpeg3B2240C1-302E-4E26-B97D-92E91D4AB5AE.jpegA7DFA290-01CD-48D1-B73A-5F53D06FD456.jpegFE4A7B0F-8D25-49CF-879F-B961184CEF8F.jpegE3C4A96F-92B5-422D-8A8F-5D3D1938485A.jpegB9266A89-778B-4440-B5F9-28D73B2A4D47.jpegB21B101A-A31E-4976-9F62-09A482B65751.jpegC072B014-E577-465B-B1C0-4A55ED9AA5B0.jpegEF09FDCB-EFEA-47A4-9D91-C8516E56FD40.jpeg5C43A7BC-38C9-46D7-B5DE-536DDFFCE1A4.jpeg663693EA-E81A-4DD1-910A-AE72489B1DB9.jpeg
 
Last edited:

Bigfoot57

SMF Supporter
Joined
Jun 24, 2015
Messages
860
Points
93
First Name
Colin
Anybody looking for reference material for the Bentley blower be it Airfix or Revell should check out this video from you tube from Misko Models of Germany


Regards

Colin
 
Top