Churchill Mk. IV AVRE with Small Box Girder Assault Bridge Mk. II

Jakko

Way past the mad part
SMF Supporter
Joined
Apr 28, 2018
Messages
10,936
Points
113
First Name
Jakko
What I intend to do is first build the bridge, then fix the suspension so it sits correctly, with the front half or so of the springs compressed (I’ll need to find some good photos to decide how many and how far), then assemble the major parts of the hull and hang the bridge off the front so I can judge how much weight to put in. That’s the plan, anyway :smiling3:

BTW, I wouldn’t mind seeing either a photo of your model from way back when, or the article about it. I checked my collection of MilMods yesterday, but the oldest ones I have are from 1984, so not early enough :sad:
 

adt70hk

I know its a bit sad but I like quickbuild kits!!!
SMF Supporter
Joined
Sep 4, 2019
Messages
9,526
Points
113
First Name
Andrew
BTW, I wouldn’t mind seeing either a photo of your model from way back when, or the article about it. I checked my collection of MilMods yesterday, but the oldest ones I have are from 1984, so not early enough :sad:
My exact thoughts!
 

Scratchbuilder

SMF Supporter
Joined
Jul 2, 2022
Messages
2,031
Points
113
Location
Luton
First Name
Mike
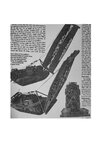
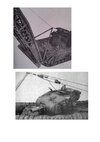
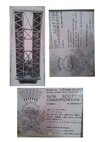
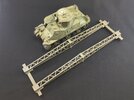
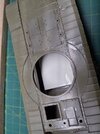
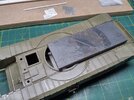
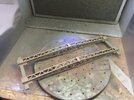
As requested and by popular demand :rolling:....
The pics are not very good, and even photoshop could not do its work with this old photocopy 1978 vintage...
This version was built using the available reference material at the time - the 1/76 scale drawings by Geoffrey W Futter and the book 'Hobo's Funnies' (long out of print). The model did itself proud as you will see.
chuch2.jpg
church1.jpg
church3.jpg
The large spaces between the images are my fault, I forgot to trim down the borders... And thanks to the mod for allowing these.
Now can we get back to the subject at hand and watch Jakko work his magic....
 

adt70hk

I know its a bit sad but I like quickbuild kits!!!
SMF Supporter
Joined
Sep 4, 2019
Messages
9,526
Points
113
First Name
Andrew
As requested and by popular demand :rolling:....
The pics are not very good, and even photoshop could not do its work with this old photocopy 1978 vintage...
This version was built using the available reference material at the time - the 1/76 scale drawings by Geoffrey W Futter and the book 'Hobo's Funnies' (long out of print). The model did itself proud as you will see.
View attachment 475571
View attachment 475572
View attachment 475573
The large spaces between the images are my fault, I forgot to trim down the borders... And thanks to the mod for allowing these.
Now can we get back to the subject at hand and watch Jakko work his magic....
Great work Mike!
 

Jakko

Way past the mad part
SMF Supporter
Joined
Apr 28, 2018
Messages
10,936
Points
113
First Name
Jakko
As requested and by popular demand :rolling:....
The pics are not very good, and even photoshop could not do its work with this old photocopy 1978 vintage...
It still shows the model very nicely.

This version was built using the available reference material at the time - the 1/76 scale drawings by Geoffrey W Futter and the book 'Hobo's Funnies' (long out of print).
I’ve got that, and it’s obvious that was your source: the girders under the bridge deck are about twice the width they should be, just like in the book :smiling3: But it’s a very impressive model, especially if you consider you didn’t just have to build the bridge, the winch and the generic AVRE details, but also backdate the Tamiya Mk. VII to a Mk. IV. Is the turret completely scratchbuilt or converted from that of the Mk. VII?

The model did itself proud as you will see.
It deserved to, IMHO.

Now can we get back to the subject at hand and watch Jakko work his magic....
I’ll be finishing the Grant CDL and JPK 120 first — they’re being painted but I haven’t posted photos of that yet. Once they’re out of the way, I’ll start on this one.

thanks for all the backstory and photos. It really does add perspective.
I often like to build something more than a generic model, and in that respect, what better than something from your own immediate area?
 

JR

Member of the Rabble and Pyromania Consultant
SMF Supporter
Joined
May 26, 2015
Messages
17,362
Points
113
Location
lincs
First Name
John
Its the history that makes your builds so interesting , great photos as well.:thumb2::thumb2::thumb2:
 

Scratchbuilder

SMF Supporter
Joined
Jul 2, 2022
Messages
2,031
Points
113
Location
Luton
First Name
Mike
It still shows the model very nicely.


I’ve got that, and it’s obvious that was your source: the girders under the bridge deck are about twice the width they should be, just like in the book :smiling3: But it’s a very impressive model, especially if you consider you didn’t just have to build the bridge, the winch and the generic AVRE details, but also backdate the Tamiya Mk. VII to a Mk. IV. Is the turret completely scratchbuilt or converted from that of the Mk. VII?


It deserved to, IMHO.


I’ll be finishing the Grant CDL and JPK 120 first — they’re being painted but I haven’t posted photos of that yet. Once they’re out of the way, I’ll start on this one.


I often like to build something more than a generic model, and in that respect, what better than something from your own immediate area?
Jakko,
The turret was scratch built using 80thou plasticard, laminated to get the thickness to be able to sand and file to shape.
Mike.
 

Jakko

Way past the mad part
SMF Supporter
Joined
Apr 28, 2018
Messages
10,936
Points
113
First Name
Jakko
OK, it’s taken a bit longer than originally envisioned, but then, that’s always the case for me ;) With the CDL being just about done, I’ve started on the bridge for the AVRE.

As shown in the instructions (which I posted to Scalemates), in step 47 on page 22, the basic girder is two side pieces joined by zigzagging parts top and bottom. Here is one side piece and both of the zigzags, as well as the narrow end and the middle plate:
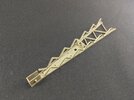
D8881A4D-FC5F-4A5A-85D6-00C17A220C69.jpeg

Yep, this is four parts, and fit is rather good, as I would expect from AFV Club. A minor difficulty is taking the sides off the sprue, because this is how they are attached:
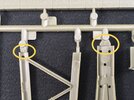
E708F2A9-559C-469E-8FC1-C6AA2F8C3070.jpeg

The gates are very wide, but need to be trimmed against the parts. I ended up snipping through them further away from the parts, where the sprue is still round, and sawing through the flat, wide gates I circled in the photo above before cutting and filing them down to the actual part.

Next, adding the other side and the end piece on the thick end:
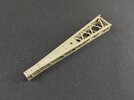
2DDC1626-D60A-4408-B3D2-6CC89D31414C.jpeg

This is slightly tricky because you need to ensure the zigzags go inside the side plate, but it’s not actually hard to get right. Just keep checking that things are square, though.

Note that the two side pieces, U7 and U13 are not identical! They look like they are, but their zigzagging struts go the other way. If you take all the pieces for all the sides off the sprues, don’t mix them up, or you may have the struts going the wrong way on some of the girders.

After that, some crosspieces need to be put in to connect the two sides, and a piece added to the narrow end:
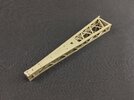
E0599CB9-5CE9-4474-8E66-971EAF718896.jpeg

You then “need” to build the other three before you can continue adding parts, because the narrow ends of the girders need different parts added depending on whether they’re left or right and at the tank end or the far end. Sure, you could do that first and then add the girders together to make a bridge, but that will mean paying much more attention to which one goes where. So, on to the other girders first!

For comparison, this is what you get in the International Models Asia conversion set (now discontinued, it seems) for making these same girders (this is for four, BTW, not just one):
B857B5C6-C12E-4E35-90B5-F3A4EE8621CE.jpeg

Lasercut sides and a lot of L-angle strip.

And after having pictured yourself not really wanting to build that and getting it all square, imagine Mike not even having had those side pieces (and lasercut decks plus resin other bits) but having to make everything himself …
 
Last edited:

Jakko

Way past the mad part
SMF Supporter
Joined
Apr 28, 2018
Messages
10,936
Points
113
First Name
Jakko
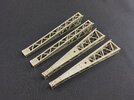
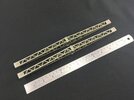
All four done now:

37D92B41-2C14-4E65-908F-13E3A2DA5C53.jpeg

Here’s an idea of the size of this thing:

F3FCBCC1-04FA-4007-B91B-680C3E7A0327.jpeg

The halves of each girder are still loose there, a few parts need to go between them before I can glue them together.
 

therapy

SMF Supporter
Joined
Apr 21, 2019
Messages
886
Points
93
Location
East Anglia
First Name
Nick
I really fancy getting one of these Jakko, but I reckon that bridge will be a real nuisance to paint... it's certainly quite a size - I can see why you need all that weight in the hull.

Nick
 

Jakko

Way past the mad part
SMF Supporter
Joined
Apr 28, 2018
Messages
10,936
Points
113
First Name
Jakko
I reckon that bridge will be a real nuisance to paint...
I was just thinking about that too ten minutes or so ago … you can’t really paint the parts before assembly, because how do you glue them then, but everything is hard to reach after assembly :sad: I’ve decided for now to stop construction at the point where the decks go on, and probably paint the insides first.

That gives another problem: the real thing was probably painted SCC 2 (brown) and then painted white over that, but I kind of doubt someone would have crawled inside it to paint everything there white too. However, I need to prime the model before I can apply any of the SCC 2 paints I have, as they’re all water-based acrylics that don’t like going over bare plastic. But that would mean spraying the bridge white, spraying the insides brown over that, and then somehow painting the outside (off)white again, somehow without covering the brown on the inside :rolling:

it's certainly quite a size - I can see why you need all that weight in the hull.
Yes, I doubt the tank will stay nicely on its tracks without. Hence building the bridge first, so I can figure out how much weight the hull needs :smiling3:

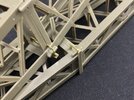
As for the actual build, I began by adding the parts the go between the bridge halves:

40832CC5-EE9F-42CA-89D0-D7D392B96523.jpeg

That’s the little brass thingies, which are actually a single piece, sort of a very shallow U, with a plastic part underneath the join. I tried glueing the brass and plastic together and then putting them between the halves, but it’s far easier to trap the brass between the halves, slide it down, glue the girders together and then add the plastic bit underneath. Beware which side is up when doing this.

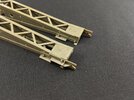
Next, I added the fittings to the ends of each girder:

984FE474-EAB3-4E11-BC7C-13AD49329A1D.jpeg

This is the tank end; the other end has only the smaller plates you can see on the second girder. (I also got the two girders the wrong way round here: the large hooks should be on the inside of the bridge, not the outside).

Those plates were awkward because each of them had a number of ejector pin marks, those large, half-round ones that are 2 to 3 mm long, on the inside that needed to be removed without accidentally cutting off their locating pins. (Luckily, if you do, there are spares of all of them as each of the four sprues has one of each, but you only need three of each of the small ones and one each of the large. Not that I needed them.)

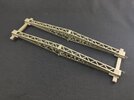
Then add the crossbeams at the ends:

1EAA7F96-AE8D-43DB-88C4-5D6FDB60BCA9.jpeg

And for more perspective on size, here is the bridge with a tank model I happened to have available:

4036E3C7-7946-4BB4-86B7-39AA7709B5F5.jpeg
 

Scratchbuilder

SMF Supporter
Joined
Jul 2, 2022
Messages
2,031
Points
113
Location
Luton
First Name
Mike
Jakko,
Too late now but for your 'brown primer' try 'Mr Mahogany Surfacer 1000' and then add the white top coat - two jobs in one, primer brown and topcoat white...
Looked at the bridge consruction and although you have progressed to full assembly, can I say to anyone else (including myself) to assemble the bridge sections as 'L' shaped sections, paint and then assemble the sections to make the whole bridge up to where you are now and touch up later.
And very sensible to build the bridge first to gain an idea about the weight. My Churchill hull minus turret, track and winch weighs in at 298grammes, so if you can deduct the hull parts weight from the 298 then you will have your weight to counteract the bridge.
Looking forward to seeing more of this build for when I get my AFV Club one - must be a glutton for punishment....
Mike.
 

Jakko

Way past the mad part
SMF Supporter
Joined
Apr 28, 2018
Messages
10,936
Points
113
First Name
Jakko
Too late now but for your 'brown primer' try 'Mr Mahogany Surfacer 1000' and then add the white top coat - two jobs in one, primer brown and topcoat white...
I was thinking of just spraying it with Tamiya dark earth acrylic, being alcohol-based that will work fine on bare plastic, unlike the Mig and AK water-based paints I have in the supposedly correct shade. The Tamiya paint isn’t a “warm” enough colour for SCC 2 (which seems to have been milk-chocolate brown) but will do for the inside, especially if I then go and shade it with a brown-tinted glaze.

Looked at the bridge consruction and although you have progressed to full assembly, can I say to anyone else (including myself) to assemble the bridge sections as 'L' shaped sections, paint and then assemble the sections to make the whole bridge up to where you are now and touch up later.
That’s what I realised would have probably been the better way too, after I was most of the way done. It would mean scraping some paint off where the zigzag struts fit, but that should be easy enough to do.

And very sensible to build the bridge first to gain an idea about the weight. My Churchill hull minus turret, track and winch weighs in at 298grammes, so if you can deduct the hull parts weight from the 298 then you will have your weight to counteract the bridge.
I find it slightly strange that AFV Club have you build the bridge last, and just say to add 100 g inside the hull, not even telling you where in the hull — it’ll make a big difference if you put it in the nose or under the transmission deck …

Looking forward to seeing more of this build for when I get my AFV Club one - must be a glutton for punishment....
It’s the painting of the bridge that I’m still looking forward to the least :smiling3: Back when the Matchbox 1:76 scale kit was fairly new, I build that but got very tired of trying to paint the inside of the bridge with it fully assembled — to the extent that I have the half-painted parts near my workbench now :smiling3: (I dug them out some years ago to measure them up as I wanted a 1:72 scale one for a wargaming AVRE, but though I mostly finished a 3D CAD drawing of it, I never did get it printed up.)

That is coming on very nicely indeed. Kudos for the way the bridge parts have come out so far.
Thanks, but TBH, building the bridge isn’t hard — it’s been engineered about as well as it could have been, given the intricate construction of the real thing.
 

Jakko

Way past the mad part
SMF Supporter
Joined
Apr 28, 2018
Messages
10,936
Points
113
First Name
Jakko
They haven’t skimped on those, for sure :smiling3:
 

Scratchbuilder

SMF Supporter
Joined
Jul 2, 2022
Messages
2,031
Points
113
Location
Luton
First Name
Mike
Hi Jakko,
After looking through the instructions you posted to Scalemates, it does seem strange about the weight. This is how I sorted my weight problem, it may be a bit of overkill but should do the job.
20230318_082753_HDR.jpg
This is the box I built for the weight...
20230318_082806_HDR.jpg
And this is the weight (similar) obtained from evilbay, the thickness is 5mm and the box is there to keep it in place.
Cheers
Mike
 

Jakko

Way past the mad part
SMF Supporter
Joined
Apr 28, 2018
Messages
10,936
Points
113
First Name
Jakko
That should be enough, yes :smiling3: What I intend to do is build the mail hull pieces, hang the bridge from the front with some string, put the roof and turret on, and just keep adding weight until the model stands correctly. I don’t entirely trust the suspension to take too much weight even after I glue it all down :smiling3:
 

Jakko

Way past the mad part
SMF Supporter
Joined
Apr 28, 2018
Messages
10,936
Points
113
First Name
Jakko
4E4DB4A5-66D4-4403-8BAB-CB8D15BB1419.jpeg

Painting the bridge was not as much of a chore as I had dreaded. It’s not a simple job, but by spraying everything from all directions that you can see it from, it’s not too bad. Still, I would urge everyone else building this kit (or the separate, larger bridge kit AFV Club also released) to follow Mike’s advice and glue one zigzag to one side panel, paint the inside faces, and only then assemble them into girders.

I also sprayed the undersides of the decks, by the way, the areas that will be covered by the girders, anyway. If you forget to do that, you will have a much harder paint job there :smiling3:
 
Top