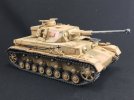
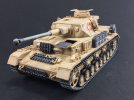
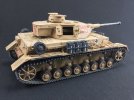
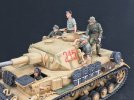
DAK Pz.Kpfw. IV Ausf. G, 1942

Jim R

SMF Supporter
Joined
Apr 27, 2018
Messages
13,731
Points
113
Location
Shropshire
First Name
Jim
Looking good Jakko. I reckon if you have "done some research" and "tried your best" then the colours are fine. There will always be those "who know better" but you could spend more time and effort trying to solve "the impossible" than making a model. Restored vehicles, old photos, different times, dirt, fading etc etc. And then there is the can of worms - "scale effect". No one can have a definitive answer.
I'd rather look for unicorns, probably have more success.:smiling3:
 

Graeme C.

SMF Supporter
Joined
Apr 29, 2018
Messages
1,485
Points
113
First Name
Graeme
The paint & colouring look fine to me Jakko, as Jim has said, there are a lot of variables.
 

Jakko

Way past the mad part
SMF Supporter
Joined
Apr 28, 2018
Messages
10,814
Points
113
First Name
Jakko
I reckon if you have "done some research" and "tried your best" then the colours are fine.
TBH, the colours as such weren’t that big of a problem — you can buy plenty of suitable model paints for this tank’s scheme that come close enough for my taste. The issue was me not really being up to speed on the schemes used, and that vexing matter of why there is dark paint under the sand when these tanks came from the factory in the Africa scheme … But I solved that conundrum to my satisfaction — all I now need to do is paint on the grey, but I didn’t actually feel like it when I sat down with the model this afternoon.

I'd rather look for unicorns, probably have more success.:smiling3:
Oh, I know where to find those. I have a couple of them there :smiling3:
 

Jakko

Way past the mad part
SMF Supporter
Joined
Apr 28, 2018
Messages
10,814
Points
113
First Name
Jakko
One of those jobs that I want to do but don’t like doing at the same time:

IMG_0524.jpegIMG_0525.jpeg

… chipped paint. After studying the photos of the real tank, and discussing it with other modellers, I reached the conclusion that the mudguards show Panzer grey where the sand-coloured paint has worn away, but that the forward sections were replaced at some point — if you look at this picture from the start of this thread:

Pz.Kpfw.IV Ausf.F2 from Pz.Rgt.5, 21.Panzer-Division abandoned at El Alamein in November 1942. by Panzertruppen, on Flickr

… you’ll notice a vertical line on the side of the mudguard, forward of which the mudguard only shows wear along the edges, but from that line, most of it is dark. This line corresponds exactly to a seam on the real tank, so my conclusion is that the front bit is newer.

One problem with the grey under the sand, is that the real tanks came out of the factory in sand colours by the time this tank was produced, but I (eventually) realised that the components would probably have been painted panzer grey already before being installed, or even that the whole hull had been built in grey already before being oversprayed at the factory once the new order came through. While I don’t know if the driver’s hatch was grey on the inside, photos exist of Panzer IVs like that, so I went for it here too.

The turret, on the other hand, shows very little or no chipped paint, so I didn’t add any there other than on the stowage bin, which does clearly have it in the photo from the right rear. That also shows remains of a white outline around the numbers, so I also painted that in the places where it showed on the real tank,
 

Tim Marlow

Little blokes aficionado
SMF Supporter
Joined
Apr 27, 2018
Messages
16,781
Points
113
Location
Somerset
First Name
Tim
You know, looking at that picture Jakko I’m not sure the hull sides under the track guards aren’t in grey? There is a huge variation in shade between the wheels and the hull side, and if it was just shadow effect the return roller ends would look the same….and they don’t.
 

Waspie

SMF Supporter
Joined
Mar 13, 2023
Messages
2,481
Points
113
Location
Portland - Dorset
First Name
Doug
I know we do it these days but maybe the Germans cobbled tanks together from a handful of defective ones to achieve one working tank.
A bit WW2 'cut and shut'!! The turret would be an easy item to replace, a crane old one off new one on! Same with track component easy to swop out!!
We certainly do it with aircraft.
 

Jakko

Way past the mad part
SMF Supporter
Joined
Apr 28, 2018
Messages
10,814
Points
113
First Name
Jakko
I’m not sure the hull sides under the track guards aren’t in grey?
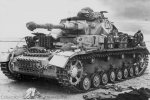
Discussion about that photo elsewhere leads me to think that they’re probably RAL 8020 yellow-brown with patches of RAL 7027 grey-green. It’s clearer in this version of the picture that isn’t halftoned:

00181f.jpg

There is a huge variation in shade between the wheels and the hull side, and if it was just shadow effect the return roller ends would look the same….and they don’t.
The hull side is too light for RAL 7021 black-grey (Panzer grey), because the jerrycans and the spare roadwheel are (almost certainly) that colour, but they’re darker than the hull side even though they’re in the light more than it is. The conclusion that there are patches of the darker of the two camouflage colours on the tank seems reasonable to me, which is why I sprayed them there more than on the rest of the tank — where I suspect the combined effects of scouring sand and bleaching sunlight faded them to be almost indistinguishable from the lighter camouflage colour.

I know we do it these days but maybe the Germans cobbled tanks together from a handful of defective ones to achieve one working tank.
True, but this tank was one of the very first Pz.Kpfw. IV Ausf. Gs produced in March 1942 and lost in November that year (the photo above was taken after it was captured at El Alamein), which makes it unlikely it was cobbled together :smiling3:
 

Jakko

Way past the mad part
SMF Supporter
Joined
Apr 28, 2018
Messages
10,814
Points
113
First Name
Jakko
A question for modellers who like to install tracks before painting: How do you do actually paint them, then?!

I had already left off the outer wheels to make it easier to paint the tracks, but all that really accomplished was make it a bit less difficult :sad: To be fair, I had already expected that, but still, now I’ve painted one of the tracks I still found it a very annoying job.

IMG_0530.jpeg

This is one track mostly painted — as far as I could with a fairly coarse (ca. 3 mm diameter) brush, anyway. It’s not only hard to get paint everywhere you want it, it’s also hard on the brush because of the pattern on the outside of the links. It’s almost impossible to get paint directly behind the guide teeth and between adjacent wheels:

IMG_0531.jpeg

Let alone on the track around the drive sprocket:

IMG_0532.jpeg

After taking these photos, I went back with a fine brush and did these bits as well as I could manage, but even then there are bits of sand colour visible that I just couldn’t reach.

If I build a Panzer IV or similar again, it almost certainly won’t be with tracks that have to be glued on. This kind of trouble is exactly why I like workable tracks: you can spray those in the base colour and then do all other painting on them when they’re off the tank.
 
Last edited:

Mini Me

SMF Supporter
Joined
Jun 1, 2018
Messages
10,160
Points
113
First Name
Rick
No worry Jakko....weathering covers a multitude of "sin" and it does get everywhere! ;)
 

Jakko

Way past the mad part
SMF Supporter
Joined
Apr 28, 2018
Messages
10,814
Points
113
First Name
Jakko
Yeah, that’s the thing … this model won’t get much weathering, because a lot of the way I would normally do that will “unshade” the model. And since the dust that would be everywhere on the real thing is close in shade to the colour the vehicle has anyway, it’s not really necessary, anyway. Though the track will get a sand-coloured wash, so that will hopefully serve to hide any remaining bits that areI couldn’t reach with the brush this afternoon.
 

Jakko

Way past the mad part
SMF Supporter
Joined
Apr 28, 2018
Messages
10,814
Points
113
First Name
Jakko
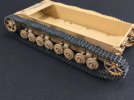
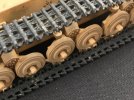
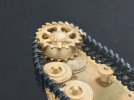
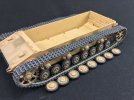
I had kind of forgotten what a chore it is to paint all those Panzer IV wheels :smiling3: But the whole suspension is finally painted now!

IMG_0536.jpeg

I first painted the tracks very dark grey, as shown above, and then added a sand-coloured wash to represent fine sand lodged in the track. After that had dried, I drybrushed it with a few lighter shades of grey and finally with Humbrol Polished Steel, buffing that up once it had dried so it shines like the steel track would after driving through fine sand for a while. I then painted the sand caked to the inside where the roadwheels seem to have deposited it in the front-view picture of the real tank.

The rubber tyres were then painted dark grey, followed by a wash of thinned-down Indian ink and, once that had dried, a medium grey drybrush.

On the drive sprockets and idler wheels, I first painted the areas where the sand-coloured paint has worn away with Panzer grey, and then Polished Steel as well, again buffed once it had dried. I also added Polished Steel to the outer faces of the inner roadwheels, where the paint would have been rubbed off by the guide teeth.

Then all I had to do was fit the wheels:

IMG_0537.jpegIMG_0538.jpeg

The hull top is still loose, but I guess I can glue it down now.
 

Jakko

Way past the mad part
SMF Supporter
Joined
Apr 28, 2018
Messages
10,814
Points
113
First Name
Jakko
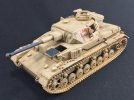
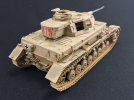
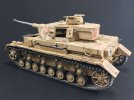
Another couple of steps forward:

IMG_0579.jpegIMG_0580.jpeg

The track links on the nose plate are Friuls I got from another modeller, the rest is from the kit. It still needs more stuff added, mainly sandbags and a few more spare track links on the hull front, as well as the tow cables, and of course the crew. Though I’m having some trouble painting them, as I’m not happy with the colours I’ve been using, so I’ll probably end up redoing the uniforms entirely (they’re about half-done at the moment).
 

Graeme C.

SMF Supporter
Joined
Apr 29, 2018
Messages
1,485
Points
113
First Name
Graeme
Looking good Jakko, a few signs of 'desert wear' showing.
 

Panzerwrecker

SMF Supporter
Joined
Mar 2, 2022
Messages
362
Points
93
First Name
Los
A question for modellers who like to install tracks before painting: How do you do actually paint them, then?!

I had already left off the outer wheels to make it easier to paint the tracks, but all that really accomplished was make it a bit less difficult :sad: To be fair, I had already expected that, but still, now I’ve painted one of the tracks I still found it a very annoying job.

View attachment 500177

This is one track mostly painted — as far as I could with a fairly coarse (ca. 3 mm diameter) brush, anyway. It’s not only hard to get paint everywhere you want it, it’s also hard on the brush because of the pattern on the outside of the links. It’s almost impossible to get paint directly behind the guide teeth and between adjacent wheels:

View attachment 500178

Let alone on the track around the drive sprocket:

View attachment 500179

After taking these photos, I went back with a fine brush and did these bits as well as I could manage, but even then there are bits of sand colour visible that I just couldn’t reach.

If I build a Panzer IV or similar again, it almost certainly won’t be with tracks that have to be glued on. This kind of trouble is exactly why I like workable tracks: you can spray those in the base colour and then do all other painting on them when they’re off the tank.
I've only painted one vehicle with the tracks already attached (Tamiya Marder I link & length) I first airbrushed the whole lower hull sides with a shadow tone first (think it was Tamiya Tyre black). Then I lowered the PSI and airbrushed just the tracks with a Tamiya, Dark Iron/Dark Earth mix.

All the wheels and the visible parts of the lower hull were then airbrushed in a darkened mix of the base coat colour. This was to avoid any stark transition between the running gear components that would be left in shadow. Before the base coat colour was applied to the wheels, I tidied up all the previous overspray with brushed Vallejo paint (with colours as close to the airbrushed tones as I could find) A final application of the base coat colour was then carefully airbrushed over the wheels concentrating mainly on the outer faces.

The tyres were the most challenging part to paint. Again, brush painted with a few diluted Vallejo Dark Rubber layers.

By this point most of the overspray was already dealt with by the brush painted layers, but any leftover overspray can be completely dealt with by the next steps of weathering both the tracks, the wheels, and the lower hull.
 

Jakko

Way past the mad part
SMF Supporter
Joined
Apr 28, 2018
Messages
10,814
Points
113
First Name
Jakko
I think I’ll stick to working tracks if at all possible :smiling3: I’ve only really had much luck with putting the tracks on before painting if I was going to cover the whole underside of the tank — hull, suspension, wheels, tracks, etc. — in a mud colour.
 

Jakko

Way past the mad part
SMF Supporter
Joined
Apr 28, 2018
Messages
10,814
Points
113
First Name
Jakko
Cheers :smiling3: I like to add at least one figure to a vehicle, to show its size more easily to onlookers who may not be familiar with it. The poses of the crew in this kit are what attracted me to it in the first place, really. However, the detail on them is so fine that they really need a better painter than me to make the most of them.
 

Neil Merryweather

SMF Supporter
Joined
Dec 29, 2018
Messages
4,425
Points
113
Location
London
First Name
Neil
Cheers :smiling3: I like to add at least one figure to a vehicle, to show its size more easily to onlookers who may not be familiar with it. The poses of the crew in this kit are what attracted me to it in the first place, really. However, the detail on them is so fine that they really need a better painter than me to make the most of them.
They look great Jakko
 
Top