Dwarf Gem Collector

PaulinKendal

SMF Supporter
Joined
Jul 13, 2021
Messages
1,072
Points
113
Location
The Lake District
First Name
Paul
20220409_082040.jpg
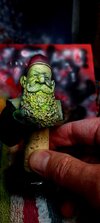
This miniature comes from Mr Lee's Minis. It comes in three pieces - the hand with the jewel and the fez are separate pieces (blu-tacked on for this photo).

This will be my first painted bust, my first resin figure and my first attempt at Object Source Lighting (OSL). Any advice gratefully received.

Specific questions before I begin - I'm guessing it'll be best to use two part epoxy to glue together - but concerned about how stringy it can be. And I might need to pin the hand. How do I ensure I get the alignment I require when drilling for the pin - do I just use flexible wire and do some judicious bending once the holes are drilled?

How do I safely address seam lines and fill plugs? Can I sand them - how hazardous is resin dust?

More pictures, including a stock one of the completed figure, from the supplier's website.
20220409_082056.jpg

20220409_082103.jpg20220409_082244.jpg20220409_082306.jpgScreenshot_20220409-082525_Samsung Internet.jpg
20220409_082845.jpg
 

Attachments

  • 20220409_082845.jpg
    20220409_082845.jpg
    66.3 KB · Views: 0

Tim Marlow

Little blokes aficionado
SMF Supporter
Joined
Apr 27, 2018
Messages
16,820
Points
113
Location
Somerset
First Name
Tim
Love the look of him Paul. He is smaller than I expected as well….
I see lots of layer technique in your future LOL…..
As to working with resin, there are more experienced heads around than me, but I would follow this regime. Cover your bench in something like a sheet of newspaper to catch swarf, and wear a mask, while sanding (a disposable Covid type will be fine) and cleaning up the figure. When the dust producing stages are done, just fold the paper inwards to catch all the bits and throw it away. I would also throw the mask out. Once you’ve cleaned him up I would then wash him. For which glue to use during assembly, it depends upon how positive the joints are. It sounds like the hand is not that tightly engineered, so your wire idea is a good one. Copper cable from 1mm T &E off cuts would be useful for this.
Epoxy gives a much stronger joint than CA. CA works very well for positive joints, and epoxy is better for loose wobbly ones.
Once you have it aligned as you want, and can repeatedly assemble him as required, then CA should hold it in place. If you use epoxy, then blue tack may be needed to hold the alignment well enough while the glue sets.
The fez looks like it can be put together either using CA or epoxy, but again it depends how good the fit is as to wether the joint needs support. Personally I’d use epoxy and blue tack, mostly because you can fine tune the alignment while it dries. You won’t need much, so get ready, mix the glue, and do both joints at once. A trick I’ve used in the past for larger or heavier joints is to cover most of the joint with epoxy, but put a couple of spots of CA on to tack the part in place while the epoxy dries.
As to OSL, well I’m all eyes, and hoping to learn :smiling5:
 
Last edited:

Mickc1440

SMF Supporter
Joined
Apr 27, 2018
Messages
4,279
Points
113
Location
Sheffield
First Name
Mick
That’s a great looking little bust. Check out YouTube as there are some tutorials for OSL on there. I’ve seen some fantasy painters do some brilliant work using it. Good luck
 

Ian M

Administrator
Staff member
Administrator
Moderator
SMF Supporter
Joined
Dec 14, 2008
Messages
19,758
Points
113
Location
Falster, Denmark
First Name
Ian
Resin is nasty stuff. Use a razor saw to cut blocks off. Place the parts being cut on wet paper towels to hold the dust. Always wear a mask.
Use wet wet and dry to sand with.

A thick slow CA jell should hold him together.
 

PaulinKendal

SMF Supporter
Joined
Jul 13, 2021
Messages
1,072
Points
113
Location
The Lake District
First Name
Paul
Thanks for the encouragement and advice chaps. I think I'll go with epoxy, as it's certainly tougher than CA, and having bits fall off at a late stage is horrible.

The figures I've been painting so far come fully assembled, so I've got used to painting them like that, even though there are clearance issues at times. With this mini, I'm undecided as to whether I should assemble and then paint, or paint the separate parts then assemble afterwards. I think I'll attach the fez first, as it presents no issues in the painting stage that I can see.

But the hand... OSL will be easier to do if I can put my airbrush in the same position as that jewel, at least for when I'm setting up the initial light values. Leaving the hand off will also make painting the beard easier. But if I paint it all up first, I'll have gap-filling to do on that wrist joint, which will then need finishing with very careful blending into the paintwork already done. And it's in a prominent position, with gem-light illuminating the cuff...

Decisions, decisions - it's so much easier when the mini comes ready-assembled and you have no choice in the matter!
 
  • Haha
Reactions: JR

Tim Marlow

Little blokes aficionado
SMF Supporter
Joined
Apr 27, 2018
Messages
16,820
Points
113
Location
Somerset
First Name
Tim
I think your idea of a locating wire for the hand will make this bit much easier Paul. You may not need to do any filling, the area is pretty much in shadow, just see what it’s like first….
 

Steve Brodie

SMF Supporter
Joined
Sep 17, 2014
Messages
3,734
Points
113
Location
Shropshire
First Name
Steve
I’ve never had any bits fall off, ooh matron, using superglue. Have some excellent industrial stuff from Amazon.
Looks a great little bust, have fun
 

PaulinKendal

SMF Supporter
Joined
Jul 13, 2021
Messages
1,072
Points
113
Location
The Lake District
First Name
Paul
First try at two-source light mapping. I'm thinking of making the ambient light (from over his left shoulder) cool blue, and the gem-light a warmer yellow-green. These sketches are just to get a sense of where the two lights would fall, so the fact the colours are wrong doesn't matter - it's just so I can differentiate one from the other.
20220410_094723.jpg20220410_094729.jpgScreenshot_20220410-100200_Gallery.jpg

The end of his nose is ridiculously bright. It's a function of the light source I used - a highly directional torch shining upwards. The gem would cast light around itself more evenly - his beard would be as brightly-lit as his nose, for example.

There are definitely limitations in using a torch like this to analyse OSL - not just a case of slavishly following lightmap photos like these, clearly. But a useful starting point nonetheless.
 

Tim Marlow

Little blokes aficionado
SMF Supporter
Joined
Apr 27, 2018
Messages
16,820
Points
113
Location
Somerset
First Name
Tim
You could soften and diffuse the light source by putting some baking paper over the torch lens Paul. It should give more of the effect you are after. Loving the thought and idea, by the way…..
 

Tim Marlow

Little blokes aficionado
SMF Supporter
Joined
Apr 27, 2018
Messages
16,820
Points
113
Location
Somerset
First Name
Tim
This might be worth a look as well if you haven’t seen it..
 

PaulinKendal

SMF Supporter
Joined
Jul 13, 2021
Messages
1,072
Points
113
Location
The Lake District
First Name
Paul
This might be worth a look as well if you haven’t seen it..
Thanks for the link, Tim. I do like Mr Venturella's work generally (although I do wish he wouldn't say "M'kay?" quite so often) and I've found him frequently very helpful indeed. But I'm not sure this video is particularly helpful in this instance.

Here he's doing low-key and localised OSL, whereas I'm going for highly theatrical - no subtlety in the final effect (although I'm going to have to be very controlled with technique in achieving that high impact).

Vince says the best OSL is very, very subtle. I simply can't agree with that - the pictures of The Alchemist above surely indicate that OSL can be extremely unsubtle and still work very well indeed.

I also don't think it's helpful that Vince says OSL is extremely difficult - he says he's not trying to intimidate viewers or put them off, but you'll only start to get there with OSL after fifty attempts or so. If that's not offputting, I don't know what is!

I've watched lots of other YouTubers, and I try to learn something from them all (although there are wildly different techniques for achieving good OSL effects, and plenty of them are mutually exclusive, so they can't be mixed together - I'm going to have to decide on one approach or another).

I've found the following helpful - Squidmar Miniatures, NJM Marco Frisoni (worth the effort in getting your head around his accent), 52 Miniatures and Zumikito Miniatures.

For example, Marco explores bold, cinematic OSL here - this is the level of theatricality I'm after:


It's all grist to the mill, of course - even Vince Venturella!
 

Tim Marlow

Little blokes aficionado
SMF Supporter
Joined
Apr 27, 2018
Messages
16,820
Points
113
Location
Somerset
First Name
Tim
I always like the fact he tries to show why rather than just how…….but agree he can be off putting sometimes, as can virtually all the others LOL…..I’ll take a look at some of the others sometime. I’ve watched vids by most of those guys, but Frisoni is a new one to me.
Might be worth looking at actual paintings as well Paul…Rembrandt was pretty good at directional lighting techniques ;)
 

PaulinKendal

SMF Supporter
Joined
Jul 13, 2021
Messages
1,072
Points
113
Location
The Lake District
First Name
Paul
That's interesting, Tim. We were in Newcastle recently and I took a picture of some NMM in the Laing Gallery - just shows there's nothing new under the sun.
20220316_115732.jpg
It's called Hazel in Black and Gold, by Sir John Lavery. I think the thick pile velvet is amazingly realistic from normal viewing distance, and it's good to be able to see the deception up close.
20220316_115745.jpg
 

Tim Marlow

Little blokes aficionado
SMF Supporter
Joined
Apr 27, 2018
Messages
16,820
Points
113
Location
Somerset
First Name
Tim
It always amazes me how much great art is put together from just suggestion rather than actual detail. Not all of them though. I spent an afternoon in the national a couple of weeks ago. If you ever get a chance look at “the Arnolfini betrothal” by Van Eyck really really closely. The steward showed it to me in close up using his mobile to zoom in. The detail is simply staggering, it goes right down to single hairs on the chin…. Everything they do is pretty much NMM by the way, but they don’t have to worry about someone rotating the figure when they look at it LOL.
 

PaulinKendal

SMF Supporter
Joined
Jul 13, 2021
Messages
1,072
Points
113
Location
The Lake District
First Name
Paul
I'd agree there's plenty to learn from a trip around an art gallery.

It's funny how NMM is considered a wee bit 'edgy' among miniature painters, yet is, as you say, totally the norm on canvas. In fact, when you see true metallics on canvas (I'm thinking greek icons), THAT looks a bit out of the ordinary.
 

PaulinKendal

SMF Supporter
Joined
Jul 13, 2021
Messages
1,072
Points
113
Location
The Lake District
First Name
Paul
So, I've dealt with mould lines and bubbles, epoxied his fez on and primed him.
20220412_155122.jpg

Then I've done a 'zenithal' prime from two angles - above and behind his left shoulder, and upwards from the gem. The gem itself has been painted titanium white.
20220412_193539.jpg20220412_193520.jpg20220412_193529.jpg
Now, I've only ever used an airbrush to prime, zenithal prime and varnish before - never anything more. So from now on, this is entirely new territory for me.

I blocked in the main colours using inks or diluted paints, to maintain some degree of transparency. I then overlaid two inks to represent the two different light sources - a cool turquoise from above and behind, and light green from the gem. I then went back and forth, adding more white and more colour as necessary.

20220412_210426.jpg20220412_210430.jpg20220412_210448.jpg20220412_210519.jpg20220412_210525.jpg
At this stage it's very rough and ready. I've been amazed at how quickly the main colours go down with an airbrush, but I found it really nerve-wracking, as I had no idea what I was doing really.

I'm reasonably pleased with where I've got to so far, but it's obvious that you can't just rely on airbrushing to set up all the right tones. For example, his brows and his massive hooter cast deep shadows and, even though I've laid on white and light green really heavily there, they still aren't lit up as they should be. I'm going to have to lift the tone there even further when I switch to brushes.

It's been just a couple of hours airbrushing, but I'm completely knackered from concentrating so hard!
 

Attachments

  • 20220412_210422.jpg
    20220412_210422.jpg
    95.2 KB · Views: 1

Tim Marlow

Little blokes aficionado
SMF Supporter
Joined
Apr 27, 2018
Messages
16,820
Points
113
Location
Somerset
First Name
Tim
Certainly brought out the character in the sculpt Paul. Well worth all that hard work…..
 
Top