- Home
- Forums
- Civilian Vehicles
- Civilian vehicles Under Construction
- Civilian Trucks, Lorries, etc. under construction
You are using an out of date browser. It may not display this or other websites correctly.
You should upgrade or use an alternative browser.
You should upgrade or use an alternative browser.
Scania 770s 6X4 Tamiya R/C 1/14
- Thread starter Ian M
- Start date
So those spoons from yesterday... they got hit with some of this:
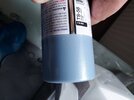
Which after careful examination in both natural light, and in the booth. looked like this.
Please see photo above!!! Hardly any difference at all. I had even sprayed it on a spoon with just the same primer, no primer (black spoons) Bronze and copper.
So I think I can say that was a waste of time, effort and paint.
Tried to save them with some clear blue over a la candy... A cool colour but not thedroid colour I was looking for.
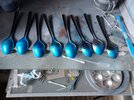
Left to right, primer only. Silver leaf. Gunmetal. Gold leaf. Titan silver. Bronze. Copper and black.
Conclusion TS pale blue pearl is opaque! Bugger.
I Think My plan now is either just paint it with the pale blue, as to if I do it directly over the primer of do it silver first... don't know.
Or I find another colour. Just plain old metallic (or Mica as it's now often called).
I did manage to find the Graphic I was looking for. scale it and print it. Just need to cut a mask or three.... lol
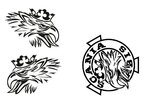
Disappointed of Denmark...

Which after careful examination in both natural light, and in the booth. looked like this.
Please see photo above!!! Hardly any difference at all. I had even sprayed it on a spoon with just the same primer, no primer (black spoons) Bronze and copper.
So I think I can say that was a waste of time, effort and paint.
Tried to save them with some clear blue over a la candy... A cool colour but not the

Left to right, primer only. Silver leaf. Gunmetal. Gold leaf. Titan silver. Bronze. Copper and black.
Conclusion TS pale blue pearl is opaque! Bugger.
I Think My plan now is either just paint it with the pale blue, as to if I do it directly over the primer of do it silver first... don't know.
Or I find another colour. Just plain old metallic (or Mica as it's now often called).
I did manage to find the Graphic I was looking for. scale it and print it. Just need to cut a mask or three.... lol

Disappointed of Denmark...
boatman
SMF Supporter
WELL Ian i think the colour looks nice
chrisb
chrisb
Andy T
SMF Supporter
A random idea if you are wanting the graphics to be subtle - how about spraying the vehicle in the blue pearl then create a negative mask from your design and spray it in a really light coat of the clear blue?
That was what I had in mind if I go for the option of the Pale blue pearl. I like subtle.A random idea if you are wanting the graphics to be subtle - how about spraying the vehicle in the blue pearl then create a negative mask from your design and spray it in a really light coat of the clear blue?
LOL I came to the laptop to write this and saw that I forgot to press send on the previous comment. Duh!
Anyhow:
I had one of my "Oh fork" moments:
One Pearl Baby Blue Scania 770.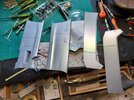
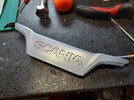
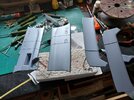
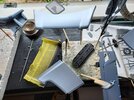
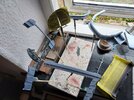
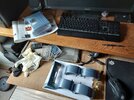
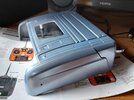
Not to shabby for me. Don't do shiny for a reason There is a cat hair and the odd bit of crud that has landed on the paint but overall it's even a bit shinny!!!
A day or two cure time and I will try to polish them out then a second coat ?
I might do the Griffon logo either in a clear blue or.... smoke ?
C&C welcome as always.
Anyhow:
I had one of my "Oh fork" moments:
One Pearl Baby Blue Scania 770.


Not to shabby for me. Don't do shiny for a reason
A day or two cure time and I will try to polish them out then a second coat ?
I might do the Griffon logo either in a clear blue or.... smoke ?
C&C welcome as always.
Jim R
SMF Supporter
Looks very good. Lots of experimenting and time and then a straight forward method is best. Ain't that often the way though.
Andy T
SMF Supporter
Looking good. Satin finishes are all the rage right now in real life but an absolute pain in the rear for us on the front line lol. The slightest imperfection and you're starting again..I might do the Griffon logo either in a clear blue or.... smoke ?
C&C welcome as always.
I'd be doing the graphics in gunmetal personally to tie everything together as a whole, but it's your choice and the smoke actually sounds like a good shout
thanksLooking good.....
That is so blindingly obvious. Good idea. I might just do that!I'd be doing the graphics in gunmetal personally to tie everything together as a whole,
Thanks Jim. Sometimes it's just best to jump on smack it's rump and hold tightLooks very good. Lots of experimenting and time and then a straight forward method is best. Ain't that often the way though.
Been turning the room up-side-down trying to find the door handles. Gone. Vanished. pretty sure I have painted them. Hope they turn up!
Anyhow:
I need some bench space for a GB build so I have been, purely for your entertainment, been putting bits together...
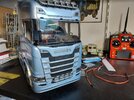
The three slots between the high cab and the windscreen are to hold the sun visor/toptrim. The Idea was that the top part is body colour, the bottom part black. For some odd reason I painted the bottom blue and the top black.
The paint is now drying. Annoyingly I had to start a new rattle can of pearl blue. I also just blasted it with the can. Hope it matches...
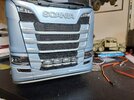
The three slots under the spotlights are position/marker lights for which you can get a working version of Still trying to find a set in EU. Found one shop In Japan that has (had?) them. I will be at the mercy of Flea-bay/wish/some other market site....
I did find numberplate lights though. No I did not buy them. Yet. LOL.
Oh My little driver figure arrived today. Looks far to slim and young to be a trucker! lol
Comments welcome.
Anyhow:
I need some bench space for a GB build so I have been, purely for your entertainment, been putting bits together...

The three slots between the high cab and the windscreen are to hold the sun visor/toptrim. The Idea was that the top part is body colour, the bottom part black. For some odd reason I painted the bottom blue and the top black.
The paint is now drying. Annoyingly I had to start a new rattle can of pearl blue. I also just blasted it with the can. Hope it matches...

The three slots under the spotlights are position/marker lights for which you can get a working version of Still trying to find a set in EU. Found one shop In Japan that has (had?) them. I will be at the mercy of Flea-bay/wish/some other market site....
I did find numberplate lights though. No I did not buy them. Yet. LOL.
Oh My little driver figure arrived today. Looks far to slim and young to be a trucker! lol
Comments welcome.
Yeah! I found the handles. They had fallen off the bench into the carrier bag I put the empty sprue in to take to the recycle ♻️ bin!
They where even still firmly stuck to the bamboo grill skuer with the white tac.
They where even still firmly stuck to the bamboo grill skuer with the white tac.
Which ones I found some....Didn't by any chance find two of the decals for my Zero while you were there Ian?
Pete
Anyone wondering, I have this on pause: Holiday/Hedge clipping and GBs in the way.
Not worthy of a before and after photo (OK I forgot) But I have spent an hour or two yesterday and three hours today faffing about with wire management* and a working hinge and catch for the cab tilt. Only problem is the seats prevent a full tilt so am now looking for a solution for fixing the seats to the tilting cab rather than the fixed floor.
*Wire management. As said this rig will be getting a full lights package, this involves a lot of wires. Individual LEDs all have two wires a common and a control. First step is to reduce the amount of wires. Five spot lamps and two dual lamps in the roof had 18 wires! 9 common and 9 control. The spot lamps all got grouped down to one common and one control, the auxiliary driving lights all got the commons tied in to the other new common and the remaining four control wires paired off innermost and outermost. 18 wires reduced to four. A common and three controls. As for the tail lights and main head lamps they each have about 6 controls plus a common. some of those; brake, driving, reversing lights can be paired left and right together, the rest will have to be singles.
Headlights the same. then there are side marker lights and some cool lights in the front grill and the side bars under the side panels... LOADS of wires to sort out yet!
Right now; coffee and interweb.
Right then after a quick look on t'interweb, I saw that the same people that do the tilt assemblies, Scaleclub, if you are so inclined, also sell a "multipurpose" 4 in 1 mount. Part of which is a new 'floor' to mount on the chassis and a new cab floor to mount in, errrrr the cab. £40 plus post. So I cut into a sheet of 2mm plastic card and after a bit of f'naglin' I ended up with this:
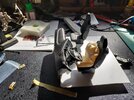
Bo the driver has been on the bottle and it totally legless. Again. I could maybe adjust the angle of where his knee joint is, (he is moulded this way by the way) or just leave it and put a disabled sticker in the windscreen.
I s'pose I better put his arms on, paint him and maybe even do a seat belt. Probably a great idea considering may last adventures in a tractor cab. lol.
Having done this once painted I will have much better access to this pile of spaghetti.
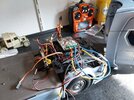 I might even find room for the receiver!
The clear box on top is the speed control unit that also controls all the lights and the sounds.
The spiral bound wires over the wheel at the bottom of the picture are from ONE head light!!!
Cheers. Comments welcome as always.

Bo the driver has been on the bottle and it totally legless. Again. I could maybe adjust the angle of where his knee joint is, (he is moulded this way by the way) or just leave it and put a disabled sticker in the windscreen.
I s'pose I better put his arms on, paint him and maybe even do a seat belt. Probably a great idea considering may last adventures in a tractor cab. lol.
Having done this once painted I will have much better access to this pile of spaghetti.
 I might even find room for the receiver!
The clear box on top is the speed control unit that also controls all the lights and the sounds.
The spiral bound wires over the wheel at the bottom of the picture are from ONE head light!!!
Cheers. Comments welcome as always.
Ended up makin a full interior, more or less. that got a couple of matt black.
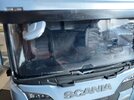
Bo the legless is primed. Might paint him one day.
Been taking an hour here and there sorting the wire madness. Most of it sorted so not to much more. Then its that RC unit.... yeah.
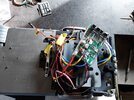
Yes this IS the tidy version. Without the cab floor and seats, there is a loot more room Some more wires have been bound up in spiral tube, some grouped to reduce the amount of wires. I have some lights that came from another place that needed resistors fitted, so they got soldered in whilst extending the wires. Yeah they work!
A question. Is anyone still looking in on this?

Bo the legless is primed. Might paint him one day.
Been taking an hour here and there sorting the wire madness. Most of it sorted so not to much more. Then its that RC unit.... yeah.

Yes this IS the tidy version. Without the cab floor and seats, there is a loot more room Some more wires have been bound up in spiral tube, some grouped to reduce the amount of wires. I have some lights that came from another place that needed resistors fitted, so they got soldered in whilst extending the wires. Yeah they work!
A question. Is anyone still looking in on this?

