Some questions please

Easyrider5258

SMF Supporter
Joined
Dec 31, 2023
Messages
64
Points
33
Location
Cambridgeshire
First Name
Mark
Hi, all Introduced my self at the end of last year as returning to modeling after some 38 years, all quiet since because I have been building my workspace and equipment as I had nothing to start the hobby

So far have re purposed an outbuilding which is dry and insulated and used for storage, added extra heating and an old PC and generally got it fit to work in.

What I brought so far is a iwata compressor and air brush, micro saw and knifes, sprue nippers a selection of vallejo paints about 15 including some primary colors some dirt paint Micro sol/set a cutting mat, assorted brushes, thinners, alcohol, foam for masking masking tapes including frog lots of other bits and pieces
YouTube has been handy to watch builds and techniques

Also stated building a stash all in 1/48th, a Spitfire /Tempest / focke wulf TA 152 and a P51 Mustang.

Questions about Glue and putty, have brought the thin glue but notice some are using super glue and / or pva, what / when are these used?
Have Surfacer spray 1500 and putty surfacer medium for bigger gaps what putty recommended
Notice some are using oils? hows that work over acrylic, and then over sprayed with your final varnishes acrylic again?
 
Last edited:

boatman

SMF Supporter
Joined
Nov 8, 2018
Messages
12,926
Points
113
Location
NORFOLK UK
First Name
christopher
HI Mark well i just use Super glue to glue the whole kit but the glue i buy has very fine tubes in the pack of 3 an for me this just right to get a nice thin line of glue to glue the part but i dry fit firstly then if ok then glue an its glued in seconds so no hangin around waiting for glue to go off but i now always wear safety glasses as its quite danergoues stuff if caught in the eyes or mouth hope this info helps you oh an i use car filler on the gaps as it sands down easy
chrisb
 

Easyrider5258

SMF Supporter
Joined
Dec 31, 2023
Messages
64
Points
33
Location
Cambridgeshire
First Name
Mark
HI Mark well i just use Super glue to glue the whole kit but the glue i buy has very fine tubes in the pack of 3 an for me this just right to get a nice thin line of glue to glue the part but i dry fit firstly then if ok then glue an its glued in seconds so no hangin around waiting for glue to go off but i now always wear safety glasses as its quite danergoues stuff if caught in the eyes or mouth hope this info helps you oh an i use car filler on the gaps as it sands down easy
chrisb
Do you not have problem positioning the part before the glue goes off? and how does it affect clear parts ?
 

Tim Marlow

Little blokes aficionado
SMF Supporter
Joined
Apr 27, 2018
Messages
16,785
Points
113
Location
Somerset
First Name
Tim
Superglue is useful for adding things like etch and painted parts to a build. I would just drop a tube into your shopping basket next time you go to a supermarket.
PVA can be useful for adding things like clear parts to a build. Solvent glues and CA (superglue) can fog or craze clear parts and PVA doesn’t. It can be slow acting so takes a bit of patience.
You might find a thicker plastic cement , like Revell Contacta useful for joints that need a modicum of gap filling.
The Surfacer mediums you mention are great for very small gaps and surface blemishes, but for larger gaps I would recommend something like Tamiya putty (if you can find it) or Mr white putty. If you can’t find those the Mig Ammo Arming putty classic is OK, though a little wetter than the others. I personally find acrylic putty’s not as good as these solvent based types.
Oils work just fine over acrylic paints, and personally I usually use them after varnishing leaching the oils out before use to give them a matter finish, but to be absolutely honest I’d get a couple of builds under your belt before you worry about them.
 

Mark1

SMF Supporter
Joined
Apr 17, 2021
Messages
3,556
Points
113
Location
South london
First Name
Mark
Hi, i generally just use superglue or pva for fixing photo etch parts and small parts that i have already painted, any excess of pva can be cleaned up with water and a cotton bud without affecting the painted surface.
 

boatman

SMF Supporter
Joined
Nov 8, 2018
Messages
12,926
Points
113
Location
NORFOLK UK
First Name
christopher
Do you not have problem positioning the part before the glue goes off? and how does it affect clear parts ?
WELL i think Tim has answered all what you have asked but regards the parts positioning with super glue i just make sure it in the correct postion with a couple of pratise tries before i i glue an press the part home but if you do this an get it wrong then there is the super glue debonder just put some of this on the jionts an leave for a while an then its possible to remove the wroned part an start again as thats how i do anyway hope this helps you mark
chrisb
 

Tim Marlow

Little blokes aficionado
SMF Supporter
Joined
Apr 27, 2018
Messages
16,785
Points
113
Location
Somerset
First Name
Tim
WELL i think Tim has answered all what you have asked but regards the parts positioning with super glue i just make sure it in the correct postion with a couple of pratise tries before i i glue an press the part home but if you do this an get it wrong then there is the super glue debonder just put some of this on the jionts an leave for a while an then its possible to remove the wroned part an start again as thats how i do anyway hope this helps you mark
chrisb
Gel type superglue has a little more “wriggle room”, not going off for about ten seconds or so.
 

boatman

SMF Supporter
Joined
Nov 8, 2018
Messages
12,926
Points
113
Location
NORFOLK UK
First Name
christopher
Regarding using superglue, can it effect paint applied over it?
WELL Mark i have not had any trouble regards that what you say just take a look at my hms tiger build as that had loads of super glue used an i painted that ok an no probs but again i suppoce it depends apon what paint you are usein but here a small pic of tiger an the paint looks fine an this is fairly big in 1/72 scale but all S/S is plasticard glued togeather with super glue IMG_8540.JPG
chrisb
 
Last edited:

rtfoe

SMF Supporter
Joined
Apr 29, 2018
Messages
7,512
Points
113
Location
Malaysia
First Name
Richard
Well Mark, you've got most of your questions answered. Mines not an answer but a caution...when using thin liquid cement, don't hold the part across the joint you are applying the cement to. You'll find your finger print etched onto the plastic from glue drawn by the capillary action of the thin glue. I used to panic when that happened but now just wait when it's dry and sand the smudge down.
You're lucky to have almost all the equipment at hand before starting. I remember having only a pair of scissors, nail clipper, the Airfix glue that came with the kit, mums saucer to dip the decals in and no paint at all. I had a few builds under my belt before progressing to where I am now...still learning and enjoying every minute of it.

Cheers,
Wabble
 

Ian M

Administrator
Staff member
Administrator
Moderator
SMF Supporter
Joined
Dec 14, 2008
Messages
19,732
Points
113
Location
Falster, Denmark
First Name
Ian
Lots of sound advice here Mark.
CA can be a burger at times, it likes clean, dry and oil free surfaces to work. Always have some ca de-bonder at hand. Not only good for unsticking fingers but also for removing traces of CA glue from where it shouldn't be.
 

Tim Marlow

Little blokes aficionado
SMF Supporter
Joined
Apr 27, 2018
Messages
16,785
Points
113
Location
Somerset
First Name
Tim
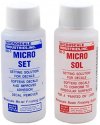
To answer a question that you may not know you need to ask yet…..these are decal setting solutions…there are others, but these are the ones I use.
E66010FE-7247-4EA7-8AD1-71E98FF2C6B8.jpeg
The blue one helps the decal slide around to get it in the right place. When the decal is dry, generously painting the red one on the surface of the decal will soften it and make it conform properly over things like rivets. You won’t need these immediately, but later on you will find them very worthwhile to keep on the shelf.
 

boatman

SMF Supporter
Joined
Nov 8, 2018
Messages
12,926
Points
113
Location
NORFOLK UK
First Name
christopher
To answer a question that you may not know you need to ask yet…..these are decal setting solutions…there are others, but these are the ones I use.
View attachment 500029
The blue one helps the decal slide around to get it in the right place. When the decal is dry, generously painting the red one on the surface of the decal will soften it and make it conform properly over things like rivets. You won’t need these immediately, but later on you will find them very worthwhile to keep on the shelf.
HI Tim where can i get the these for placement an for softenind decaals an how much ? as i think i will need some on the big jolly rogers decalls on my big tomcat ? an is there instruckions on the bottle to tell you how to use them ?
chris
 

Tim Marlow

Little blokes aficionado
SMF Supporter
Joined
Apr 27, 2018
Messages
16,785
Points
113
Location
Somerset
First Name
Tim
Hi Chris
John stocks them, but they are usually found in most model shops.
Not much to instruct really. I think it’s written on the bottle but I haven’t looked for years. I use a clean soft brush to apply them.

Paint the blue one on the model where the decals are going to go. Soak and place the decal as usual. The solution should make it easier to slide around. Press the decal down as normal when it’s where you want it And wick off any excess water with a scrap of tissue. Once it’s in place let it dry.

After that, paint a generous coat of the red one over the dry decal and leave it alone. The decal will go soft and swell, looking wrinkly, so don’t touch it or you will damage it. When the decal dries again (I leave them a couple of hours) it will shrink back down to size and the solution will draw it down over the surface details giving it a painted on look.
 

boatman

SMF Supporter
Joined
Nov 8, 2018
Messages
12,926
Points
113
Location
NORFOLK UK
First Name
christopher
Hi Chris
John stocks them, but they are usually found in most model shops.
Not much to instruct really. I think it’s written on the bottle but I haven’t looked for years. I use a clean soft brush to apply them.

Paint the blue one on the model where the decals are going to go. Soak and place the decal as usual. The solution should make it easier to slide around. Press the decal down as normal when it’s where you want it And wick off any excess water with a scrap of tissue. Once it’s in place let it dry.

After that, paint a generous coat of the red one over the dry decal and leave it alone. The decal will go soft and swell, looking wrinkly, so don’t touch it or you will damage it. When the decal dries again (I leave them a couple of hours) it will shrink back down to size and the solution will draw it down over the surface details giving it a painted on look.
COR CHEERS Tim for info as ive never used these
THANKS SIR
Chrisb
 
Top