Tamiya 1/12 Ducati Superleggera V4

PaulinKendal

SMF Supporter
Joined
Jul 13, 2021
Messages
1,059
Points
113
Location
The Lake District
First Name
Paul
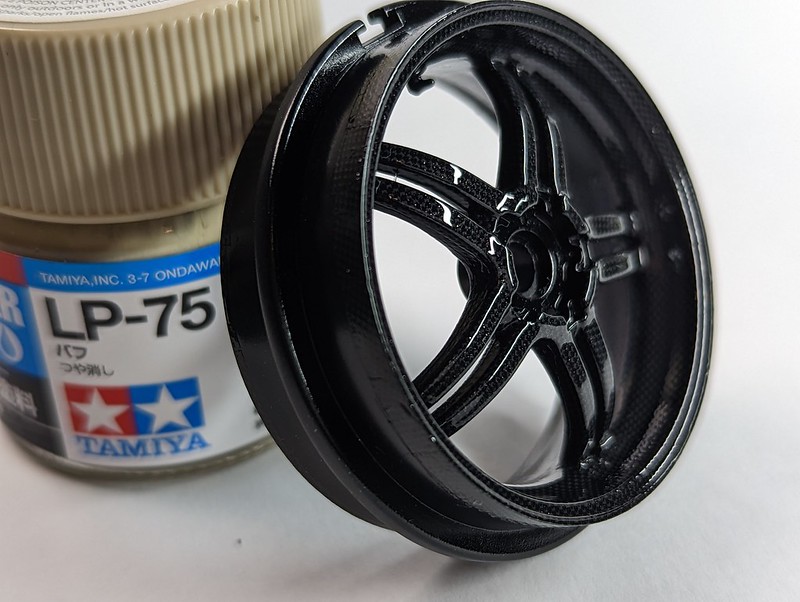
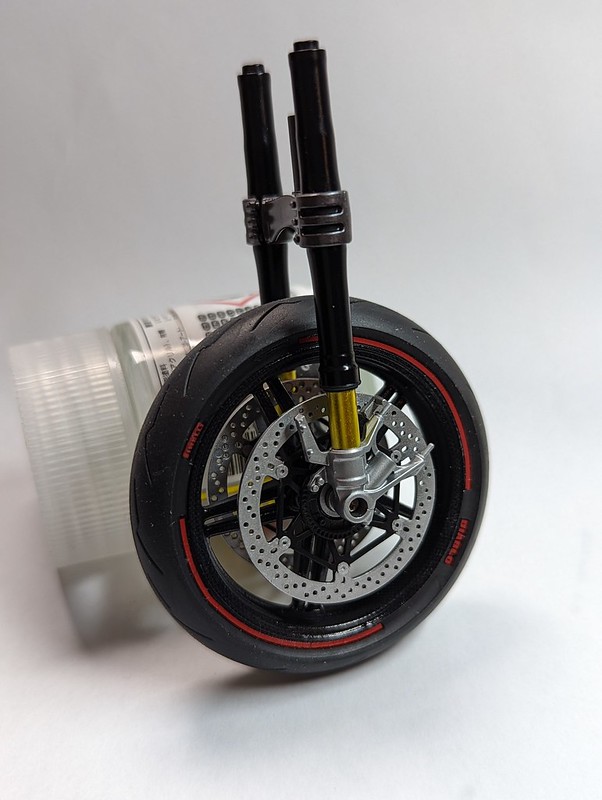
This is just amazing. The wheels looked superb already, but then you put on that amazing gloss coat - it looks flawless!

As an aside, do you think the mini heat guns would work in place of a hair-dryer to quick-dry acrylic paints?
 
Joined
Oct 17, 2022
Messages
49
Points
33
Location
Merseyside
First Name
Chris
Morning all. :smiling3:

Some weekend progress.

Back wheel CF'd and glossed.

52466902856_18acc75dd6_c.jpg


Swing arm completed.

52466902836_29c9a556f3_c.jpg


Exhaust built and painted.

52467181089_305066068e_c.jpg


And the detail painting done on the frame. This involved some tricky masking but came out OK.

52467363785_00ac8852a0_c.jpg


Next up is getting CF decals on the frame. I'm only going to cover the bits that will be seen, so to that end I've been cleaning up the various body panels so they can be test fitted to work out how far the decals need to go.

The details are insane!

Can I ask what’s your process when applying any washes? Are you clear coating before hand?

I’ve so much to learn!
 

Mr Bowcat

SMF Supporter
Joined
Dec 29, 2016
Messages
3,647
Points
113
Location
London
First Name
Bob
Cheers Chris. :smiling3:

It depends a lot on the paint finish. I mainly use Tamiya LP (lacquer) paints which tend to lay down very smoothly. The washes on this bike, and the decals, were all over bare paint. However, if I'm building a plane or AFV I do usually gloss first, mainly because panel lines tend to be way longer and it helps the wash to flow, or if using a clay wash the whole thing gets covered and it's easier to remove from where I don't want it.
 
Joined
Oct 17, 2022
Messages
49
Points
33
Location
Merseyside
First Name
Chris
Cheers Chris. :smiling3:

It depends a lot on the paint finish. I mainly use Tamiya LP (lacquer) paints which tend to lay down very smoothly. The washes on this bike, and the decals, were all over bare paint. However, if I'm building a plane or AFV I do usually gloss first, mainly because panel lines tend to be way longer and it helps the wash to flow, or if using a clay wash the whole thing gets covered and it's easier to remove from where I don't want it.

Looks great mate.

I’m using Tamiya acrylics and on bare paint the mig ammo enamel wash caused the paint to smudge when I tried to remove it after drying.

I’ve since bought some enamel thinner so hoping that will clean it up as I go.
 

Mr Bowcat

SMF Supporter
Joined
Dec 29, 2016
Messages
3,647
Points
113
Location
London
First Name
Bob
Yeah, I started out with Tamiya acrylics (still have a drawer full of them) but since moving to lacquers there's no going back. Far more durable, but they do smell a bit.
 

Mr Bowcat

SMF Supporter
Joined
Dec 29, 2016
Messages
3,647
Points
113
Location
London
First Name
Bob
Morning all. :smiling3:

More CF (yawn).

Got the frame covered where it will be seen, and a couple more of the covers, one for the rear part of the exhaust and another that fits on the underside of the frame at the front where the headlights go.

52476418099_e7e2258fc9_c.jpg


52476684113_402ab29167_c.jpg


With the frame done I was hoping to get the rear end together and fitted, however I'm waiting for some tyre decals from Italy. I tried painting the tyre stripes with acrylic paint (was worried about using lacquers on rubber). To this end I made some masks, but on removal peeled the paint straight off the tyre. :sad:
 

adt70hk

I know its a bit sad but I like quickbuild kits!!!
SMF Supporter
Joined
Sep 4, 2019
Messages
9,496
Points
113
First Name
Andrew
Simply amazing!! Very smooth paint finishes indeed!!

Keep up the great work.

Andrew
 

Mr Bowcat

SMF Supporter
Joined
Dec 29, 2016
Messages
3,647
Points
113
Location
London
First Name
Bob
Morning all. :smiling3:

I'd taken a break from this build, all of the CF decals had sapped my mojo. One of my modelling rules is know when to walk away from the bench, and this was one of those times.

I got back to it this weekend with yet more CF, but the break had done the job and I enjoyed it. I got to work on the back end of the bodywork which is several small parts, all of which needed some CF.

52498776651_7335a0f409_c.jpg


52498292547_2a412262d2_c.jpg


52499257125_785128efa0_c.jpg


52499257105_7b0799ab81_c.jpg


I also decided to put the radiator together. I've overdone the dry brushing on the fans, but as these will be facing in toward the engine I wanted to give the detail a chance to be seen.

52498292502_053dcbd53f_c.jpg


I'm still waiting for the wheel decals to arrive from Italy so I think I'm going to move on to the fairing next.
 

Mr Bowcat

SMF Supporter
Joined
Dec 29, 2016
Messages
3,647
Points
113
Location
London
First Name
Bob
Cheers Simon. To be fair it's not massively difficult, just takes a lot of time and patience.
 

simontie

SMF Supporter
Joined
Jan 13, 2010
Messages
997
Points
93
Location
Morayshire Scotland
First Name
simon
Morning all. :smiling3:

I had a lazy weekend so didn't do much modelling. I did gloss coat the body panels, and matt coat the parts with CF, but not worth a picture. Other than that I painted the shocks and got the front end put together.

52514155439_5f62b8a8ab_c.jpg
Are the fork DP or standard.
 

adt70hk

I know its a bit sad but I like quickbuild kits!!!
SMF Supporter
Joined
Sep 4, 2019
Messages
9,496
Points
113
First Name
Andrew
Bob,

That's coming on beautifully. Very well done indeed!!

ATB.

Andrew
 

Mr Bowcat

SMF Supporter
Joined
Dec 29, 2016
Messages
3,647
Points
113
Location
London
First Name
Bob
Cheers guys. :smiling3:

Simon, do you mean detail up part by DP? If so, then no, they are the kit plastic parts.
 
Top