Tamiya 1/24 Aston Martin D B S

Joined
Jan 3, 2015
Messages
588
Points
63
First Name
Marc
This is the next model ill be building over the next 5 months or so.


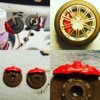
Made a start on the brakes. These are the carbon ceramic brakes so i mixed up some light grey metallic and airbrushed that on. And did a mist coat of matt black to simulate the carbon ceramic look.


The kit itself isnt as nice as the 300sl kit. Its still a nice kit though and im looking forward to spending many hours on this.

20151217_205619.jpg

20151217_210308.jpg

20151217_210316.jpg

20151217_210328.jpg

20151217_210336.jpg

20151217_210343.jpg

20151217_210410.jpg

20151217_210429.jpg

20151217_211932.jpg

20151217_215501.jpg

20151217_215512.jpg

20151217_231214.jpg
 

takeslousyphotos

No Tears Please. It's a Waste of Good Suffering.
Joined
Apr 14, 2013
Messages
4,295
Points
113
First Name
Peter
Good luck with this one Marc. I'm sure you'll make a Cracking Job of it......
 
Joined
Jan 3, 2015
Messages
588
Points
63
First Name
Marc
Brake discs are complete. Did a light dusting of tamiya oil stain onto the discs themselves to make them look more dusty.


I am running low on supplies so i have made a start on the kit. But need to get some paints and thinners etc

IMG_20151218_202003.jpg
 
Joined
Apr 7, 2012
Messages
3,118
Points
113
First Name
Adrian
I built this kit last year as part of the forums "I'm a TV Car" GB. Really enjoyed it but as I wasn't a car builder I made a few mistakes so its on my side bench in bits now waiting a revamp :smiling3:


Will watch with interest as to what you do :smiling3:


Adrian
 
Joined
Jan 3, 2015
Messages
588
Points
63
First Name
Marc
Thanks guys for your positive comments, this forum is awesome.


Some progress on the front suspension wishbones & steering rack. Added some black weathering powder on the wishbones to bring out the recesses and a small buff up.


Attached the wheels to protect the brake discs while in storage.

20151220_183631.jpg

20151220_200059.jpg

20151220_201627.jpg

20151220_201635.jpg

20151220_201655.jpg

20151220_203400.jpg
 
Last edited by a moderator:
Joined
Jan 3, 2015
Messages
588
Points
63
First Name
Marc
Did the inlet manifold this evening. Added some weathering to bring out the manifold a little. Otherwise its just going to look like a lump of white plastic for a toy car in my opinion and it just needed some real life injected into it.


I used zero paints white primer for the base colour, polished up with micromesh added a top coat of white primer and polished again. Then distressed the manifold with humbrol weathering black powder, this made the manifold go completely black and smudgy. Then under a running tap of warm water i apply toothpaste to clean of the excess black to leave detail in the gaps and recesses. Apply decals, add a spot of semi gloss over the badge. The air hoses were painted matt black and a dry brushing of semi gloss. The throttle bodies were painted silver aluminium, with some small amounts of tamiya oil stain brushed over to tone it down a little.

20151230_204210.jpg

20151230_235654.jpg

20151231_000422.jpg

20151231_000431.jpg

20151230_235214.jpg
 
Last edited by a moderator:

takeslousyphotos

No Tears Please. It's a Waste of Good Suffering.
Joined
Apr 14, 2013
Messages
4,295
Points
113
First Name
Peter
This is looking very very good Marc...... I'm going to have to tag along and watch this build.
 
R

roymattblack

Guest
Are you building it as -box, or convert it to RHD?


It's not a difficult conversion.


I did mine a few years back - the pics make the interior look pink but in reality it is Salmon and ox-blood - a genuine Aston scheme...


Roy.


P1010004_zpsijcuqmqz.jpg


post-2922-1280227928321_zps2vtsyvrx.jpg
 
Joined
Jan 3, 2015
Messages
588
Points
63
First Name
Marc
That looks great. I think as its a brittish car its got to be right hand drive. How did you convert it?
 
R

roymattblack

Guest
I've got some pics somewhere showing what I did.


I'll search them out and post them with a description...


All the best, Roy.
 
Top