You are using an out of date browser. It may not display this or other websites correctly.
You should upgrade or use an alternative browser.
You should upgrade or use an alternative browser.
Wingnut Wings 1/32 Halberstadt Cl.II (late)
- Thread starter Allen Dewire
- Start date
Neil Merryweather
SMF Supporter
Looking very sweet now Allen, heading for the home stretch maybe? 
I'll get my coat
I'll get my coat
Scratchbuilder
SMF Supporter
Yep!, did notice they even had to give away free tickets, and look how many turned upEvening good people,
The play goes on at the table and another full inspection of the fusi found no damage from yesterday's pre-flight...
Thanks my friend! All is back to normal today and the couple of Weizens last night did the trick to get me back in the groove...
Much appreciated Olderthanme! Happy to see you looking in on me, buddy. I hope your finger is healing up well and I see you are playing scratchy a little too...
Thanks Andy! I really thought it was the end of the line for this puppy and my meager attempts. I do have to finish it now, for sure...
Thanks too Jim! I was happy they worked out as good as they did. The oils had totally slipped my mind, and I have a lot of them. The clothespins are with rubber pads in them. That's why I bought them in the first place. Maybe it slipped off because of the oil wash on the cowling. I don't know and probably never will...
So. we painted up all the brass turnbuckles with black and finally glued the bridge in place over the cockpit. While letting it dry, I put a new piece of rigging in the tail to replace the one I broke off early in the build. I used the same method as the rigging for the cowling. A bit of round stretched sprue with the rigging end CA'd to it...
The kit has 2 clear parts in it. One is the fuel line gage on the top wing bridge and the other is the wind screen. After playing around, trying to find a way to affix it, I gave up. This Halberstadt is not going to have one, as it was shot up in a dogfight. End of the story!!!...
As I also mentioned earlier, the rigging from the cowling up to the bridge was going to be the hardest of them all. I would need at least 3-4 hands to do them. I made up a fusi thang holding tub so at least I could try it with 2 hands,
View attachment 480424
Just a foam piece, a supperware container and two weights to keep it from tipping over. Armed with 2 sets of tweezers, I went on with threading the line through the eyelets,
View attachment 480425
It was actually a lot easier than I thought it would be. Once they were threaded, I pulled them forward to the front and clipped the end with a red clamp (in the background), to make it taunt. With a flat shaved toothpick with a drop of CA on it, I attacked the eyelet from behind and coated the line and the eyelet. I did the same with the other side. All went well and is holding so far,
View attachment 480426
I just had to nip the excess line off carefully and Viola. The hard part was done!!! I do have to glue the fuel line end under the right wing to the fuel tank outlet, next to the strut eyelets. I then did a test fit of the landing gear assembly to see how everything would line up on the fusi thang,
View attachment 480427
It doesn't look too bad and the fit was good. I do need to do some paint touchups on the cowling and wing roots though. Then came a terrible shock from hell!!!
View attachment 480428
Damn, we were losing the match against Erfurt!!! There was still plenty of time and we still had a chance, but after 90 minutes, we lost 2-0.........
Heartbroken, I sadly went back to work at the table and did another test fit,
View attachment 480429
The wings are the heaviest parts on the Halberstadt and the landing gear assembly is the lightest......And it does wobble a bit. The wing rigging will have to be done with the plane upside down so the landing gear has no stress on it. Not a big deal, and I'll have to break out my larger wing thingy tub to do it, either way. Another pic,
View attachment 480431
I also glassed the wing compass with a big drop of M Krystal Klear. It's all looking up and in the right direction now. I removed the landing gear and put my baby to bed until tomorrow...
It's a holiday tomorrow, so work will continue as usual. Thanks again folks and enjoy the day off, if you have one...
Prost
Allen
 Stick to a real sport - raindrop racing...
There's an old saying, "If it wasn't for bad luck, I wouldn't have any luck at all".................
Feeling lucky yesterday, I decided to glue on the rear wing thing with the flappies and string it up. I didn't risk adding the steering fin at this point in the build. The stringing on the top side went well,
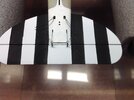
And the CA seems to being doing its job holding the ends, so I flipped her over to do the bottom side of the flappies. WTF!!!...The rigging pieces were about 5mm too short and didn't reach the eyelets on them!!! It's good that the Infini rigging stretches a lot and with patience and 2 tweezers, we came up with this,
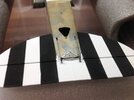
Once again, the Deluxe CA did its job and held them in place. I just need to do a bit of touchup painting to make it pretty. I fiddled around with some other things on her and put her back in the hanger for the evening. Today was another day and I had plans to really get going on this puppy. I took the kits I sold in evilbay to the post and sent them off. Came home to fire up the hissy stick and paint the 2 white stripes on the top wings next to the bridge. I have decals for them in the kit, but figured it would be better to spray them flat white and not have to mess around shooting a Matt coat on them later. So with 2 strips of AK tape and 1 little notepad paper on the tape, I masked the 1cm wide stripes on the wings. The papers were to cover the rest of the wing from overspray. Mixed up a small batch of Tamiya Flat White and IPA, 60 to 40 and gave them a good shot. I cleaned the AB and then went about carefully removing the masks to check my work. The first one came off ok, but the other one didn't come off ok. SUMBEATCH!!!,
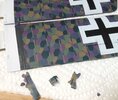
The damn AK tape, that normally doesn't stick too well, stuck too good...The loose pieces were very gently/carefully removed from the tape with a dull blade. I had to dab/scrape off the tape adhesive with the tip of my tweezers while trying not to bust up the decal even more. Was I upset???......Three swear jars full upset!!!...I also noticed the tape had peeled off a section of the Matt coat on the other wing, but didn't damage the decal. Now, how do I get these bits back on the wing was the big question. TET or thin CA? Not...I broke out the M Set, carefully placed and dabbed the big pieces on first. A Q-tip soaked off the excess and then I placed the tidbits on,
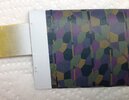
Ok, the damage isn't too bad and with a coat of Matt, should be ok. Then I found the missing bottom left piece and gave it the same treatment,
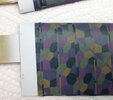 There are 2 little spots on the upper wing area that are missing, but the gray basecoat hides them ok. I let this dry for a bit and then brushed a coat of Matt over it and the area on the other wing. I'll let it dry and see how it looks. With a second coat, we should be back in business and I can drive on with the build. I really think I'm too old for this crap!!!...
So how was your day folks???...
Prost
Allen
I was just trying to be nice to the workin' folks Rick! Thanks Buddy, but the Halberstadt almost flew in the bin today. See below...Every day is a day off.......life's too short to be without one! Nice bit of "rigging" there Herr Dewire! You will now complete der Modelle!
Thank you Dr. Merryweather! The 'stretch' is near and no need for the coat my friend...Looking very sweet now Allen, heading for the home stretch maybe?
I'll get my coat
C'mon Olderthanme, it was a regional league match and even with free beer, they would only get about 2000 spectators in the stadium. I almost went back to my true sport today too! Watching the damn grass grow...Yep!, did notice they even had to give away free tickets, and look how many turned upStick to a real sport - raindrop racing...
Feeling lucky yesterday, I decided to glue on the rear wing thing with the flappies and string it up. I didn't risk adding the steering fin at this point in the build. The stringing on the top side went well,

And the CA seems to being doing its job holding the ends, so I flipped her over to do the bottom side of the flappies. WTF!!!...The rigging pieces were about 5mm too short and didn't reach the eyelets on them!!! It's good that the Infini rigging stretches a lot and with patience and 2 tweezers, we came up with this,

Once again, the Deluxe CA did its job and held them in place. I just need to do a bit of touchup painting to make it pretty. I fiddled around with some other things on her and put her back in the hanger for the evening. Today was another day and I had plans to really get going on this puppy. I took the kits I sold in evilbay to the post and sent them off. Came home to fire up the hissy stick and paint the 2 white stripes on the top wings next to the bridge. I have decals for them in the kit, but figured it would be better to spray them flat white and not have to mess around shooting a Matt coat on them later. So with 2 strips of AK tape and 1 little notepad paper on the tape, I masked the 1cm wide stripes on the wings. The papers were to cover the rest of the wing from overspray. Mixed up a small batch of Tamiya Flat White and IPA, 60 to 40 and gave them a good shot. I cleaned the AB and then went about carefully removing the masks to check my work. The first one came off ok, but the other one didn't come off ok. SUMBEATCH!!!,

The damn AK tape, that normally doesn't stick too well, stuck too good...The loose pieces were very gently/carefully removed from the tape with a dull blade. I had to dab/scrape off the tape adhesive with the tip of my tweezers while trying not to bust up the decal even more. Was I upset???......Three swear jars full upset!!!...I also noticed the tape had peeled off a section of the Matt coat on the other wing, but didn't damage the decal. Now, how do I get these bits back on the wing was the big question. TET or thin CA? Not...I broke out the M Set, carefully placed and dabbed the big pieces on first. A Q-tip soaked off the excess and then I placed the tidbits on,

Ok, the damage isn't too bad and with a coat of Matt, should be ok. Then I found the missing bottom left piece and gave it the same treatment,
 There are 2 little spots on the upper wing area that are missing, but the gray basecoat hides them ok. I let this dry for a bit and then brushed a coat of Matt over it and the area on the other wing. I'll let it dry and see how it looks. With a second coat, we should be back in business and I can drive on with the build. I really think I'm too old for this crap!!!...
So how was your day folks???...
Prost
Allen
scottie3158
SMF Supporter
Some great work going on here dude she is really looking the part.
Andy the Sheep
SMF Supporter
What does not kill you, make you stronger, Allen.
Glad the damage wasn't irretrievable and that your coronary arteries withstood the shock.
Glad the damage wasn't irretrievable and that your coronary arteries withstood the shock.
Born under a bad sign eh Allen……..looks like it’s sorted out though. Nice save.
Scratchbuilder
SMF Supporter
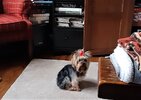
She will break your heart, become a daddies girl....Fine, first cuppa watching the new rescue Yorkie chase bunnys on the back lawn. First grooming result.
View attachment 480636
Here is my girl snoring - had to turn the tv up - her and SWMBO in cometition....zzzzzzzzzzz
Jim R
SMF Supporter
Greetings from the Halberstadt Aerodrome everyone,
Life goes on in the great war of nerves and progress must go forward, at all cost...First,
After decal-gate, I drove on and did (I hope) the last of the decals. There are little signs on the lower end of the wing struts, facing outwards. I laid out the struts in their order and put them on. Then brain fart #529 took over,
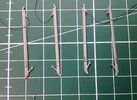
They are stenciled V, vorn or H, hinten (front or rear), and L and R. I studied the destructions for 30 minutes and laid them out in their respective positions. Applied the decals and then saw I screwed them up. The two on the left should have the decals on the other side. Too late to cry about it, so I hit them Set and Sol. I didn't want to risk trying to fix them...
I then decided to go ahead and mount the top wings. I had to use tweezers to pull down the rad pipe so I could get the wing in. The wing had a slot for the pin on the end of the pipe that fits into it. Ok, a bit more paint touchup on the pipe later. Wings glued on and time to see if the struts worked on the wings,
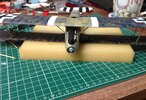 They aren't glued in place yet as this was just a test fit. They fit great and when glued, will be pretty stabile and withstand my rigging adventures (fingers & toes crossed),
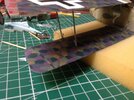
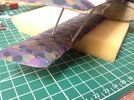
A view from the top,
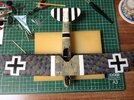
Happy with the results, it was time to finish the steering fin thing. I trimmed the pins and CA the 2 pieces together for strength against my rigging. I also don't like the standard fare of it being straight,
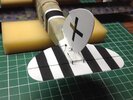
Just a test fit to ensure the pins fit into the fusi thang correctly. Another view,
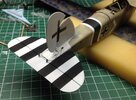
I just hope the CA holds when I begin the string thing with 2 per side...
I am once again having probs with blue screens on the laptop and I'm not sure how long she will run this time. Thank you all for looking in and your great comments (and pics). You guys are the best!!!...Maybe more tomorrow?...
Prost
Allen
Life goes on in the great war of nerves and progress must go forward, at all cost...First,
A cutie Paul and it must have been a blast watching her chasing rabbits that were probably bigger than she is...Fine, first cuppa watching the new rescue Yorkie chase bunnys on the back lawn. First grooming result.
View attachment 480636
Oh Bro!!! This build will either make me or break me to pieces. Thanks Paul and the show must go on...Some great work going on here dude she is really looking the part.
I'm not too sure about that Andrea. Yes, I got the decals pieced back together, and I hope to remain calm for the rest of this ordeal...What does not kill you, make you stronger, Allen.
Glad the damage wasn't irretrievable and that your coronary arteries withstood the shock.
You might be right Tim! I do have to admit getting the decals off of the AK tape went better than I thought it would. I just couldn't believe it stuck so well after my earlier dealings with it when it wouldn't stick...Born under a bad sign eh Allen……..looks like it’s sorted out though. Nice save.
Thanks Tony, but if I had been in the goal, we would have lost 10-0.......The repair did turn out rather well with the 2nd coat of Matt on them. 10 meter rule is in effect when looking at it though...Ouch ! Great save though allen ( pity you werent in goal for Halberstadt the other night ! )
Olderthanme, what did I tell you about posting self-portraits here!!! Some folks just don't listen...A real cutie though! Was she the cause of your injured finger, Mike???...She will break your heart, become a daddies girl....
Here is my girl snoring - had to turn the tv up - her and SWMBO in cometition....zzzzzzzzzzz
View attachment 480704
Honestly Jim, this build is like riding a rollercoaster at Disneyland. Luckily, I still have a few brain cells left to fix everything that might come later. Thanks for your support Sir...This build is certainly having plenty of ups and downs Allen. Luckily you seem to be fixing problems as they come up. Glad the rigging is going ok.
After decal-gate, I drove on and did (I hope) the last of the decals. There are little signs on the lower end of the wing struts, facing outwards. I laid out the struts in their order and put them on. Then brain fart #529 took over,

They are stenciled V, vorn or H, hinten (front or rear), and L and R. I studied the destructions for 30 minutes and laid them out in their respective positions. Applied the decals and then saw I screwed them up. The two on the left should have the decals on the other side. Too late to cry about it, so I hit them Set and Sol. I didn't want to risk trying to fix them...
I then decided to go ahead and mount the top wings. I had to use tweezers to pull down the rad pipe so I could get the wing in. The wing had a slot for the pin on the end of the pipe that fits into it. Ok, a bit more paint touchup on the pipe later. Wings glued on and time to see if the struts worked on the wings,
 They aren't glued in place yet as this was just a test fit. They fit great and when glued, will be pretty stabile and withstand my rigging adventures (fingers & toes crossed),

A view from the top,

Happy with the results, it was time to finish the steering fin thing. I trimmed the pins and CA the 2 pieces together for strength against my rigging. I also don't like the standard fare of it being straight,

Just a test fit to ensure the pins fit into the fusi thang correctly. Another view,

I just hope the CA holds when I begin the string thing with 2 per side...
I am once again having probs with blue screens on the laptop and I'm not sure how long she will run this time. Thank you all for looking in and your great comments (and pics). You guys are the best!!!...Maybe more tomorrow?...
Prost
Allen
Last edited:
- Joined
- Apr 28, 2018
- Messages
- 6,250
- Points
- 113
- First Name
- Bob
Tremendous work Allen, looks a lovely kit and plane!
This is looking soòo nice.
Seeing the paint job on the fuselage, I bet you could have done the wings as well.
Seeing the paint job on the fuselage, I bet you could have done the wings as well.
Hell's Bells Allen, you sure like living on the edge!! When I saw what you did to your B...1...R...D it even made my stomach turn.....just a little though. Good that you were able to save this beauty. Und now you Vill finish Der Flugzueg Machinen! 

Neil Merryweather
SMF Supporter
It's going to look simply stunning Allen!
Amazing work allen , loving watching this go together . Only problem is , I feel strange urges welling up inside me , making me want to build something with wires and lozenge patterns , I dont know how much longer I can hold it down !

