1/35 ChTZ 60 Stalinetz Tractor by Thunder Models.

Steve Jones

Steve Jones Scale Modelling Site
Joined
Apr 27, 2018
Messages
6,698
Points
113
Location
Plymouth
First Name
Steve
Now repeat after me Dude 2, I Love Miniart…...I Love Miniart.....

I don't know where Stevie is, but I have been lurking in the back, at the bar, waiting for the crowds. Remember to let them know that drinks aren't for free any more. We have a new saying too, "Show me the money".....Got to support my hobby somehow!!!!!!!!!!!

Oh, nice tractor ya got there too and what's all this noise about a square frame……..

Prost
Dude 1

PS, Don't worry Jim, that Black Russian is on the house!!!!

Up to my eyeballs organising my own bar at the moment. My youngest daughter is getting married on Saturday so it's a total mad house at the moment with family everywhere I look. Will catch up with you all next week when my life returns to some sort of normality
 

JR

Member of the Rabble and Pyromania Consultant
SMF Supporter
Joined
May 26, 2015
Messages
17,275
Points
113
Location
lincs
First Name
John
I’m in for this, Interested to see what you think of the thunder model kits, and how you get on with this.
Dom , this is what I meant by a Rabble build ! All ready and it's only page 1 and things are going hay wire!.

Evening Mr R,
I remember how complex the other dozer build you did was.
I see this looks to have a lot of fine delicate parts too!
Even with two good eyes, most of us would find it challenging so I tip my hat to you for taking this on:cool:
Great start though.....keep it coming :thumb2:
Thanks Si, fine parts indeed, lost 2 of those cylinder head tops on the bench, just disappeared into thin air after I removed them from the sprue with great care into a container ! Going to have to use CA on a lot of these small parts as the TET is too strong .

Evening JR , got to watch this one come together, I’m sure it will look brilliant
Hi Mick and thanks.

I remember your first ChTZ 61 build - I hope the tracks are a bit easier, on this, but I doubt it!
I'll keep an eye out for your posts..................
Dave
Dave , I hope this time as you had told me the method of track assembly after I asked for help , this time should be easier.:smiling2:

Now repeat after me Dude 2, I Love Miniart…...I Love Miniart.....

I don't know where Stevie is, but I have been lurking in the back, at the bar, waiting for the crowds. Remember to let them know that drinks aren't for free any more. We have a new saying too, "Show me the money".....Got to support my hobby somehow!!!!!!!!!!!

Oh, nice tractor ya got there too and what's all this noise about a square frame……..

Prost
Dude 1

PS, Don't worry Jim, that Black Russian is on the house!!!!
I love MiniArt, I love MiniArt, I do I do, and two with internals in the stash I had better !
It's the first time I've built anything with a frame and it's come out square , an omen I hope :nerd:.

Glad I haven't missed too much. Looks like a nicely detailed kit.
No Andy, not missed much so far it's been calm, and that's only in the front row. :smiling2:


Looks to be a very interesting set-up John - the figure set looks particularly nice (though I would say that).

Well Peter I have to agree with you, it does look a fine kit. Leads to a group of villages standing in awe as the tractor has been delivered to the farm.

:surprised:


Be extra careful with the scalpel John :smiling5:
:smiling2::smiling3: should have realised some one would pick that out !
Up to my eyeballs organising my own bar at the moment. My youngest daughter is getting married on Saturday so it's a total mad house at the moment with family everywhere I look. Will catch up with you all next week when my life returns to some sort of normality

Excuses about organising you own bar due to your daughter's wedding is I suppose acceptable in the circumstances. However is there a postal strike on as we have not received our invitations ?
When has your life ever been normal ! Or more to the point are you normal !:smiling3::smiling3::smiling3:
Wish your daughter all the best for a long and happy marriage Steve ..:blow-kiss:.

CA can also be a problem if he insists on this lack of attire. I know it has been warm but .......

.... rather extreme I think.
Jim
Yes Jim, the mere thought of CA on certain areas is worrying.

He will have his trusty apron. PaulE

Paul, I will indeed, and as a fellow convert you can vouch how good they are !.
 

JR

Member of the Rabble and Pyromania Consultant
SMF Supporter
Joined
May 26, 2015
Messages
17,275
Points
113
Location
lincs
First Name
John
We can only hope so Paul :smiling4:

:tongue-out3::smiling2:

John .

Well thank you for the interesting replies, proves a point though that someone does read the posts :smiling3:.

Got nothing done today, gardening all morning, another morning tomorrow but did get the flat roof prepped for a replacement coat of resin. The original coatings put on some 14 years ago had cracked on the top edge and the vertical sections below, so sanded back and feathered out the damaged area. Will wash with acetone before applying the resin coating on Thursday. Just need 2 hrs of dry weather after applying. Please pray ! For sun Thursday .
 

minitnkr

Rabble & escape committee member
SMF Supporter
Joined
Apr 27, 2018
Messages
6,717
Points
113
Location
Dayton, OH
First Name
Paul
Always follow your stuff John. This last freeze frame of flying bricks was truly amazing. PaulE
 

JR

Member of the Rabble and Pyromania Consultant
SMF Supporter
Joined
May 26, 2015
Messages
17,275
Points
113
Location
lincs
First Name
John
Always follow your stuff John. This last freeze frame of flying bricks was truly amazing. PaulE
Thanks Paul, that's very kind of you to say .
John,
making tracks is like root canal filling - you've done it before, and you know it has to be done - but each installment is as painful as the first!
Dave
Dave ,oh your so kind :smiling3:

John .
 

JR

Member of the Rabble and Pyromania Consultant
SMF Supporter
Joined
May 26, 2015
Messages
17,275
Points
113
Location
lincs
First Name
John
Started well ! ---------------;;;;-----------.
Some very small parts that were quite taxing
IMG_20190814_154936154.jpg

IMG_20190814_154946746.jpg

The above was hard to hold E10 and E11 while applying touch of TET. But was accomplished.
The. Started to fit the engine to the frame.
IMG_20190814_181945148.jpg

The fan assy just doesn't line up it's far to high, so cut it off and glued if direct into the rad . At some point I will attempt to fit a small length of wire to join it up the the engine.
Although the front of the sump is angled it fits well on the cross bar, the rear of the engine fit perfectly into the
gearbox. You would think that would be perfect

IMG_20190814_182045283.jpg

After all this work the damned frame is twisted, can't understand why, the engine fitted into the
15658051866888183709349441674446.jpg


the marked area, so don't understand why it's twisted.
If it still looks odd it will have to end up as a wreak in a ditch with the villages standing around .
Oh well. I'll carry on tomorrow.:cold-sweat:
 

Attachments

  • IMG_20190814_161656839.jpg
    IMG_20190814_161656839.jpg
    68.4 KB · Views: 12
  • IMG_20190814_182031214.jpg
    IMG_20190814_182031214.jpg
    99.4 KB · Views: 12

scottie3158

SMF Supporter
Joined
Apr 27, 2018
Messages
12,694
Points
113
Location
Spalding
First Name
Paul
John,
Sorry to hear about your troubles with this. Are there any large components to be fitted that will bring it back into shape?
 
  • Like
Reactions: JR
D

Deleted member 6559

Guest
Oooh, that looks painful John. I know you won't give up on it though, so good luck.

By, the way, I've found Miniart's 1/35 figures to be pretty good - no relation at all to their 1/16 offerings.
 

JR

Member of the Rabble and Pyromania Consultant
SMF Supporter
Joined
May 26, 2015
Messages
17,275
Points
113
Location
lincs
First Name
John
John,
Sorry to hear about your troubles with this. Are there any large components to be fitted that will bring it back into shape?
Hi Paul, about an HR after posting I twisted the rad and front end into a better line. Definitely something I'm doing and not the model. The strange thing about this is the way that the engine just linned up so well when it was connected to the gearbox. Decided to press on and build up the under side and leave the top side until last. When I start to fit the running gear I might be able to apply some weight to that and coax the frame. All good fun !

Oooh, that looks painful John. I know you won't give up on it though, so good luck.

By, the way, I've found Miniart's 1/35 figures to be pretty good - no relation at all to their 1/16 offerings.
Thanks Peter, so annoyed as I've read and reread the instructions. Refreshing to hear that the MiniArt figures are ok .:thumb2:


Flat resin roof to repair first thing, all ready and sanded back , just have to give a wipe over with the acetone, mix up the resin, add the catalyst at a mere 2 % and apply. 2 hrs of dry weather a must !
Then back to the model .
 

Jim R

SMF Supporter
Joined
Apr 27, 2018
Messages
13,726
Points
113
Location
Shropshire
First Name
Jim
Hi John
You'll sort that twist I'm sure. As you say a bit of pressure when fitting other parts may well pull it back square.
Enjoy your roof mending.
Jim
 

JR

Member of the Rabble and Pyromania Consultant
SMF Supporter
Joined
May 26, 2015
Messages
17,275
Points
113
Location
lincs
First Name
John
Hi John
You'll sort that twist I'm sure. As you say a bit of pressure when fitting other parts may well pull it back square.
Enjoy your roof mending.
Jim
Hi Jim, in the cold light of day its not looking too bad, I did give it a twist, surprisingly nothing broke or flew off.
Roof edges went well thank you, just had to wait for the sun as it kept cloudling over this morning.
Progress is being made on the rollers and idler wheels, only one error so far ! by THUNDER , incorrect sprue given , of course the parts on the one I was looking at had been used, clue I thought, soon found the correct sprue.
Photos later, can't down load onto this pc as the memory is full . !!!:cold-sweat:

John.
 
Last edited:

rtfoe

SMF Supporter
Joined
Apr 29, 2018
Messages
7,509
Points
113
Location
Malaysia
First Name
Richard
You're doing great John...the fact that building started on page one means things are slightly in order.

I remember Tim's builds only started on page ten and most of the time he'd be in his PJ's walking around sounding like mexican maracas pockets full of paint jars jiggling being agitatedly stirred. You'd think he was serving tea when he brought his tray out... ala work table. :tears-of-joy:

Feels like the Ritz (Tea & Cakes) with a casino crap table crowd going on in the background at your builds. Rabble all present and accounted for. No flashing...gonna be a smooth ride...watch out for that scalpel!!!:smiling6:

Cheers,
Richard
 

JR

Member of the Rabble and Pyromania Consultant
SMF Supporter
Joined
May 26, 2015
Messages
17,275
Points
113
Location
lincs
First Name
John
You're doing great John...the fact that building started on page one means things are slightly in order.

I remember Tim's builds only started on page ten and most of the time he'd be in his PJ's walking around sounding like mexican maracas pockets full of paint jars jiggling being agitatedly stirred. You'd think he was serving tea when he brought his tray out... ala work table. :tears-of-joy:

Feels like the Ritz (Tea & Cakes) with a casino crap table crowd going on in the background at your builds. Rabble all present and accounted for. No flashing...gonna be a smooth ride...watch out for that scalpel!!!:smiling6:

Cheers,
Richard
Thanks Richard. Coming to the conclusion that I'll never be a clean modeller no matter what I do there is always glue marks on my builds. If I use a smaller brush then I do not get enough glue on and bits drop off, then I apply far too much and it runs everywhere.
No good bothering about it. Some of these parts are so small the even the slightest glue melts them.
I've removed 10 u bolts in plastic from the rollers going to make copper replacements , seem to remember doing this on the ChTZ 61, which had a very similar drive train.
Bit of mud and no one will be the wiser !
John .
 

JR

Member of the Rabble and Pyromania Consultant
SMF Supporter
Joined
May 26, 2015
Messages
17,275
Points
113
Location
lincs
First Name
John
Afternoon all .
Here at Race Towers the battle continues, sorry to say although I rate this kit highly there are some parts that I just cannot do. The kit is far better than I am as a modeller.

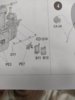
Although there are some missed No's on sprues, which is so simple to proof read in the beginning for Thunder as you can spend time looking for the parts, esp when looking at the sprue in question you see the parts have already being used. Then you question if you have used the wrong parts some where else.:worried:

I think the main problem is the size of some of the parts for me, , less than a mm think and 6mm long, and of course very thin. For example some u bolts.
IMG_20190815_104139095.jpg

Now these go above D15 and fit over the end of the shafts.
IMG_20190815_122759268.jpg

IMG_20190815_104203585.jpg:smiling:

Well I tried to fit, looked worse when Id finished so cut them off. I remember on the S61 I actually made them out of wire, but have decided not to bother.

IMG_20190816_141849626.jpg

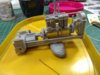
Nice sub assembly of the foot plate.

IMG_20190816_141933898.jpg

Bit out of focus , that's a a rather too close up of the fitted plate. The small hole at the centre of the photo was so tight aIMG_20190816_143608921.jpg
Diamond file was used to open it, now not many parts had to be cleaned up, but with such small locating pins problems soon came to light .
IMG_20190817_144143623.jpg

:anguished:
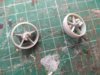
The front idler wheel caused a lot of trouble . IMG_20190816_160129212.jpg

Part C36 being the problem, those pins I could hardly see and there was no feel as you attempted to fit . Once glued on the slot the stepped part was supposed to slide onto the frame.:confused:
Well they just didn't , the gap was too small , in the end I hacked them and half the outer rim of the wheel and just glued the wheel in place.

As for the tracks................................ great ! loved them. OH NO YOU DIDN'T I HEAR YOU SHOUT, OH YES I DID.

IMG_20190817_144119839_BURST005.jpg

Made up from 3 parts, I glued the right hand part on first, had to drill 5 holes including one in one of the right hand part.
Once all the drilling was done it was a matter of gluing all the right hand parts with the hole and when fully dry the left hand fitted easily into the pin hole and then into the two holes in the plate. So good was this that you good feel and hear a click as the pins engaged.

IMG_20190817_144100726.jpg

IMG_20190817_144050310.jpg
Ok not the cleanest look track but they are together.

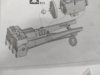
It ends up looking like this.

IMG_20190817_144201372_BURST001.jpg

Yes there's a good gap, try as I may it just didn't want to join up , even with CA. Will I use filler, no can't be arsed !!!! sorry.

IMG_20190817_144153637_BURST001.jpg

Still have that twist, and nothing I can do the get it any better.

IMG_20190817_144143623.jpg


IMG_20190817_144134092_BURST001.jpg

I messed up the front PE name to the rad, the PE should have also gone around the fuel tank, but they showed that going on after the tank was fitted, no way could I get the PE round when it was fitted. There is supposed to be some cross angled parts running from top left to bottom right and vise versa. Just too much for me, so might fit some plastic strip of the same angle if the sixe is near.
I've left off several other bit which will be fitted when the tracks are on. Oh the rad fan was completely out of alignment if fitted onto the engine, so stuck it on the the centre of the rad, need to insert a section of wire.

Not too dejected, tried to do more than I'm capable of, better suited to wreaks and buildings I think .

Comments by al means. Just want to get it finished, hope there are enough track parts with moving the wheel, and get on with the dio .

John.
 

Attachments

  • IMG_20190814_185322202.jpg
    IMG_20190814_185322202.jpg
    73.7 KB · Views: 4
  • IMG_20190815_180818418.jpg
    IMG_20190815_180818418.jpg
    156.3 KB · Views: 4

scottie3158

SMF Supporter
Joined
Apr 27, 2018
Messages
12,694
Points
113
Location
Spalding
First Name
Paul
John,
Sorry to hear about your woes. I have only built one thunder model and It was a pig, beautifully detailed but 10 tiny pieces to make one part. Well done for sticking with it. Once the paint is on it will look a whole lot better.
 
Top