You are using an out of date browser. It may not display this or other websites correctly.
You should upgrade or use an alternative browser.
You should upgrade or use an alternative browser.
Sd.Kfz. 7 half-track, post-war
- Thread starter Jakko
- Start date
- Joined
- Apr 28, 2018
- Messages
- 10,954
- Points
- 113
- First Name
- Jakko
Thanks 
Another thing I needed to do was finish the roadwheels. Since the outer row of them had been nicked, the question is: what is visible then? Well, this:
 (source: Panzer Colours 2)
From the inside out, there’s a round thing sitting on a hexagonal thing, then a ring around them and finally seven bolts, two of which are not spaced evenly because the flange on the axle has a flat side to it. Now to try and build all that …

On the left is a Dragon inner roadwheel, in the centre is one that has had its axle lengthened with one sawed off the outer wheel, and on the right is one with the hub as I built it.
The flange is a slice sawed from a piece of 5 mm plastic rod, largely because my largest punch is 3.9 mm and I couldn’t find anything else of the 5 mm diameter that the flange is in 1:35 scale. I then cut off one side and drilled seven holes around the circumference, using a template I made on my computer and printed out: a 5 mm circle with seven lines radiating from the centre at the right places for the holes.
Into those holes, I glued bits of 0.5 mm plastic rod to represent the bolts, while the ring is a part from an old Italeri kit (intended to have turning wheels on a tank kit) which I drilled out to 2 mm inner diameter. The bits inside were punched from plastic card, a 1.25 mm hexagon of 0.25 mm thick and an 0.8 mm round bit of 0.5 mm card. All I need to do now is make five more like that
(This was attempt No. 2, by the way. The first try was glueing punched bolts around the circumference, but that was so hard to do well that drilling holes and glueing rod into them proved a good deal easier and quicker.)
Another thing I needed to do was finish the roadwheels. Since the outer row of them had been nicked, the question is: what is visible then? Well, this:
(source: Panzer Colours 2)From the inside out, there’s a round thing sitting on a hexagonal thing, then a ring around them and finally seven bolts, two of which are not spaced evenly because the flange on the axle has a flat side to it. Now to try and build all that …
On the left is a Dragon inner roadwheel, in the centre is one that has had its axle lengthened with one sawed off the outer wheel, and on the right is one with the hub as I built it.
The flange is a slice sawed from a piece of 5 mm plastic rod, largely because my largest punch is 3.9 mm and I couldn’t find anything else of the 5 mm diameter that the flange is in 1:35 scale. I then cut off one side and drilled seven holes around the circumference, using a template I made on my computer and printed out: a 5 mm circle with seven lines radiating from the centre at the right places for the holes.
Into those holes, I glued bits of 0.5 mm plastic rod to represent the bolts, while the ring is a part from an old Italeri kit (intended to have turning wheels on a tank kit) which I drilled out to 2 mm inner diameter. The bits inside were punched from plastic card, a 1.25 mm hexagon of 0.25 mm thick and an 0.8 mm round bit of 0.5 mm card. All I need to do now is make five more like that
(This was attempt No. 2, by the way. The first try was glueing punched bolts around the circumference, but that was so hard to do well that drilling holes and glueing rod into them proved a good deal easier and quicker.)
- Joined
- Apr 28, 2018
- Messages
- 10,954
- Points
- 113
- First Name
- Jakko
Finally got all the wheels done:

The drive wheels got an etched part (supplied in the kit) added to the hubs for the antislip plate that was n them, and I thinned the plastic tube-thing that was on them so it isn’t as obvious — the real thing was just a piece of antislip plate bent into a circle and welded to the hub.
Those roadwheel hubs with their seven bolts each were not a greatly fun job, so I took them one wheel at a time and split them up between doing other stuff. Like working on the engine:

I added the fuel feed line to the carburettor, figuring that would still be there even if the carburettor itself wasn’t. Also the hose through which the spark plug leads ran, and the plate that would have sat over the plugs on the side of the engine. I still need to figure out what I can use for the actual spark plug leads that would come out of this and also hang loose with the thing half-disassembled like this. Oh, and more cables and stuff still need to be added elsewhere too, unfortunately.
The drive wheels got an etched part (supplied in the kit) added to the hubs for the antislip plate that was n them, and I thinned the plastic tube-thing that was on them so it isn’t as obvious — the real thing was just a piece of antislip plate bent into a circle and welded to the hub.
Those roadwheel hubs with their seven bolts each were not a greatly fun job, so I took them one wheel at a time and split them up between doing other stuff. Like working on the engine:
I added the fuel feed line to the carburettor, figuring that would still be there even if the carburettor itself wasn’t. Also the hose through which the spark plug leads ran, and the plate that would have sat over the plugs on the side of the engine. I still need to figure out what I can use for the actual spark plug leads that would come out of this and also hang loose with the thing half-disassembled like this. Oh, and more cables and stuff still need to be added elsewhere too, unfortunately.
Jim R
SMF Supporter
Ten out of ten for finding and interpreting that old photo. Same score for the inventive build 

Engine is looking good but it's gonna need an expensive rebuild to get it running
Jim
Engine is looking good but it's gonna need an expensive rebuild to get it running
Jim
scottie3158
SMF Supporter
Jakko,
Excellent attention to detail.
Excellent attention to detail.
- Joined
- Apr 28, 2018
- Messages
- 10,954
- Points
- 113
- First Name
- Jakko
Thanks, all
It was mostly the flat side that puzzled me, until I noticed that was also on the kit part for the outer wheel. The photo above then showed me I needed to make these things a lot more complicated than I had expected (so what else is new?).
It was actually a combination of that photo, the pictures in the Nuts & Bolts and Wings & Wheels books on the Sd.Kfz. 7 (which only show the assembled suspension) and looking at the kit partsTen out of ten for finding and interpreting that old photo. Same score for the inventive build
It was mostly the flat side that puzzled me, until I noticed that was also on the kit part for the outer wheel. The photo above then showed me I needed to make these things a lot more complicated than I had expected (so what else is new?).Somehow, I suspect that never happened before the scrap metal merchant took the remains awayEngine is looking good but it's gonna need an expensive rebuild to get it running
Great detail interpretation there, and even better work to replicate it. Top job Jakko.
therapy
SMF Supporter
Amazing perseverance with the wheels Jakko.
Nick
Nick
Excellent work Jakko.
I have a question; How the hell did they steal the tyres off the wheels? Surely it would have been easier to knick the whole wheel!?
- Joined
- Apr 28, 2018
- Messages
- 10,954
- Points
- 113
- First Name
- Jakko
Thanks, all, though I think the work could have been done more neatly. Just not by me ")
They did liberate the whole wheels. The Sd.Kfz. 7 has four rows of roadwheels on each side: an outer row on the even-numbered axles, two rows on the odd-numbered ones, and then an inner row on the even ones again. On the stripped vehicle, the outer row was missing. My guess is they ended up under someone’s cart.I have a question; How the hell did they steal the tyres off the wheels? Surely it would have been easier to knick the whole wheel!?
Get to the mad part ! Your way past that Jakko. Love the way you use a photo and really represent this in scale . That's a great way to model true life like you do.On the right side of the engine, below the ports for the spark plugs, the real engine has a sharp ledge that the sheet metal cover sits against. To make it, I carefully sawed a slot through the inlet pipes and glued in a piece of plastic strip:
View attachment 443805
And I also drilled holes for the spark plugs themselves, making it clearer (I hope) that there are parts missing here. The mounting for the carburettor is also in place, but I cut the carburettor itself off and drilled two holes into the top of the mounting (not visible here) as the inlet pipes.
Now, I mentioned to Mr. Race that I needed to finish this before I would get to the mad part …
View attachment 443806
If you look very closely at the first photo of the real vehicle I posted, you may notice that the valve cover is missing. I’m puzzled about the reason for this, as in the earlier picture (where the front is on bricks) it’s still in place, but because it’s missing in the picture I’m using as a guide, I need to build the valve mechanism …
I began by cutting the top out of the engine. Dragon has the valve cover as a separate piece, but the top of the engine below it as a flat plate, which I cut out before glueing the two engine halves together. Then I put in a piece of plastic card as the top of the cylinder head, a cog from a punched disc with teeth sawn into it, a camshaft and various other bits I could see in a photo of a disassembled, real engine on page 80 of the Nuts & Bolts book about the Sd.Kfz. 7.
The holes are for pieces of plastic rod that will represent the valve stems and springs:
View attachment 443807
This picture also shows the shafts for the rocker arms and more pieces of plastic strip between them to fill the gap.
Now to find a way to build the rocker arms themselves …
But you are Mad

- Joined
- Apr 28, 2018
- Messages
- 10,954
- Points
- 113
- First Name
- Jakko
There’s a lot of satisfaction in building a model of an actual vehicle, I think. But there’s also the down side that once you’re done, you will start seeing things you missed …Love the way you use a photo and really represent this in scale . That's a great way to model true life like you do.
Oh, I have been for a long time. There’s no cure, you knowBut you are Mad
You've done a splendid job , a pleasure to follow .There’s a lot of satisfaction in building a model of an actual vehicle, I think. But there’s also the down side that once you’re done, you will start seeing things you missed …
Oh, I have been for a long time. There’s no cure, you know
Sorry I did not make myself clear. lol I was referring to the front wheels where the actual wheel is there, good job on the rims by the way, but they have made off with just the tyres...They did liberate the whole wheels.
- Joined
- Apr 28, 2018
- Messages
- 10,954
- Points
- 113
- First Name
- Jakko
Ah, sorry, misunderstood because I had been working on the roadwheels for the track I don’t quite get that bit either, but the third photo I posted is clearly earlier than the other two (the outer road), yet the rims are off the wheels while they are back on in the later ones. Somebody must have seen a use for the tyres but not the whole wheels, so perhaps they fit a pre-war lorry or something, but then why re-install the rims on the spokes? For that matter, why remove the bricks from under the front axle? It’s not like there was a shortage of those, given what this part of town looked like about five years earlier:
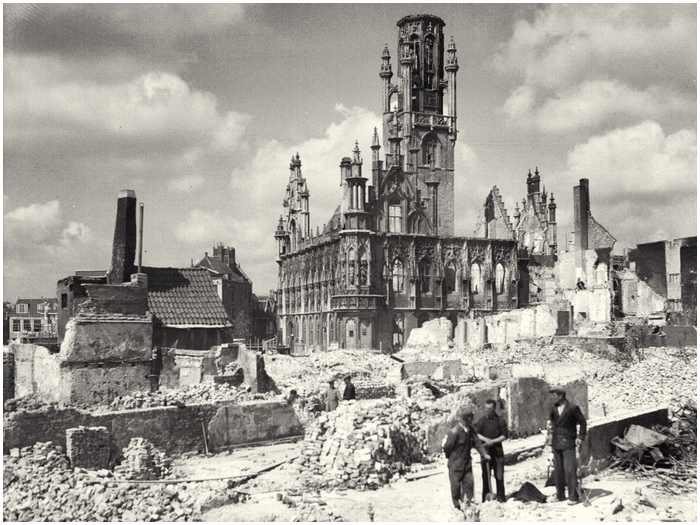 (source)
The spot where the Sd.Kfz. 7 stood is probably a bit to the left of the photo here, as it was taken from behind what is the line of new buildings visible on the right in the post-war photos of the Sd.Kfz. 7 at the start of this thread.
And the same area on 7 November 1944:
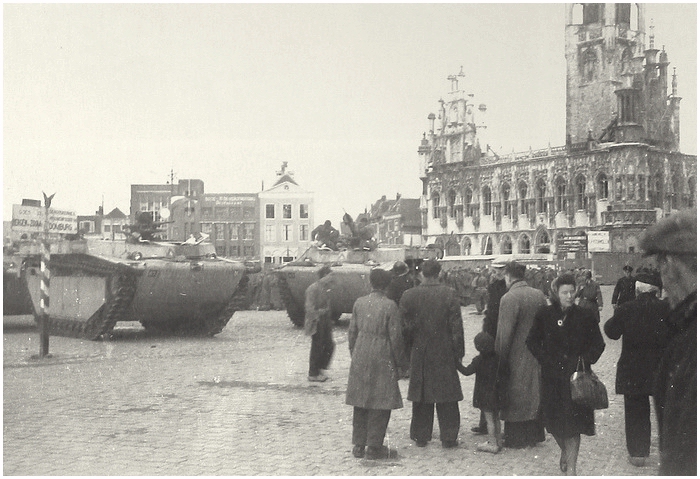 (source)
The LVTs are approximately in the same spot as the Sd.Kfz. 7. The mass of soldiers in the background are German POWs.
I don’t quite get that bit either, but the third photo I posted is clearly earlier than the other two (the outer road), yet the rims are off the wheels while they are back on in the later ones. Somebody must have seen a use for the tyres but not the whole wheels, so perhaps they fit a pre-war lorry or something, but then why re-install the rims on the spokes? For that matter, why remove the bricks from under the front axle? It’s not like there was a shortage of those, given what this part of town looked like about five years earlier:
The spot where the Sd.Kfz. 7 stood is probably a bit to the left of the photo here, as it was taken from behind what is the line of new buildings visible on the right in the post-war photos of the Sd.Kfz. 7 at the start of this thread.
And the same area on 7 November 1944:
The LVTs are approximately in the same spot as the Sd.Kfz. 7. The mass of soldiers in the background are German POWs.
Isitme
SMF Supporter
- Joined
- Nov 2, 2020
- Messages
- 707
- Points
- 93
- First Name
- Mike
Jakko,
Sorry for the late arrival to this remarkable build.
I have enjoyed your journey through the trials and tribulations and seen you come out of them successful.
I agree with you about modelling the real item and then seeing the things that are missed or could have been done better or another way.
Keep going, you are near the end and do not worry about sanity - sanity claus comes once a year....
Cheers, Mike.