1/250 USS St Louis ( CL-20 ) my first 3D printed model

Dave Ward

Still Trying New Things
SMF Supporter
Joined
Apr 27, 2018
Messages
8,656
Points
113
Location
South Gloucestershire
First Name
David
USS St Louis was a protected cruiser, built at the time when the US Navy was expanding. Commissioned in 1907, she was obsolete almost before she was finished
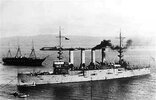
St Louis C-20.jpg
The model is from 'World of Warships', and hosted on the Printables website of Josef Prusa. The model is free to download, for private & non-profit use.
The model is scaled at 1/150 which would make it 860mm long. The hull is in 5 sections, my printer could handle this, but the printing times would be very long, something like 17-18 hours! I decided to scale it down to 1/250 - this gives a hull length of 520 mm - each section takes from 10-12 hours to print. ( I've been hoping that we don't have any power cuts )
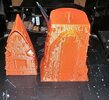
DSCF4233.JPG
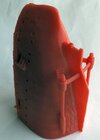
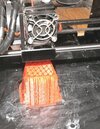
The first two sections - they're printed in the vertical position & don;t need much in the way of supports. After printing the bows, I reduced the infill ratio from 25 to 18%, this reduced the printing time, used less filament & weighed less!
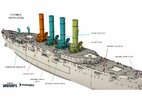
The instructions are in the form of a 21 page .pdf file - nicely illustrated
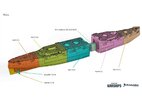
hull .jpg
The hull is joined by connectors that have wings, which spring out into slots internally - which can't be test fitted, as it's strictly a one-way operation. I'll use 2-part epoxy adhesive, as it needs a very strong bond between the parts. It will weigh quite a bit & I don't want the thing to come apart. I'll need to print out the stand. Most of the construction will be with CA, although I will use epoxy on the bigger parts, like the funnels. There are a load of small parts that need to be printed out, which will probably take more hours than the hull sections.
I don't think the model will take a complete 1kg spool of PLA filament, but as this only costs around £12 a spool that's not a lot - the time factor is not something you cannot ignore, it's going to be quite a marathon! After the hull sections are done, I'm going to do a bit of maintenance & tlc on the printer......................
Dave
 

JR

Member of the Rabble and Pyromania Consultant
SMF Supporter
Joined
May 26, 2015
Messages
17,275
Points
113
Location
lincs
First Name
John
This will be an interesting venture to follow , good luck Dave .
 

Dave Ward

Still Trying New Things
SMF Supporter
Joined
Apr 27, 2018
Messages
8,656
Points
113
Location
South Gloucestershire
First Name
David
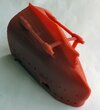
The final hull section printed - I was uncertain whether this would print without supports for the propeller shafts & support brackets.....................
DSCF4234.JPGDSCF4235.JPG
No problems - I'm printing off the stand at the moment.
There are a large number of small parts to be printed out - but I may have some news about that!
Dave
 

Dave Ward

Still Trying New Things
SMF Supporter
Joined
Apr 27, 2018
Messages
8,656
Points
113
Location
South Gloucestershire
First Name
David
All five parts together
DSCF4236.JPG
They all line up pretty well, apart from the bow section, the first that I printed. I might be able to correct it by some heavy sanding on the joint face, but otherwise, I'll just have to print off another.
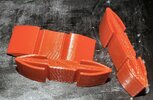
These are the connectors that join the hull sections together.............................
DSCF4238.JPG
Printed in draft mode, they're functional & never will see the light of day again when used.
I'm now waiting for some epoxy glue, I found that my existing tubes were not good - so I've ordered some - I could use CA, but the jointing areas are so large that you'd need a tube for each joint & with epoxy there's plenty of wiggle time to get everything flush.
An idea struck me last night, that I might not need to use any putty on the joints - I have the 3D pen & using the same filament could fill any gaps - that's certainly something I will be experimenting with
Dave
 

Dave Ward

Still Trying New Things
SMF Supporter
Joined
Apr 27, 2018
Messages
8,656
Points
113
Location
South Gloucestershire
First Name
David
Had to bite the bullet & print off another bow section
DSCF4241.JPG
Too much work to correct the old bit! This gives me an opportunity to experiment with the 3D pen on an actual printed part - I was doodling with this yesterday & wondered if it were possible to produce a welded seam such as that on a tank. It may be possible, but you'd have to have a very steady hand. The main thing is making good the joints between the hull halves - if I use the same filament in the 3D pen, then hopefully I can get a good surface, without hours of sanding ( I hope )
Dave
 

Dave Ward

Still Trying New Things
SMF Supporter
Joined
Apr 27, 2018
Messages
8,656
Points
113
Location
South Gloucestershire
First Name
David
In case anyone was wondering about the work needed to correct the poor part. It's a large area that needs to be sanded back - no problem with that, BUT PLA has a low melting point, and using anything like a power sander results in the surface melting & burning & scabbing! You can sand it manually ( sanding sticks & files etc ), as you don't generate enough heat to cause problems, OK in comparatively small areas, but not in large flat areas!
Dave
 

Neil Merryweather

SMF Supporter
Joined
Dec 29, 2018
Messages
4,425
Points
113
Location
London
First Name
Neil
An idea struck me last night, that I might not need to use any putty on the joints - I have the 3D pen & using the same filament could fill any gaps - that's certainly something I will be experimenting with
Dave
That should work well Dave
 

wotan

SMF Supporter
Joined
May 16, 2018
Messages
1,044
Points
113
Location
Quebec
First Name
John
Dave

When using the 3D pen, I have found that you can smooth the surface by using a soldering iron with a large flat head on it. Running this down a rough seam line might be an easy answer.

John
 

Dave Ward

Still Trying New Things
SMF Supporter
Joined
Apr 27, 2018
Messages
8,656
Points
113
Location
South Gloucestershire
First Name
David
I have a pyrogravure somewhere - that has a number of swappable heads with various shapes that would work - now all I have to do is find it! - I haven't used it for many years.....................
Dave
 

Dave Ward

Still Trying New Things
SMF Supporter
Joined
Apr 27, 2018
Messages
8,656
Points
113
Location
South Gloucestershire
First Name
David
My epoxy glue arrived in the post, so I've bonded together all the sections
DSCF4243.JPG
IF - I was going to do this again ( unlikely ) I wouldn't use the bayonet connectors - they're actually too tight a fit- which you only find out when you actually come to assemble it! With the epoxy glue having a few minutes working time you have difficulty in getting the parts together, and are unable to wiggle them for a best fit!, and of course the bayonet fittings mean that you can't get it apart......... The ends were pretty closely matched together, but the connectors were just too tight to allow for any adjustment. I think the 3D Pen will be getting a bit of use in the next few days. The St Louis didn't have much superstructure - but of course the 4 funnels are prominent. Funnels 2 & 3 are the same, but 1 & 4 are both different. They have a grating at the top, and I'm hoping that the printer can cope
Dave
 

Dave Ward

Still Trying New Things
SMF Supporter
Joined
Apr 27, 2018
Messages
8,656
Points
113
Location
South Gloucestershire
First Name
David
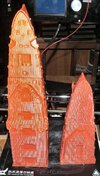
I'll be working on the hull joints - but the printer will be making the bits for this stage..................
funnels..jpg

How small 'tiny' is remains to be seen!
Dave
yay! - I found my pyrogravure!
 

adt70hk

I know its a bit sad but I like quickbuild kits!!!
SMF Supporter
Joined
Sep 4, 2019
Messages
9,505
Points
113
First Name
Andrew
Interesting Dave. Do you have any idea how much the filament first for a job this size?
 

Dave Ward

Still Trying New Things
SMF Supporter
Joined
Apr 27, 2018
Messages
8,656
Points
113
Location
South Gloucestershire
First Name
David
Interesting Dave. Do you have any idea how much the filament first for a job this size?
I think so far I've used just over 200m of filament - including printing a replacement bow section - a spool contains 330m of filament. I don't think that the smaller parts will take that amount. Like all things recently, the price of a spool has gone up to £11.99 delivered but all in all I think less than one spool for a model this size isn't bad. - After the Budget last week, I wondered how much a packet of ciggies was ( I gave up 23 years ago ), cheapest is around £10! - a bit of perspective
Dave
 

adt70hk

I know its a bit sad but I like quickbuild kits!!!
SMF Supporter
Joined
Sep 4, 2019
Messages
9,505
Points
113
First Name
Andrew
I think so far I've used just over 200m of filament - including printing a replacement bow section - a spool contains 330m of filament. I don't think that the smaller parts will take that amount. Like all things recently, the price of a spool has gone up to £11.99 delivered but all in all I think less than one spool for a model this size isn't bad. - After the Budget last week, I wondered how much a packet of ciggies was ( I gave up 23 years ago ), cheapest is around £10! - a bit of perspective
Dave
Thanks Dave, so actually cost wise not too bad, just a lot of time. Not being a smoker had no idea how much a packet of ciggies costs but no idea it was that high!

Thanks again.

Andrew
 

Dave Ward

Still Trying New Things
SMF Supporter
Joined
Apr 27, 2018
Messages
8,656
Points
113
Location
South Gloucestershire
First Name
David
A bit more printing............................
DSCF4245.JPG
Funnels etc only dry fitted, some of the mating faces need a little cleaning up. I have doubts about whether some of the tiny parts will print, so a degree of scratchbuilding, or replacement parts will be needed - anchor chain for one!
Dave
 

Dave Ward

Still Trying New Things
SMF Supporter
Joined
Apr 27, 2018
Messages
8,656
Points
113
Location
South Gloucestershire
First Name
David
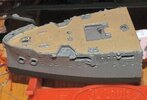
Whilst trying unsuccessfully to print some tiny ventilators, I picked up the original bow section, and painted it roughly to see how the paint took, and if masking was going to pull the paint off!
DSCF4247.JPG
Answer is very well and no, this was just slapped on with a 10mm flat brush, the deck with a smaller pointy brush. I just picked the grey up, as it was the first I came across! The St Louis ,may be finished in the white/buff scheme used by the USN early in the 20th century, I haven't decided yet............
Dave
 
Top