- Home
- Forums
- Military Vehicles
- Military Vehicles Under Construction
- Armoured Vehicles Under Constuction
You are using an out of date browser. It may not display this or other websites correctly.
You should upgrade or use an alternative browser.
You should upgrade or use an alternative browser.
1/35 Trumpeter Panzerkampfwagen. VIII Maus Build
- Thread starter Jakko
- Start date
Jim R
SMF Supporter
Glad the tracks are done Alex. A very repetitive task.
I did wonder Jakko
I did wonder Jakko
I thought it was me!WTF? I posted that to the wrong threadLet me report that one too …
- Joined
- May 13, 2020
- Messages
- 30
- Points
- 18
- First Name
- Alex
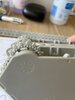
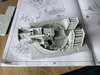
First obstacle.. and if anyone can think of best ways to alter this that would be welcomed. The spokes on each wheel are not aligned - having followed the instructions carefully and the way the spokes fitted together, they could only fit the way they did.. either an error in the manual or from me (the latter most likely). As such, the tracks do not wrap around the spoked wheels correctly. So far I can only think of
A - cutting of the spokes on one wheel, and gluing/pinning them so they are aligned.
B - cut the part(s) that holds the spoked wheels in place, then try and pry-apart one spoked side, re-align and fit back in…
Any other ideas would be greatly appreciated!
A - cutting of the spokes on one wheel, and gluing/pinning them so they are aligned.
B - cut the part(s) that holds the spoked wheels in place, then try and pry-apart one spoked side, re-align and fit back in…
Any other ideas would be greatly appreciated!
Attachments
Think B might be the better option, if you can pry them apart Alex.
The thought of cutting off the spokes then trying to realign seems to be even harder.
I am known for my love hate of plastic tracks, so think looking at those you've done well. 
Love the interior, going to be fun painting. Most the ones I've seem the builder paints the internals before assembly., any reason you decided to do it this way ?
The thought of cutting off the spokes then trying to realign seems to be even harder.
I am known for my
Love the interior, going to be fun painting. Most the ones I've seem the builder paints the internals before assembly., any reason you decided to do it this way ?
- Joined
- May 13, 2020
- Messages
- 30
- Points
- 18
- First Name
- Alex
Many thanks for the response John.Think B might be the better option, if you can pry them apart Alex.
The thought of cutting off the spokes then trying to realign seems to be even harder.
I am known for mylovehate of plastic tracks, so think looking at those you've done well.
Love the interior, going to be fun painting. Most the ones I've seem the builder paints the internals before assembly., any reason you decided to do it this way ?
Ok I’ll go with plan B & find a small saw/drill bit and carefully cut it out and hope for the best.. Do you know of any solvent that would de-bond plastic cement?
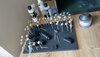
Regarding the painting, I have done just a dry fit in the pictures, just to ensure everything fits smoothly. Then, as you mentioned, I will paint each part individually and then fit.
Hi Alex.
The only way I know of taking a previously glued part would to add some Tamiya Thin to the area.As it melts the plastic then pry .I would wait for some of the guys to say what they think first.
That's good about it being a dry fit, bet I didn't read the post well enough, if so sorry.
You could always put up a post asking for help in removing glued parts, then more people would see it. Just a thought.
- Joined
- May 13, 2020
- Messages
- 30
- Points
- 18
- First Name
- Alex
Good shout I’ll post around and see what people say. No I don’t think I mentioned it being a dry fit, I was just eager to see what it would look like as well! Thanks again.Hi Alex.
The only way I know of taking a previously glued part would to add some Tamiya Thin to the area.As it melts the plastic then pry .I would wait for some of the guys to say what they think first.
That's good about it being a dry fit, bet I didn't read the post well enough, if so sorry.
You could always put up a post asking for help in removing glued parts, then more people would see it. Just a thought.
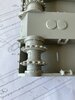
Best way to realign those would be a fine (needs to remove as little material as possible) saw cut inside one of the sprockets to remove it from the assembly. Then once you have separated it, realign and re cement the joint. It should be virtually invisible afterwards.
Disassembling a cement join is possible using liquid solvent such as John said, but it is possible to damage the parts that way. Plastic cement is a solvent that melts the parts together and then evaporated. The solvent will need to melt the join to allow separation, but can also melt the rest of the part. A clean cut would be my choice.
Disassembling a cement join is possible using liquid solvent such as John said, but it is possible to damage the parts that way. Plastic cement is a solvent that melts the parts together and then evaporated. The solvent will need to melt the join to allow separation, but can also melt the rest of the part. A clean cut would be my choice.
- Joined
- May 13, 2020
- Messages
- 30
- Points
- 18
- First Name
- Alex
Thank you for the input! Time for some surgery then and impromptu DIY… at least the sprockets are hidden under the tracks once completed, so it won’t be the end of the world if it doesn’t look 100%.Best way to realign those would be a fine (needs to remove as little material as possible) saw cut inside one of the sprockets to remove it from the assembly. Then once you have separated it, realign and re cement the joint. It should be virtually invisible afterwards.
Disassembling a cement join is possible using liquid solvent such as John said, but it is possible to damage the parts that way. Plastic cement is a solvent that melts the parts together and then evaporated. The solvent will need to melt the join to allow separation, but can also melt the rest of the part. A clean cut would be my choice.
many thanks again.
Jim R
SMF Supporter
Hi Alex
I would go with Tim's idea. You do need a fine razor saw. I think a very important part of modelling is thinking of ways to sort problems. I usually try bad language, it rarely helps but I do feel better.
Jim
I would go with Tim's idea. You do need a fine razor saw. I think a very important part of modelling is thinking of ways to sort problems. I usually try bad language, it rarely helps but I do feel better.
Jim
Ancientmariner
SMF Supporter
Hi Alex
I would go with Tim's idea. You do need a fine razor saw. I think a very important part of modelling is thinking of ways to sort problems. I usually try bad language, it rarely helps but I do feel better.
Jim
Sign of a true great isn't how well you do it, it's how good you can make a messed up bodge job look
I always think that’s what you pay for when you get a professional in to do DIY type work at home. You pay for knowledge!Sign of a true great isn't how well you do it, it's how good you can make a messed up bodge job look
- Joined
- May 13, 2020
- Messages
- 30
- Points
- 18
- First Name
- Alex
- Joined
- May 13, 2020
- Messages
- 30
- Points
- 18
- First Name
- Alex
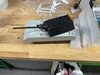
Hope you don't mind a bit of advice Alex:
For the love of all the Gods get rid of that pocket knife and get yourself a decent craft knife with scalpel blades!!! That will absolutely halve the time you spend on clean-up of flash and sprue attachment points.
PS Good work so far, and I'd follow Tim's suggestion for your sprocket repair. A nice, clean square cut will make it much simpler to reattach the parts.
- Joined
- May 13, 2020
- Messages
- 30
- Points
- 18
- First Name
- Alex
Hope you don't mind a bit of advice Alex:
For the love of all the Gods get rid of that pocket knife and get yourself a decent craft knife with scalpel blades!!! That will absolutely halve the time you spend on clean-up of flash and sprue attachment points.
PS Good work so far, and I'd follow Tim's suggestion for your sprocket repair. A nice, clean square cut will make it much simpler to reattach the parts.
yes a proper craft knife with scalpel blades may well be in order… my pocket knife would struggle to cut cheese…
Sprocket repair is done, many thanks for the advice all!
yes a proper craft knife with scalpel blades may well be in order… my pocket knife would struggle to cut cheese…
It'll be the best modelling investment you'll ever make! Get the best you can afford - it will be worth every penny.
dalej2014
SMF Supporter
Seconded; heartily agree. I couldn't believe my eyes on viewing the pictures.It'll be the best modelling investment you'll ever make! Get the best you can afford - it will be worth every penny.
And what a build!? You seem to be doing very well considering how detailed and daunting this looks. Following.
- Joined
- May 13, 2020
- Messages
- 30
- Points
- 18
- First Name
- Alex