1/72 Airfix North American F-86F/E(M) Sabre

Geordie

SMF Supporter
Joined
Oct 3, 2023
Messages
12
Points
13
Location
Monty200617#new
First Name
John
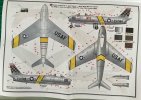
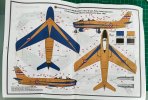
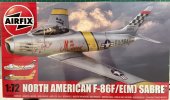
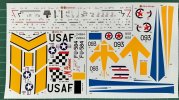
Hi. This is my first time posting a build and indeed my first build for many years. Any tips and help would be very welcome. There are 2 schemes to choose from. I’m going for the USAF ‘John Glen’ version.
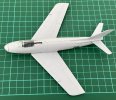
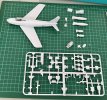
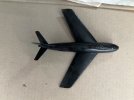
there were 4 sprees and a clear parts spruce. I’ve put together a few pieces an tried to remove seam lines etc. The main parts of the wings and fuesilage are just dry fitted in the picture. I’m waiting for paint for the cockpit so no glueing yet. There will be a little filling needed at the nose and possibly at the wing roots - I’ll need to see if the gap goes when I glue them.
live got Vallejo gloss black for the primer coat and then I’m going to try either Vallejo Aluminium or Steel for the top coats. They are the Model Air paints and I’ll be trying to airbrush for the first time!
meanwhile I’ll try to mask the canopy and clean up some other parts. I have today I’m impressed with the fit of the parts so far. Things have come a long way.
I’ll post the next pictures as soon as my ‘Interior green’ paint arrives. IMG_2126.jpegIMG_2127.jpegIMG_2128.jpegIMG_2129.jpegIMG_2130.jpegIMG_2131.jpegIMG_2132.jpeg
 

Jim R

SMF Supporter
Joined
Apr 27, 2018
Messages
13,754
Points
113
Location
Shropshire
First Name
Jim
Good choice John. These newer Airfix kits are generally pretty good. Lots of "firsts" for you. Constant dry fitting is always useful. Good luck with airbrushing a metallic finish.
 

Geordie

SMF Supporter
Joined
Oct 3, 2023
Messages
12
Points
13
Location
Monty200617#new
First Name
John
Managed to get the cockpit finished this week. It’s pretty basic with just a seat dropping into a tub with side panels for decals. I painted the panels black before applying the decals as i did with the instrument panel. One panel decal has risen a bit but hopefully will settle back with some Microset. . I made some seatbelts with Tamiya tape. I did try painting the pilot but it wasn’t good!
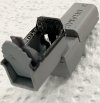
added some nose weight and popped the jet exhaust in (painted in burnt iron - but you can barely see it) and glued the fuesilage halves together. Bit of seam fixing needed but it’s a good fit.
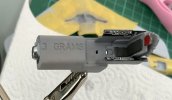
Added the wing section. This is a reasonable fit too but again some filling and sanding back needed. Glued the nose on. This isn’t such a good fit so some filling needed again. You can see rather more of the weight I put in than I hoped but it was all I had and impatience got the better if me.
Tail parts glued in. The canopy is ready to go on. So hopefully I’ll be spraying the black gloss primer next.

IMG_2143.jpegIMG_2144.jpegIMG_2145.jpeg
 

Mickc1440

SMF Supporter
Joined
Apr 27, 2018
Messages
4,263
Points
113
Location
Sheffield
First Name
Mick
Great start on one of my favourite aircraft, I like the colour scheme you’ve chosen, that’s what I used on the last one I built.
 

Jakko

Way past the mad part
SMF Supporter
Joined
Apr 28, 2018
Messages
10,839
Points
113
First Name
Jakko
You can see rather more of the weight I put in than I hoped
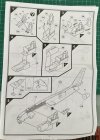
Wait, it says “3 grams”? Oh, hang on — I scrolled back and noticed in the instructions it’s a plastic part that comes with the kit. Is that weight indicated there to tell you that you need to add 3 g to the front of the model? In that case I think I would have stuck it on top of that part, not inside the intake duct, though.
 

Geordie

SMF Supporter
Joined
Oct 3, 2023
Messages
12
Points
13
Location
Monty200617#new
First Name
John
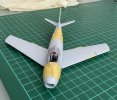
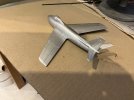
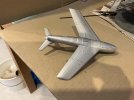
Had a bit of a break due to family commitments but back on track now. Gloss black primer coat done. Then 3 coats of Vallejo Aluminium Model air. I was pleased with this for my first airbrushing efforts. Sadly, I then apllied a coat of gloss varnish which didn’t go so well. Might need to give that a gentle rub back and add another aluminium layer to get back to a more even finish. I think I didn’t wait long enough after the last aluminium coat. Or maybe I should have reduced the air pressure. I seemed to get a bit of a mottled finish. It’s a lesson learned! The pictures are before the varnish coat.
IMG_2217.jpegIMG_2218.jpegIMG_2219.jpeg
 

adt70hk

I know its a bit sad but I like quickbuild kits!!!
SMF Supporter
Joined
Sep 4, 2019
Messages
9,507
Points
113
First Name
Andrew
John

That's coming on very nicely indeed.

On the metallics front, Model Air can be a bit hit and miss, although it's gone down nicely for you.

However, Vallejo's Metal Color is the best water based metallic paint around and sprays flawlessly every time, with great coverage.

Keep up the good work!

Andrew

 
Last edited:

Geordie

SMF Supporter
Joined
Oct 3, 2023
Messages
12
Points
13
Location
Monty200617#new
First Name
John
Wait, it says “3 grams”? Oh, hang on — I scrolled back and noticed in the instructions it’s a plastic part that comes with the kit. Is that weight indicated there to tell you that you need to add 3 g to the front of the model? In that case I think I would have stuck it on top of that part, not inside the intake duct, though.
You’re right, it would be better out of sight, but it’s all I had handy and I’m using it to get used to the new paints,glues etc. available now.wouldn’t fit anywhere else. It’s not ideal but as this is my first model in over 40 years I just wanted to get on with it.
 

Scratchbuilder

SMF Supporter
Joined
Jul 2, 2022
Messages
1,948
Points
113
First Name
Mike
What a good start. A kit with plenty of reference material, a good choice of colour, although you learned the mistake we have all made about gloss varnish over metalic paint. Now once you have completed it, sit back and take note of what you could do better on the next one - and if in doubt - ask, we will answer any question no matter how idiotic you think it is - mind you some of the answers will need a translator....
 

Geordie

SMF Supporter
Joined
Oct 3, 2023
Messages
12
Points
13
Location
Monty200617#new
First Name
John
What a good start. A kit with plenty of reference material, a good choice of colour, although you learned the mistake we have all made about gloss varnish over metalic paint. Now once you have completed it, sit back and take note of what you could do better on the next one - and if in doubt - ask, we will answer any question no matter how idiotic you think it is - mind you some of the answers will need a translator....
Thanks. So no gloss varnish on metallic paint then? I didn’t know that. Good to find out as I’ve got a BAE Lightning and a Starfighter in 1/48 lined up. Do I just apply decals to the metallic paint direct then? Should I not put a Matt varnish on at the end? I presume a Matt varnish would really dull the finish? Thanks again.
 

colin m

Moderator
Staff member
Moderator
SMF Supporter
Joined
Dec 26, 2008
Messages
8,604
Points
113
Location
Stafford, UK
First Name
Colin
This is looking very nice John, that silver finish didn't come out too bad at all.
Generally metallic paint is very smooth so the decals should be ok just going straight onto a metallic finish. However, once everything is done, the decals will reflect light differently than your metal finish, so, a clear coat over everything, would be a good idea,
 

Waspie

SMF Supporter
Joined
Mar 13, 2023
Messages
2,515
Points
113
Location
Portland - Dorset
First Name
Doug
My experience is that you learn something with each model :smiling3:
Only just finished my third kit and couldn't agree more with Jacko. Each and every one has had its challenges! First was simply getting used to everything. Airbrushing, newer paints etc, second was PE!! the third I went over the top weathering and I'm sure number four will be no different!!
However, as has been said by many on here, it's about enjoyment. The only person you have to please is you.
Cracking job by the way on the Sabre.
 

Geordie

SMF Supporter
Joined
Oct 3, 2023
Messages
12
Points
13
Location
Monty200617#new
First Name
John
This is looking very nice John, that silver finish didn't come out too bad at all.
Generally metallic paint is very smooth so the decals should be ok just going straight onto a metallic finish. However, once everything is done, the decals will reflect light differently than your metal finish, so, a clear coat over everything, would be a good idea,
Thanks. I think I’ll give it a very gentle rub over with very fine sandpaper then do another coat or two of the aluminium. Then I’ll apply the decals. Am I okay using microsol and microset on metallic paint? I thought maybe some gentle panel line and weathering then a coat of Kleeneez polish.
Really appreciate the help and encouragement from everyone.
 

Geordie

SMF Supporter
Joined
Oct 3, 2023
Messages
12
Points
13
Location
Monty200617#new
First Name
John
Only just finished my third kit and couldn't agree more with Jacko. Each and every one has had its challenges! First was simply getting used to everything. Airbrushing, newer paints etc, second was PE!! the third I went over the top weathering and I'm sure number four will be no different!!
However, as has been said by many on here, it's about enjoyment. The only person you have to please is you.
Cracking job by the way on the Sabre.
The airbrushing was a revalation! i expect to have to learn all about oressures and distances for various paints but ir is fun. I have bought a kit with some PE parts but that’s a way off yet. It looks tricky and I fully expect to superglue my fingers together at regular intervals!
Looking forward to learning a lot from the builds on here and the advice being offered.
 

Scratchbuilder

SMF Supporter
Joined
Jul 2, 2022
Messages
1,948
Points
113
First Name
Mike
The airbrushing was a revalation! i expect to have to learn all about oressures and distances for various paints but ir is fun. I have bought a kit with some PE parts but that’s a way off yet. It looks tricky and I fully expect to superglue my fingers together at regular intervals!
Looking forward to learning a lot from the builds on here and the advice being offered.
Right I see your problem with the aluminium...
Acrylic reacts to lacquer based varnish for some reason. And from experience their (Vallejo) gloss varnish leaves a lot to be desired. Johnsons Kleer polish is a great substitute, available from most supermarkets or online here - and for under £4 it will last years... And can be sprayed with the airbrush..
If I am going to paint a mettalic surface I would choose a lacquer based paint (AK, Tamiya, Modelmaster) and most important is to work next to an open window if you do not have a spray booth.
Decals will be ok and you can use the Micrsol method but make sure they sit down by rolling a cotton bud over them.
PE, so I am told is a black art by some of the modellers on here and I am considered to have been lured to the dark side many moons ago. PE is nothing to be worried about and I am sure I left a tutorial on the forum explaining the basics... As for sticking your fingers together, there are many horror stories going around on here of others experiences...
Yes, take a look at the builds, ask about the methods used either on the blog or contact the member with a PM (Personal Message) and i am positive you will get the information you want..
Cheers
Mike.
 
Top