Wow , to see them all together like this is incredible neil , its going to look epic . Amazing vision and workmanship , its been fantastic to watch this develop , cheers tony
You are using an out of date browser. It may not display this or other websites correctly.
You should upgrade or use an alternative browser.
You should upgrade or use an alternative browser.
Airfix 54mm Napoleonic French Line Infantry
- Thread starter Neil Merryweather
- Start date
Neil Merryweather
SMF Supporter
Praise indeed Tim, and I can't pretend the similarity hasn't crossed my own mind. If I had a tenth of his talent I'd be chuffed!Looks like the best birthday cake to give a modeller …. Also reminds me a lot of Bill Horan’s Gandemak diorama.
Neil Merryweather
SMF Supporter
Many thanks PaulExcellent work Neil.
Neil Merryweather
SMF Supporter
Thank you and Thank you MickThat's an amazing looking cheesecake with excellent figures Neil. Congratulations on the safe arrival of little one.
Neil Merryweather
SMF Supporter
Glad you like it Tony- almost there....Wow , to see them all together like this is incredible neil , its going to look epic . Amazing vision and workmanship , its been fantastic to watch this develop , cheers tony
Doesn't look pointless to me... seems very pointy!I applied the brown mix with a small palette knife to get in around the pins, and what a pointless exercise that was.
Congratulations on the granddaughter.
Pete
rtfoe
SMF Supporter
Yup it reminds me of Gandemak, Neil like most last stands. With the population in it looks real good. Once the groundwork is starting to set will you be adding small pebbles and sand plus trampled vegetation?
Also nice icing sugar sprinkles you have there for the chocolate cake.
Cheers,
Wabble
Also nice icing sugar sprinkles you have there for the chocolate cake.

Cheers,
Wabble
Andy the Sheep
SMF Supporter
Simply amazing, Neil.
PaulinKendal
SMF Supporter
Just come back to the forum after months away and I HAD to see this - it's just incredible! It's a bravura display of ambition achieved (I know it's not finished but, seeing all the figures together proves it's going to be completely stunning). Sustaining this level of perfectionism, attention to detail, and sheer LABOUR for so long is truly impressive.
Sorry to gush, but really, this is a masterclass in what can be achieved compositionally if you have otherworldly skills and patience - bravo!
Sorry to gush, but really, this is a masterclass in what can be achieved compositionally if you have otherworldly skills and patience - bravo!
WOW!!Well the first excellent news is that Granddaughter Penelope finally arrived safe and sound on Saturday 3 Feb.
The second news is that Porte-Aigle is painted and ready to join his pals
View attachment 501283
And the third news is that I have made a start on the base.
Using Allen’s fine suggestion I poked the pins through from the underside, now it looks like an instrument of torture…
View attachment 501278
As promised I used Sculptamold, which is a kind of cellulose-reinforced instant papier-mâché.
View attachment 501280
View attachment 501281
It’s mixed with water and is supposed to set within an hour,
It’s white so I mixed in a large dose of brown acrylic paint, and although there are some bits that don’t take the paint it makes touching up a relatively simple task. The acrylic paint will probably delay the curing time, but that’s no bad thing in this case.
I applied the brown mix with a small palette knife to get in around the pins, and what a pointless exercise that was. Next time I will just shove the pins in afterwards. It now looked like a fetishist chocolate cake.
View attachment 501282
I put cling film over the whole lot and replaced the pins with the numbered flags, starting with the lying down figures. I want them to properly touch the ground. They will require some more work so that it doesn’t look like the Somme , and there is going to be grass but this is the first stage
View attachment 501284
I have to say it tells quite a story just like this- oh for some restraint….but I’ve made all the others so they are damn well going on!
View attachment 501285
Every time I take this shot my phone helpfully tells me it’s food……………
I removed as much clingfilm as I dare, although its presence will probably further inhibit the drying time- I will just have to wait and see
cheers
Neil

Neil Merryweather
SMF Supporter
welcome back Paul, and thanks for the gushing -no need to apologise- I can cope!Just come back to the forum after months away and I HAD to see this - it's just incredible! It's a bravura display of ambition achieved (I know it's not finished but, seeing all the figures together proves it's going to be completely stunning). Sustaining this level of perfectionism, attention to detail, and sheer LABOUR for so long is truly impressive.
Sorry to gush, but really, this is a masterclass in what can be achieved compositionally if you have otherworldly skills and patience - bravo!
Neil Merryweather
SMF Supporter
cheers Mr Smiff!WOW!!
Neil Merryweather
SMF Supporter
After a second application of Sculptamold to fill in the gaps under the casualties I painted it all earth colour
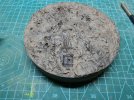
I then applied flock- so called ’muddy’, - which I don’t really like because it has bits of red and blue in it, but I haven’t figured out how to get single coloured flock.
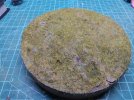
So I sprayed it a bit green, which, of course, coloured the earth-grrr! But I prefer the colour of the grass now. Then, although I had promised myself NOT to do it, I made some rye grass, because that’s what we’re told it was at Waterloo. Most of it will be trampled down, but I still think I need to do another batch.
Here’s the field of battle- looks like a crazy golf course.
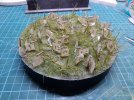
When I put the laying down figures on they sat on top of the flock and rye grass rather than pressing in to it, so I had to carefully scrape away everything from underneath them, and now I’ve lost so much I’m going to have to re-flock.
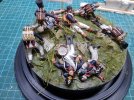
But then I’ll have to spray it green again, which will make the earth even greener.....
But I’m going to do it anyway, even though I think it’s doomed. If it doesn’t work I will just have to start again.
That's all for now , folks!

I then applied flock- so called ’muddy’, - which I don’t really like because it has bits of red and blue in it, but I haven’t figured out how to get single coloured flock.

So I sprayed it a bit green, which, of course, coloured the earth-grrr! But I prefer the colour of the grass now. Then, although I had promised myself NOT to do it, I made some rye grass, because that’s what we’re told it was at Waterloo. Most of it will be trampled down, but I still think I need to do another batch.
Here’s the field of battle- looks like a crazy golf course.

When I put the laying down figures on they sat on top of the flock and rye grass rather than pressing in to it, so I had to carefully scrape away everything from underneath them, and now I’ve lost so much I’m going to have to re-flock.

But then I’ll have to spray it green again, which will make the earth even greener.....
But I’m going to do it anyway, even though I think it’s doomed. If it doesn’t work I will just have to start again.
That's all for now , folks!
Neil Merryweather
SMF Supporter
Well, I did start again.
After a couple of ‘disappointed’ comments on the Planet Figure forum I decided to dump the flock and go full-on with the rye grass. I’ve come this far it would be a shame to ‘spoil the ship for ha’p’orth of tar’, as my mum used to say to me.
So I scraped everything off, repainted it and started again.
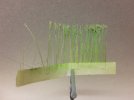
I made the rye grass stems with bristles cut from a cheap natural-coloured paint brush, dipped the ends in PVA and then in fine sand to represent the seed heads, as per the Gospel according to St Stan of Catchpol.
The long leaves are made from natural raffia, also as decreed by St Stan.
Then I sprayed it all green
I needed loads and it was right PITA, but I’ve done it twice before so I knew what to expect (which is why I wimped out first time around… )
)
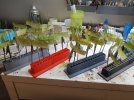
I’ve decided- no more Waterloo models- EVER!
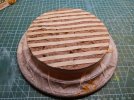
I wanted to plant it in rows so I marked the base with thin masking tape to keep them more or less parallel.
I had done a few rows but I was having trouble getting the grass to stand upright with PVA, (even though it’s all going to be trampled down in the end)
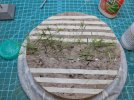
I thought ‘I really should drill holes but that will drive me CRAZY, how can I invent a gadget that will do it easily?’
And then I had a light bulb moment and realised I already have the PRECISE tool required
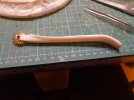
This instrument of torture is called a tracing wheel, and it is used by dress-makers to transfer sewing pattern pieces to fabric by means of carbon paper. And the reason I have one is because I do actually do dress-making. I learned the skill in art school when I studied stage-design and we were taught how to make stage costumes. To my surprise I really enjoyed it and it’s been very useful over the years- I even made my wife’s wedding dress( I was young and fearless then, obviously).
In fact I was even able to use the skill when I got work in film prop- making, sewing webbing, parachutes and upholstery and stuff on ‘Masters of the Air’. ANYWAY…..
It gave me a perfect line of evenly spaced holes in the Sculptamold, which is soft enough to take it.
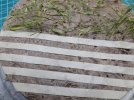
I was tempted to remove the stuff I had already done, but it looked quite trampled so I decided to work around it
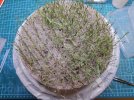
The right hand side is the side I had already done and you can really see the difference. It probably should be even denser but life’s too short! So now I just have to add some trampled stuff in the spaces in the other half and then we’re almost there! I will add more in the gaps when the figures are in place.
And there’s still a load of muskets and shakos to place as well.
That's all for now, thanks for looking
N
After a couple of ‘disappointed’ comments on the Planet Figure forum I decided to dump the flock and go full-on with the rye grass. I’ve come this far it would be a shame to ‘spoil the ship for ha’p’orth of tar’, as my mum used to say to me.
So I scraped everything off, repainted it and started again.
I made the rye grass stems with bristles cut from a cheap natural-coloured paint brush, dipped the ends in PVA and then in fine sand to represent the seed heads, as per the Gospel according to St Stan of Catchpol.

The long leaves are made from natural raffia, also as decreed by St Stan.

Then I sprayed it all green

I needed loads and it was right PITA, but I’ve done it twice before so I knew what to expect (which is why I wimped out first time around…
 )
)
I’ve decided- no more Waterloo models- EVER!
I wanted to plant it in rows so I marked the base with thin masking tape to keep them more or less parallel.

I had done a few rows but I was having trouble getting the grass to stand upright with PVA, (even though it’s all going to be trampled down in the end)

I thought ‘I really should drill holes but that will drive me CRAZY, how can I invent a gadget that will do it easily?’
And then I had a light bulb moment and realised I already have the PRECISE tool required

This instrument of torture is called a tracing wheel, and it is used by dress-makers to transfer sewing pattern pieces to fabric by means of carbon paper. And the reason I have one is because I do actually do dress-making. I learned the skill in art school when I studied stage-design and we were taught how to make stage costumes. To my surprise I really enjoyed it and it’s been very useful over the years- I even made my wife’s wedding dress( I was young and fearless then, obviously).
In fact I was even able to use the skill when I got work in film prop- making, sewing webbing, parachutes and upholstery and stuff on ‘Masters of the Air’. ANYWAY…..
It gave me a perfect line of evenly spaced holes in the Sculptamold, which is soft enough to take it.

I was tempted to remove the stuff I had already done, but it looked quite trampled so I decided to work around it

The right hand side is the side I had already done and you can really see the difference. It probably should be even denser but life’s too short! So now I just have to add some trampled stuff in the spaces in the other half and then we’re almost there! I will add more in the gaps when the figures are in place.
And there’s still a load of muskets and shakos to place as well.
That's all for now, thanks for looking
N
Looks superb neil , might be nicking some ideas here for a future project of my own , btw the last photo reminds me of some celebrity hair transplant pictures !!

Neil Merryweather
SMF Supporter
I was thinking that myself- looks like it's been on a cheap trip to TurkeyLooks superb neil , might be nicking some ideas here for a future project of my own , btw the last photo reminds me of some celebrity hair transplant pictures !!

Yep, looks like you’ve gone the whole Wayne Rooney, Neil. Far more successful than his though 

Neil Merryweather
SMF Supporter
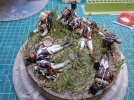
I’m afraid my ‘youthful’ idealism in planting all the rye grass first was rather misconceived ….
As with the flocking beforehand I couldn’t get the figures to lie flat on the ground without removing everything in the vicinity- and this was worse because it wasn’t just the upright stuff that was in the way, there was all the strands lying across it as well, which were sooo springy!!
And then poking a rod through from the underside (to identify the correct 2 holes for each fella) was fraught with danger of damaging one or worse, knocking one off; and the more so the more figures I managed to put on.
Still, I am encouraged, it’s starting to look the part now, and the end is actually in sight.

Neil Merryweather
SMF Supporter
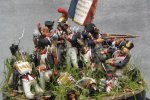
Well, it's finally FINISHED!!!!
Halle- f******- lujah!
It only took just a tad over 3 years, and it was supposed to be an easy, strictly Out Of The Box antidote to the previous epic....
ANYWAY
I was very careful to troubleshoot these first figures before they were obstructed by the standing figures. And boy, didn't the grass get in the way?
I have to say that this final part, planting the standing figures, has to be one of the hardest things I have ever done in 50 + years of modelmaking, both hobby-wise and professionally. Trying not to damage anything whilst I was constantly turning the thing upside down to find the relevant holes for each figure was fraught with worry. And then trying to get the glued pins on their feet through the grass without touching any of it, or any of the other figures.
Once that was done I replaced some of the grass I had had to remove and then touched up the shiny glue with matt lacquer.
Then I made a proper rookie mistake, which I can't actually undo, so I have to live with it.
I airbrushed matt lacquer over the whole thing, which meant I then had to retouch the gloss and satin bits.
But worse than that- I didn't dust it, so I have now sealed in white dust flecks all over the dark blue uniforms . I have been so assiduous in keeping the dust off these boys for 3 years just to wantonly undo all that effort in the last throes! B*gger!
If ever there was a lesson for new guys worrying about avoiding mistakes - @SteveT -there it is, mate!
So here it is and the rest of the pics are in a completed thread Here
Halle- f******- lujah!
It only took just a tad over 3 years, and it was supposed to be an easy, strictly Out Of The Box antidote to the previous epic....
ANYWAY
I was very careful to troubleshoot these first figures before they were obstructed by the standing figures. And boy, didn't the grass get in the way?
I have to say that this final part, planting the standing figures, has to be one of the hardest things I have ever done in 50 + years of modelmaking, both hobby-wise and professionally. Trying not to damage anything whilst I was constantly turning the thing upside down to find the relevant holes for each figure was fraught with worry. And then trying to get the glued pins on their feet through the grass without touching any of it, or any of the other figures.
Once that was done I replaced some of the grass I had had to remove and then touched up the shiny glue with matt lacquer.
Then I made a proper rookie mistake, which I can't actually undo, so I have to live with it.
I airbrushed matt lacquer over the whole thing, which meant I then had to retouch the gloss and satin bits.
But worse than that- I didn't dust it, so I have now sealed in white dust flecks all over the dark blue uniforms
 . I have been so assiduous in keeping the dust off these boys for 3 years just to wantonly undo all that effort in the last throes! B*gger!
If ever there was a lesson for new guys worrying about avoiding mistakes - @SteveT -there it is, mate!
So here it is and the rest of the pics are in a completed thread Here

