AlanG's 1/32 Hasegawa Fw190 A8

AlanG

Moderator
Staff member
Moderator
SMF Supporter
Joined
Dec 2, 2008
Messages
7,491
Points
113
Location
Scotland
First Name
Alan
Quick update from this morning.

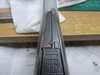
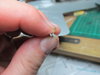
Fitted the two rear armour brackets so i can get the armour adjusting wires fitted. Had a bit of a mare with the superglue so one of them is a little squint. But i can live with that. Also it was nice to see the radio wire hole looks good too.
 

Attachments

  • Hasegawa 1.32 Fw190 A8 Schlangenschwarm 49.JPG
    Hasegawa 1.32 Fw190 A8 Schlangenschwarm 49.JPG
    99 KB · Views: 14
  • Hasegawa 1.32 Fw190 A8 Schlangenschwarm 50.JPG
    Hasegawa 1.32 Fw190 A8 Schlangenschwarm 50.JPG
    101.9 KB · Views: 14

Jim R

SMF Supporter
Joined
Apr 27, 2018
Messages
13,724
Points
113
Location
Shropshire
First Name
Jim
Hi Alan
Missed this - sorry. Just had a catch up. I do like these larger scale aircraft kits. You're doing a great job. Undercarriage especially looks good. The canopy masks look a bit extra fiddly but seem to have worked nicely.
Jim
 

AlanG

Moderator
Staff member
Moderator
SMF Supporter
Joined
Dec 2, 2008
Messages
7,491
Points
113
Location
Scotland
First Name
Alan
No probs Jim and thanks. Beers are in the fridge and the quality street are by the chair. Pull up a chair and share my trials and tribulations lol.
 

AlanG

Moderator
Staff member
Moderator
SMF Supporter
Joined
Dec 2, 2008
Messages
7,491
Points
113
Location
Scotland
First Name
Alan
Cheers Ian. I'm enjoying adding a little extra detailing. Still loads more i could do but i have learnt that for the next one i have planned to build in the future.
 

AlanG

Moderator
Staff member
Moderator
SMF Supporter
Joined
Dec 2, 2008
Messages
7,491
Points
113
Location
Scotland
First Name
Alan
Forgot to add this little detail when doing the radio cable. Although the Hasegawa rear panel is slightly wrong behind the cockpit seat (the box section is in the wrong place) i thought i'd still add it as the wire from the aerial will need somewhere to go once fitted. So it goes into a trunking tube that then goes down into the cockpit. I used a bit of copper wire to replicate this and shall re-touch up the RLM 66 later.
 

Attachments

  • Hasegawa 1.32 Fw190 A8 Schlangenschwarm 51.JPG
    Hasegawa 1.32 Fw190 A8 Schlangenschwarm 51.JPG
    60.9 KB · Views: 12
  • Hasegawa 1.32 Fw190 A8 Schlangenschwarm 52.JPG
    Hasegawa 1.32 Fw190 A8 Schlangenschwarm 52.JPG
    62.5 KB · Views: 12

AlanG

Moderator
Staff member
Moderator
SMF Supporter
Joined
Dec 2, 2008
Messages
7,491
Points
113
Location
Scotland
First Name
Alan
Cheers Ian. Not much more to go before i can finally start pre-shading. Finding time between the kids and the farm is a challenge but i wouldn't have it any other way lol
 

AlanG

Moderator
Staff member
Moderator
SMF Supporter
Joined
Dec 2, 2008
Messages
7,491
Points
113
Location
Scotland
First Name
Alan
Added few little bits n bobs on today. The gunsight, RF loop and drilled out the 20mm cannon barrels. I started with a 0.45mm as a pilot drill then gradually opened the barrel up with a 0.55mm then finished off with a 0.6mm. I didn't want to risk it any further than that. Here's the barrels.

Will do a few more bits tomorrow (maybe) depending on how i feel after work lol
 

Attachments

  • Hasegawa 1.32 Fw190 A8 Schlangenschwarm 53.JPG
    Hasegawa 1.32 Fw190 A8 Schlangenschwarm 53.JPG
    53.6 KB · Views: 10

Si Benson

SMF Supporter
Joined
Apr 27, 2018
Messages
3,322
Points
113
First Name
Si
Evening Al,
Bit of a late comer, but enjoying the build so far. Coming on nicely :thumb2:
 

AlanG

Moderator
Staff member
Moderator
SMF Supporter
Joined
Dec 2, 2008
Messages
7,491
Points
113
Location
Scotland
First Name
Alan
Cheers Si. My first model for about 4 years so it's a learning process
 

stillp

SMF Supporter
Joined
Nov 17, 2016
Messages
7,220
Points
113
Location
Rugby
First Name
Pete
I started with a 0.45mm as a pilot drill then gradually opened the barrel up with a 0.55mm then finished off with a 0.6mm. I didn't want to risk it any further than that.
Well, that's 19.2mm at full size, so near enough to 20mm!
Pete
 

AlanG

Moderator
Staff member
Moderator
SMF Supporter
Joined
Dec 2, 2008
Messages
7,491
Points
113
Location
Scotland
First Name
Alan
Well, that's 19.2mm at full size, so near enough to 20mm!
Pete

Never actually thought about that Pete. I just thought it looked about right lol. Good guess :smiling3:
 

AlanG

Moderator
Staff member
Moderator
SMF Supporter
Joined
Dec 2, 2008
Messages
7,491
Points
113
Location
Scotland
First Name
Alan
Jeez i forgot just how tedious adding the little bits (aerials, pitot and wingtip lights) is just before painting can begin. Little bits that need to be done but take an age when you're chomping at the bit to get the compressor fired up :smiling3:

But all there now. Pre-shading can finally begin
Mr-Bean-OMG.gif
 

boatman

SMF Supporter
Joined
Nov 8, 2018
Messages
12,885
Points
113
Location
NORFOLK UK
First Name
christopher
Hi Al well it looks a good build to me like the way you have run the b-pipes down the under cart leg an drilled out the gun barrels spot on work I think an bean seems to like your build v-good that looking forward to more chris
 

AlanG

Moderator
Staff member
Moderator
SMF Supporter
Joined
Dec 2, 2008
Messages
7,491
Points
113
Location
Scotland
First Name
Alan
Cheers Chris. Not done anything on it this week due to work and finding a join line i missed so needs filling. Typically it's in an awkward place and my mojo has taken a bit of a hit.
 

AlanG

Moderator
Staff member
Moderator
SMF Supporter
Joined
Dec 2, 2008
Messages
7,491
Points
113
Location
Scotland
First Name
Alan
Started a little pre-shading tonight. Not happy with a couple of things but hey ho. That's us modellers for you. Can't wait to actually get some proper colour on this wurger
 

Attachments

  • Hasegawa 1.32 Fw190 A8 Schlangenschwarm 54.JPG
    Hasegawa 1.32 Fw190 A8 Schlangenschwarm 54.JPG
    116.2 KB · Views: 9
  • Hasegawa 1.32 Fw190 A8 Schlangenschwarm 55.JPG
    Hasegawa 1.32 Fw190 A8 Schlangenschwarm 55.JPG
    97.9 KB · Views: 9

AlanG

Moderator
Staff member
Moderator
SMF Supporter
Joined
Dec 2, 2008
Messages
7,491
Points
113
Location
Scotland
First Name
Alan
That's the RLM 76 applied. Used Hannants Xtracrylix. Love the colours but imho they are a complete :poop: 
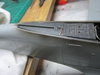
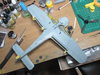
to spray. Need to start masking for the RLM 74/75 now. Bluetac at the ready!
 

Attachments

  • Hasegawa 1.32 Fw190 A8 Schlangenschwarm 56.JPG
    Hasegawa 1.32 Fw190 A8 Schlangenschwarm 56.JPG
    121.5 KB · Views: 8

Jim R

SMF Supporter
Joined
Apr 27, 2018
Messages
13,724
Points
113
Location
Shropshire
First Name
Jim
Hi Alan
Never tried Xtra crylix paints although I like their varnish. Looks to have gone on well despite the spraying difficulties. As for pre-shades - I am too heavy handed and obliterate it with the top coat :worried:
Jim
 

AlanG

Moderator
Staff member
Moderator
SMF Supporter
Joined
Dec 2, 2008
Messages
7,491
Points
113
Location
Scotland
First Name
Alan
As for pre-shades - I am too heavy handed and obliterate it with the top coat :worried:
Jim

It doesn't show through well on the pic but in the 'flesh' there is a little demarcation where the pre-shading comes through. I don't like to do it too heavy. You can always go over it post-shading with a hint of dark grey/black in the main colour.
 
Top