Centurion AVLB (slow build)

Jakko

Way past the mad part
SMF Supporter
Joined
Apr 28, 2018
Messages
10,819
Points
113
First Name
Jakko
This is one of the reasons I never dared modelling deep water on a diorama, back when I built those … Too bad this is the “model” side, too … though it has me wondering if you could salvage most of it by cutting off the water and keeping most of the rest?
 

Scratchbuilder

SMF Supporter
Joined
Jul 2, 2022
Messages
1,943
Points
113
First Name
Mike
Mike,
I feel for you mate, I have done the same. Not sure why it has dried white but I don't use the Valleyo water . I am sure though that a man of your talents will get it sorted.
I think it was some water effect that I had used before and then left it on the shelf. I do have another unopened bottle and have taken a test drop out and left it overnight to see if it is ok to use. If not then an order will be sent out for more.
 

Scratchbuilder

SMF Supporter
Joined
Jul 2, 2022
Messages
1,943
Points
113
First Name
Mike
This is one of the reasons I never dared modelling deep water on a diorama, back when I built those … Too bad this is the “model” side, too … though it has me wondering if you could salvage most of it by cutting off the water and keeping most of the rest?
Jakko,
I did think of that, but then weighed up the time it is going to take to rectify the damage compared to the time to construct another base, plus it will allow me to play with my new foam cutter.... Oh! us boys and our toys.....
 

Scratchbuilder

SMF Supporter
Joined
Jul 2, 2022
Messages
1,943
Points
113
First Name
Mike
Update,
The new base is progressing well, just about to start cleaning up the filled joints and then a final sanding and into primer ready for the groundwork (foam) to be added.
Did a dry run on the bridge to make sure everything fitted and went where it should. Just got to add the guard rail and a couple of smaller details - a final check and then off to the primer shop... Here are some pics...
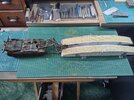
20230721_082158_HDR.jpg
Notice - I even cleaned up the bench#2....
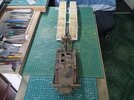
20230721_082207_HDR.jpg
The 'U' shaped frames in the centre of the bridge sections, the nearest has been cemented in place on the right section with the far 'U' frame to be added to the left section, then the whole bridge will be as you see it now with the frames cemented to their opposite frames.
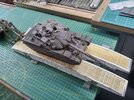
20230721_082250_HDR.jpg
And yes, it does take the weight easily and with a set of Fruil tracks....
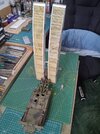
20230721_082419_HDR.jpg
And a final pic with a figure to add scale....
More later
Cheers
Mike.
 

Scratchbuilder

SMF Supporter
Joined
Jul 2, 2022
Messages
1,943
Points
113
First Name
Mike
Update (no pics).
I finally joined both halves of the bridge together yesterday (Sat) and once the pins were through the locating holes I then loaded up the two 'U' frames with liquid cement and left them for about five hours to set. I then turned the bridge over and again loaded up the frames with liquid cement and left it all to dry overnight.
In the meantime I started construction on the diagonal brace and that will be fitted today, then a final check and hopefully I can put a coat of primer on.
Mike.
 

Scratchbuilder

SMF Supporter
Joined
Jul 2, 2022
Messages
1,943
Points
113
First Name
Mike
Update,
Finally the build is complete apart from paint.
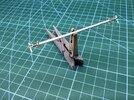
The final part to build was the cross brace. This was made from various bits and pieces to make up this part. To get the thread on the screw fittings I used a length of very fine wire found in ear plugs for a mobile phone - wrapped around the aluminium tube to get the diameter, this was then stretched and compressed to get the length of the thread...
20230723_150459_HDR.jpg
The small chains came from a Voyager Challenger 2 set that was in the spares box...
20230723_150724_HDR.jpg
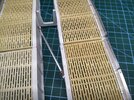
And here it is in place.
As I said this build is now complete apart from paint. The next time I post it will be in the completed section.
Cheers and many thanks for keeping up with me and my slow build.
Mike.
 

Jakko

Way past the mad part
SMF Supporter
Joined
Apr 28, 2018
Messages
10,819
Points
113
First Name
Jakko
Can’t wait to see the result :smiling3:
 

Jim R

SMF Supporter
Joined
Apr 27, 2018
Messages
13,735
Points
113
Location
Shropshire
First Name
Jim
Beautiful work Mike. A real shame about the water. Here's hoping base no2 is fine.
 

Scratchbuilder

SMF Supporter
Joined
Jul 2, 2022
Messages
1,943
Points
113
First Name
Mike
Beautiful work Mike. A real shame about the water. Here's hoping base no2 is fine.
Working on it as we speak, got the new foam cutter yesterday, spent an hour trying different foam samples, broke the wire once. so all in all a productive day..
 

Jim R

SMF Supporter
Joined
Apr 27, 2018
Messages
13,735
Points
113
Location
Shropshire
First Name
Jim
I've got a Proxxon hot wire cutter. It works very well but it's easy to push too hard and break the wire. I bought a foot switch for mine which helps as you have two free hands for better control.
 

Scratchbuilder

SMF Supporter
Joined
Jul 2, 2022
Messages
1,943
Points
113
First Name
Mike
I've got a Proxxon hot wire cutter. It works very well but it's easy to push too hard and break the wire. I bought a foot switch for mine which helps as you have two free hands for better control.
I cannot remember the name of this one (Chinese) but it comes with a box that you can control the heat with and as a basic start up at £99 job it will do untill I master the point of not trying to surgically remove my fingers. But I also ordered a replacement wire just in case which I think is slightly thicker. But I agree it is so easy to push too hard and break the wire. But as I said once I really get the hang of this one, then I will progress onto a more useable one that we use in our hobby.
 

Neil Merryweather

SMF Supporter
Joined
Dec 29, 2018
Messages
4,425
Points
113
Location
London
First Name
Neil
I cannot remember the name of this one (Chinese) but it comes with a box that you can control the heat with and as a basic start up at £99 job it will do untill I master the point of not trying to surgically remove my fingers. But I also ordered a replacement wire just in case which I think is slightly thicker. But I agree it is so easy to push too hard and break the wire. But as I said once I really get the hang of this one, then I will progress onto a more useable one that we use in our hobby.
In my experience ,Mike, the Proxxon is a very well designed machine and is probably easier to master than something more basic- sorry.
try searching for Nichrome wire by the reel- in fact you could get the Proxxon replacement reel - cheaper and better than individual pieces
 

Scratchbuilder

SMF Supporter
Joined
Jul 2, 2022
Messages
1,943
Points
113
First Name
Mike
In my experience ,Mike, the Proxxon is a very well designed machine and is probably easier to master than something more basic- sorry.
try searching for Nichrome wire by the reel- in fact you could get the Proxxon replacement reel - cheaper and better than individual pieces
Thanks Neil,
The one thing I have found is that it does not like some of the foam used in home insulation (after you strip off the silver paper coating). But at the moment this will do untill I get out of nappies and start walking. But will take on board your advice on the wire and order one or ten....
 

Scratchbuilder

SMF Supporter
Joined
Jul 2, 2022
Messages
1,943
Points
113
First Name
Mike
Update.
The base is well underway, got off with good behaviour after I sanded down and re-sprayed the freezer in satin black for SWMBO - she keeps standing in that pose they take up when looking at what you have just finished - should I be worried.... Does that mean I now have to re decorate the kitchen.
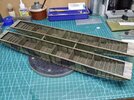
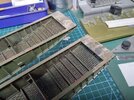
So the bridge got painted and the weathering has started. I decided to split this into two operations - inside first and then outside to finish off. I did not want a pristine just out of the field workshop finish, so went to work with the pigments.
20230731_150655_HDR.jpg


20230731_150737_HDR.jpg
More later. Mike.
 
Top