Dragon 1/35 M4 Mortar Carrier

scottie3158

SMF Supporter
Joined
Apr 27, 2018
Messages
12,692
Points
113
Location
Spalding
First Name
Paul
Nice work I did the AFV meat chopper and the assembly is pretty much identical. You are making great progress.
 

Dave Ward

Still Trying New Things
SMF Supporter
Joined
Apr 27, 2018
Messages
8,644
Points
113
Location
South Gloucestershire
First Name
David
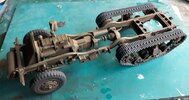
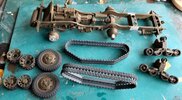
After a dose of primer, then a topcoat of Vallejo ModelAir Olive Drab, I painted all the rubber bits AK3 Tyre Black & the tracks AK3 Anthracite
DSCF3201.JPG

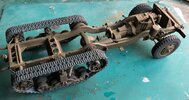
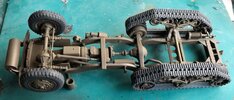
Then - the assembly! - Whichever way you assemble the tracks, they're going to be a bit of a tussle! You can see where bits go, but you have to flex those tracks alarmingly to get them to go over the roadwheels/return roller. Anyway, after a 30 minute wrestling match..........................
DSCF3202.JPGDSCF3203.JPGDSCF3204.JPG

OK, I've had to go round and touch up all those bits of paint that I scraped off during the extensive handling needed! I reckon that's the most difficult part of the model completed now. I'll have to paint the exhaust pipe, but that's the chassis ready to be put aside for later!
Dave
 

Jakko

Way past the mad part
SMF Supporter
Joined
Apr 28, 2018
Messages
10,789
Points
113
First Name
Jakko
That came out well, good to know it’s a bit of an exercise to get the tracks on but you got there without anything breaking, so I’d say all is fine :smiling3:
 

adt70hk

I know its a bit sad but I like quickbuild kits!!!
SMF Supporter
Joined
Sep 4, 2019
Messages
9,491
Points
113
First Name
Andrew
Coming on very nicely Dave, Looking good so far!

ATB.

Andrew
 

Dave Ward

Still Trying New Things
SMF Supporter
Joined
Apr 27, 2018
Messages
8,644
Points
113
Location
South Gloucestershire
First Name
David
If I were to make this model again ( extremely unlikely, as they're very expensive ), I'd not add the road wheel bogies where the instructions say. I'd assemble each track unit, adding the sprocket & idlers loose & inserting the bogie loose into the track assembly. Then I'd offer the whole lot up to the chassis fitting over the drive shaft, idler axle & fitting the bogie mount onto the chassis rail. Keeping them loose should just give enough jiggle room to ease the parts together. Adding a few drops of TET should hold it all on place - considering the struggle to get it together. Sorry if this sounds weird, but I'm running through it in my head, the way to assemble it with minimum grief! ( not the way I did it! )
Dave
 

Tim Marlow

Little blokes aficionado
SMF Supporter
Joined
Apr 27, 2018
Messages
16,775
Points
113
Location
Somerset
First Name
Tim
However you did it Dave, that’s looking very smart :thumb2:
 

JR

Member of the Rabble and Pyromania Consultant
SMF Supporter
Joined
May 26, 2015
Messages
17,275
Points
113
Location
lincs
First Name
John
Agree with the guys it's looking good . Good for you getting those tracks on.

Personally I like that premade chassis, that's what's puts me off from trucks and builds like this .
 

Dave Ward

Still Trying New Things
SMF Supporter
Joined
Apr 27, 2018
Messages
8,644
Points
113
Location
South Gloucestershire
First Name
David
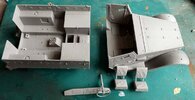
Once you've worked out the placement of the parts, the fit is exquisite!, it's just not obvious at first..............
I spent ages hunting for a part S3, the S3 I found didn't remotely look like the instructions.................until I noticed that there is another sprue called 'S'! ( It's only small is my excuse )
DSCF3205.JPG
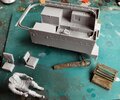
Aside from the fact that there aren't any pedals - there aren't any decals for the dashboard instruments, and not even a paint reference. I'll have to look in the decal box & find some suitable dials. There is a driver, who would conceal the lack of pedals & I'll paint him up, to see if he looks the part. You have the option of having two panels open ( one either side ) showing more ammo stowage, but I'm not doing that. The back of the bonnet is scored, so you can have one leaf open to show the nifty little engine, but that isn't mentioned in the instructions..............
Dave
 

Jakko

Way past the mad part
SMF Supporter
Joined
Apr 28, 2018
Messages
10,789
Points
113
First Name
Jakko
Surely it had pedals?
Of course it did :smiling3:

attachment.aspx
(source)

This is an M3, but all these M2, M3, M4, M13, M15, M16, M21 etc. halftracks had the exact same cab, aside from minor things like the number of seats.
 

Dave Ward

Still Trying New Things
SMF Supporter
Joined
Apr 27, 2018
Messages
8,644
Points
113
Location
South Gloucestershire
First Name
David
Of course it did :smiling3:

attachment.aspx
(source)

This is an M3, but all these M2, M3, M4, M13, M15, M16, M21 etc. halftracks had the exact same cab, aside from minor things like the number of seats.
Jakko,
The dials on the dashboard all seem to be white, & knobs black, which simplifies things. The driver will obscure the lack of pedals, so that's sorted!
Dave
 

Dave Ward

Still Trying New Things
SMF Supporter
Joined
Apr 27, 2018
Messages
8,644
Points
113
Location
South Gloucestershire
First Name
David
The body is ready to be primed & topcoated, I've left off the seats, radio, the mortar & the ammo stowage, as they'll need a bit of detail painting.
DSCF3207.JPG
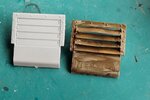
Driver assembled roughly ( arms are blutacked on! ) ..............................and the front radiator shutters. Each photo etched shutter fits into a slot on either side of the surround. Or it would, if the shutters weren't too long, or the aperture too narrow. Widening the aperture was the easiest, but in the process, the locating slots vanished. Adding four PE shutters by eye was aggravating! I've done the best I could, but if after priming & topcoating, it looks rubbish, then I'll go to plan 'B' - which is using the supplied shut version!
DSCF3208.JPGOne of those jobs that looked simple on the face of it, but ended up taking half an hour - so I didn't quite get as far as I expected today!
Dave
 

Dave Ward

Still Trying New Things
SMF Supporter
Joined
Apr 27, 2018
Messages
8,644
Points
113
Location
South Gloucestershire
First Name
David
I quite like the slightly 'wobbly' appearance of the louvres Dave. I bet the real ones weren't neat and straight for long.
Pete
Pete,
what I'm hoping to do, after painting, is use the tweezers to try and even the spacing out, but it's nice to have a fallback. The shutters were the same armour as the bodywork, so you'd have to hit something pretty hard to bend them!
Dave
 
Top