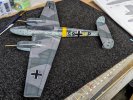
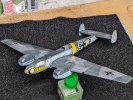
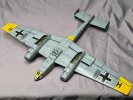
Eduard 1/48 Bf 110E

Andy T

SMF Supporter
Joined
Apr 26, 2021
Messages
2,054
Points
113
Location
Sheffield
First Name
Andy
Similar with me,was going to spray in the garage,but it was -2 this morning! :sad:
Apparently it was - 1 in there overnight, so practically tropical now :smiling5:

Andy,
Your paint work is always on another level mate, she is looking well tasty.
Thanks Paul, I'm hoping a dazzling paint job will distract people from the flaws :smiling3:
 

Jakko

Way past the mad part
SMF Supporter
Joined
Apr 28, 2018
Messages
10,954
Points
113
First Name
Jakko
Is that ice on the screen of the thermometer? :smiling3:
 

Andy T

SMF Supporter
Joined
Apr 26, 2021
Messages
2,054
Points
113
Location
Sheffield
First Name
Andy
Is that ice on the screen of the thermometer? :smiling3:
I wouldn't be surprised :smiling5:

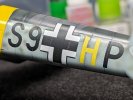
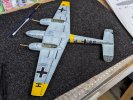
Most of the decals are on now. I ran out of time to get the big wasp one on but had always planned to do that last after practicing on the others.

A few of the tiny markings need adding too but on the whole they are going down quite nicely.

(controversial markings blurred out for social media purposes)

1000005481.jpg

1000005482.jpg
 

Andy T

SMF Supporter
Joined
Apr 26, 2021
Messages
2,054
Points
113
Location
Sheffield
First Name
Andy
Thanks Joe. I'm enjoying this part but know there's more drama to come :smiling5:

I got the wasp decal on today. It's far from perfect as it is split into 3 pieces along panel lines and has a few compound curves to negotiate, as well as the gun & cannon openings. Pretty happy that it's on though, and with a few touch ups here & there it should be fine.

1000005494.jpg

Peeling the decal film off is an exercise in patience. I tried a few methods, first dissolving it off with mineral spirits which was fast, but I was a bit heavy handed and removed some of the actual ink as well in places.

So onto the "peeling" method. After trying a few different tools I found a good old toothpick worked the best for me, lifting up an edge and gently scraping the film off.

I only bothered with the larger decals as they settled pretty well anyway so I didn't feel the need to mess with the tiny ones, but it was good to have a play around.

Here's how some looked after removing the film

1000005490.jpg
 

adt70hk

I know its a bit sad but I like quickbuild kits!!!
SMF Supporter
Joined
Sep 4, 2019
Messages
9,526
Points
113
First Name
Andrew
Andy

Just had a catchup! That's looking very good despite the MANY issues you've had with the process.....Hope my one of these doesn't give me as much trouble!

ATB

Andrew
 

Tim Marlow

Little blokes aficionado
SMF Supporter
Joined
Apr 27, 2018
Messages
16,874
Points
113
Location
Somerset
First Name
Tim
Decals looking very good Andy. Glad the peeling went well. I went with a scalpel and tweezers, I never thought about using a toothpick.
 

Andy T

SMF Supporter
Joined
Apr 26, 2021
Messages
2,054
Points
113
Location
Sheffield
First Name
Andy
Thanks chaps.

I also used tweezers in places Tim, when I'd got a nice peel going.


I've given in to the scam and ordered Edwards resin exhausts. They obviously make the plastic parts so hard to assemble with 28 badly moulded blobs that one is forced to buy their hop-up packs if you want the model to look anything like decent.

Of course the only retailer also has their own scam going with a minimum order value, so I've ordered the rear MG too, which means the add on now owe me more than the original kit :rolling:

Can you tell I've really had enough of this? :tears-of-joy:
I've come so close to smashing the thing up but my Autistic brain just won't let a lump of plastic beat me!
 

Tim Marlow

Little blokes aficionado
SMF Supporter
Joined
Apr 27, 2018
Messages
16,874
Points
113
Location
Somerset
First Name
Tim
Exhaust ports are a weak point of many aircraft kits I find. They are awkward to clean up and the shape makes it hard to open out the aperture. The Eduard ones will lift this kit a level or two I’m sure.
I’ve used quickboost resin exhausts in the past Andy, but not sure if they are still available. I’ve noticed that since lock downs AM parts are not as easy to source. They were easily sourced in the UK and fairly cheap for something that saved an hour or two of tedious clean up.
 

Andy T

SMF Supporter
Joined
Apr 26, 2021
Messages
2,054
Points
113
Location
Sheffield
First Name
Andy
Yes, it wouldn't be so bad if they'd moulded them as one piece, but with 24 separate pipes (8 or 9 different types) that need attaching to their bases (which they recommend to attach to the nacelles first) it's way beyond what I can manage well. Or even be bothered with to be honest, seeing as it'll go in the recycling as soon as it's finished.
 

Tim Marlow

Little blokes aficionado
SMF Supporter
Joined
Apr 27, 2018
Messages
16,874
Points
113
Location
Somerset
First Name
Tim
I wouldn’t bin it Andy. The finish on her is great. If you really don’t want to keep it, stick it on eBay. You will probably get enough to cover your next kit purchase if nothing else.
 

Andy T

SMF Supporter
Joined
Apr 26, 2021
Messages
2,054
Points
113
Location
Sheffield
First Name
Andy
The majority of my builds go in the bin as soon as they are finished, I just don't have the room or need to store them, and can't be bothered with the hassle of selling.

I have kept a few memorable pieces but once the modelling bit is done most don't hold any value for me.
 

Tim Marlow

Little blokes aficionado
SMF Supporter
Joined
Apr 27, 2018
Messages
16,874
Points
113
Location
Somerset
First Name
Tim
I get that to be honest. I do put mine in a cabinet, but I really don’t know why. Once they are in there I pretty much don’t look at them again.
 

The Smythe Meister

Born to be WILD....... until about 9pm
SMF Supporter
Joined
Jan 30, 2019
Messages
5,812
Points
113
Location
Devon
First Name
Andy
Thanks Joe. I'm enjoying this part but know there's more drama to come :smiling5:

I got the wasp decal on today. It's far from perfect as it is split into 3 pieces along panel lines and has a few compound curves to negotiate, as well as the gun & cannon openings. Pretty happy that it's on though, and with a few touch ups here & there it should be fine.

View attachment 496083

Peeling the decal film off is an exercise in patience. I tried a few methods, first dissolving it off with mineral spirits which was fast, but I was a bit heavy handed and removed some of the actual ink as well in places.

So onto the "peeling" method. After trying a few different tools I found a good old toothpick worked the best for me, lifting up an edge and gently scraping the film off.

I only bothered with the larger decals as they settled pretty well anyway so I didn't feel the need to mess with the tiny ones, but it was good to have a play around.

Here's how some looked after removing the film

View attachment 496084
Well,I for one, like that very much Andy.... great job :smiling3:
 

Andy T

SMF Supporter
Joined
Apr 26, 2021
Messages
2,054
Points
113
Location
Sheffield
First Name
Andy
Andy, Steve, thanks very much chaps. Really appreciated.

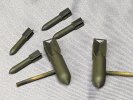
Not much to show since yesterday. It's had a "sludge" wash all over it and I've been targeting some areas with panel liner too. I've also started brushing in some of the details and got some colour on the bombs. The instructions called out for Mr Color #55 Khaki but it seemed too vibrant, so I toned it down with an enamel wash.

I hope to get some satin varnish on it tomorrow evening, then I need to get back to the other stuff. I can't keep putting it off :smiling5:

1000005503.jpg

1000005502.jpg
 
Top