Geoffer’s - KP 1/72 Supermarine Spitfire FR.IXc

Geoffers

SMF Supporter
Joined
Jan 26, 2017
Messages
1,022
Points
113
Location
Shropshire
First Name
Geoff
Hello Guys,


E0951E10-5FCC-41EF-A3A1-091B0C7BB80F.jpeg

A bit late to the party but this will be my entry to th GB.

1735AB15-B7E0-4ADC-BC64-75BA0033CAD3.jpeg

Some interesting call out options on the rear of the box.
While the Belgian AF example is nice it will have to be one of the pink RAF examples :smiling4:

So here’s what’s in the box.

E9FE8B7B-0A60-4479-A6E1-1A8255C8E3BA.jpeg

A0ED66A3-F26C-4CA7-9B9B-2754C26070B1.jpeg
C9220016-166A-4AD1-A4F3-B301889E79E8.jpeg

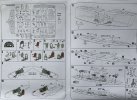
Seem like nice clear instructions, I like how they highlight the colour call out.

A2D393FD-6437-4C7C-86A9-4AF7C7A8023C.jpeg
CBCCBBFA-D95F-4056-BC6A-659C61727F38.jpeg
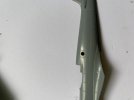
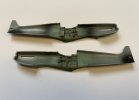
Two sprues of crisp grey plastic.
8BD7C156-11D0-45C1-AC01-59BA68ECB2C7.jpeg
Clear parts, unfortunately only a closed canopy option.

BFDAF7E1-6D80-4C8C-8D95-A71C5E4A8927.jpeg
Decals seem nice.

Seems quite a simple but nicely detailed kit. Shouldn’t take too long once I manage to get it started.

Hopefully a progress report soon, thanks for looking :thumb2:

Geoff.
 

Attachments

  • DCCC5874-5F1F-4D04-A080-4B97652CB0BD.jpeg
    DCCC5874-5F1F-4D04-A080-4B97652CB0BD.jpeg
    246.2 KB · Views: 6

colin m

Moderator
Staff member
Moderator
SMF Supporter
Joined
Dec 26, 2008
Messages
8,605
Points
113
Location
Stafford, UK
First Name
Colin
A pink Spitfire, a splendid idea.
 

Geoffers

SMF Supporter
Joined
Jan 26, 2017
Messages
1,022
Points
113
Location
Shropshire
First Name
Geoff
Thanks Ian and Peter.

It looks nicely detailed, just hope it’s not too tricky going together.

Geoff.
 

Jim R

SMF Supporter
Joined
Apr 27, 2018
Messages
13,766
Points
113
Location
Shropshire
First Name
Jim
Hi Geoff
The kit looks nice. Not a make I've come across. Detail looks good and hopefully the fit will be too. It may be fairly simple with fewer parts but in many ways that is better than some manufacturers who seem to think that ten parts where two would do is an advantage.
Jim
 

Geoffers

SMF Supporter
Joined
Jan 26, 2017
Messages
1,022
Points
113
Location
Shropshire
First Name
Geoff
I haven’t had chance to use them yet Ian so not sure.

I’ve used the blue range which are formulated for brush work, they worked well through the airbrush but had a flat finish.

The red range are formulated for airbrush use so it will be interesting to see how they differ.

Geoff.
 

Geoffers

SMF Supporter
Joined
Jan 26, 2017
Messages
1,022
Points
113
Location
Shropshire
First Name
Geoff
Hi Geoff
The kit looks nice. Not a make I've come across. Detail looks good and hopefully the fit will be too. It may be fairly simple with fewer parts but in many ways that is better than some manufacturers who seem to think that ten parts where two would do is an advantage.
Jim

Yes it looks good Jim, I’m looking forward to starting it I just need to finish another build first.

Geoff.
 

Geoffers

SMF Supporter
Joined
Jan 26, 2017
Messages
1,022
Points
113
Location
Shropshire
First Name
Geoff
Hello,

Finally had chance to kick this one off :smiling4:

As with most aircraft builds this onestarts with the cockpit.

The appropriate parts have been cleaned up, primed and given a top coat of Hataka A025 Interior Grey/Green. The seat has been painted with a base coat of Tamiya XF-9 Hull Red, this will have some dry brushing with a lighter rust colour once dry.

F094B5CB-F6E2-4CE1-AF4C-F3F23ECD9A45.jpeg

The wings come in the clipped form with separate wing tips which will need to be added once the clipped parts are cut off.

325C1B4E-4470-4B4B-957D-EE24FBDFA8D3.jpeg

The undercarriage bays have also been cemented into place and painted again with Hataka Interior Grey/Green.

Test fitting the fuselage and wings indicates some seam work / gap filling will be needed

64622117-9744-4284-B45B-A4FE3499791D.jpeg

So a bit more to do, another update soon.

Thanks for looking :thumb2:

Geoff.
 

adt70hk

I know its a bit sad but I like quickbuild kits!!!
SMF Supporter
Joined
Sep 4, 2019
Messages
9,512
Points
113
First Name
Andrew
Nice start!
 

Jim R

SMF Supporter
Joined
Apr 27, 2018
Messages
13,766
Points
113
Location
Shropshire
First Name
Jim
Hi Geoff
Glad you have found time to make a start. All seems to be going fine. Wing to fuselage joins are often the bane of aeroplane builds.
Jim
 

Geoffers

SMF Supporter
Joined
Jan 26, 2017
Messages
1,022
Points
113
Location
Shropshire
First Name
Geoff
Your right Jim, it’s all part of the “fun” :tears-of-joy:

Hopefully it won’t be quite as bad once it’s built up properly.

Geoff.
 

Tim Marlow

Little blokes aficionado
SMF Supporter
Joined
Apr 27, 2018
Messages
16,819
Points
113
Location
Somerset
First Name
Tim
Going well Geoff. You might be able to improve the wing to fuselage joint a little by pulling the wings up to the correct dihedral. It could just be that the bottom wing part is a little flat. If not then it looks like a sliver of plastic card is required. Filler might crack under later handling and then show through the paint finish.
 

Geoffers

SMF Supporter
Joined
Jan 26, 2017
Messages
1,022
Points
113
Location
Shropshire
First Name
Geoff
Thanks Tim, that’s a good idea.

I’ll have a bit of a play with it and see how it looks once I start buttoning it up.

Geoff.
 

Geoffers

SMF Supporter
Joined
Jan 26, 2017
Messages
1,022
Points
113
Location
Shropshire
First Name
Geoff
Hello guys,

I’ve managed to make some progress with the build at last.

Firstly cockpit is done.

There is no decal supplied for the instrument panel so it was given a dry brush and looks reasonable ok, not much will be seen anyway once it’s all closed up.
I found some pe seatbelts from the spares box and it was all given a bit of weathering with Tamiya panel line wash.

FA4C964D-6675-4D94-A794-1FCF88242C93.jpeg
9EF90243-5B6C-4BE7-AE88-B68C4924EB52.jpeg
BB88D165-1813-454C-9027-1801D3D27604.jpeg

The radiators under the wing and the cannon bulges on the top of the wings have been added.

314ADAA0-AFB8-4276-B6E0-CCA793B484E5.jpeg

The exhausts need adding before the fuselage halves are joined together but the gap is slightly too large for a good fit.
C1FEAAF9-B4A2-4749-8B1F-F6E56A107496.jpeg

So I glued in some backing plates using strips of plasti-card which gives a more secure fixing.

719315A4-3567-4070-ADD8-DF6F90488A95.jpeg

The side window behind the cockpit where the camera would be fitted is represented by a black decal.
I’ve decided to drill it out instead and will fill the gap using crystal clear near the end of the build.

4A4B29AC-D390-4B3E-9AD5-6DD9DF1466A1.jpeg

The cockpit has been sandwiched between the fuselage halves and the wings have been added. Although it will need some cleaning up it is starting to take shape.

61EEEE5F-E32A-44A5-BEA5-586EC960E691.jpeg
5FD402B2-D54A-4877-9C85-5A6E3CDFEAF1.jpeg
F6E978A1-01AD-4E51-B375-C50755FE653E.jpeg

Hopefully another update soon.

Thanks for looking :thumb2:

Geoff.
 

Attachments

  • 5B5D5809-B9BE-4F12-A381-F84E9832485A.jpeg
    5B5D5809-B9BE-4F12-A381-F84E9832485A.jpeg
    84 KB · Views: 3
  • B21987AE-999F-48ED-A841-039D21F11A4C.jpeg
    B21987AE-999F-48ED-A841-039D21F11A4C.jpeg
    47.4 KB · Views: 1
Top