Hopefully.
- Home
- Forums
- Group Builds
- The New Group Builds (2017 on)
- The User Created Group Builds
- 2022 Builds
- Dave's Half track GB: Sept - Nov 2022
You are using an out of date browser. It may not display this or other websites correctly.
You should upgrade or use an alternative browser.
You should upgrade or use an alternative browser.
Ian M's Sd.Kfz.8 12t half track. Trumpeter. 1/35.
- Thread starter Ian M
- Start date
Great progress Ian!!! The paint job looks really good. The parts you mentioned, normally would be painted by the manufacturer. The tranny would be dark gray or the motor color. The others can be painted in dark yellow. It really depends on which year the 12 ton was built. Before '43, gray and after the switch to dark yellow, then dark yellow. It's your choice, so paint them what color you would like. They won't be seen anyway...
The tracks look decent too. I would leave the pads and touch up the links with AK 722 dark tracks or the similar color. You can muck them up when you weather the 12 ton. HTHs...
Jim, if you've seen his greenhouse, you'll know what they're for..........
Prost
Allen
The tracks look decent too. I would leave the pads and touch up the links with AK 722 dark tracks or the similar color. You can muck them up when you weather the 12 ton. HTHs...
Jim, if you've seen his greenhouse, you'll know what they're for..........
Prost
Allen
That they are Jim. If you want I can find some for you they're normally everywhere here where there's a flea market..Those scales in the photo - are they for letters? I love old things like that.
Shhhhhhhhhhhhhhh. You said you wouldn't tell.Jim, if you've seen his greenhouse, you'll know what they're for..........
It's medicinal I tell you!
Thanks for the tips for the colour question.
I have painted the rubber blocks on the tracks 'tyre black' and the darker colour has lifted the tracks a bit. (picture earlier was just the grey primer...
Jim R
SMF Supporter
The reason I guessed what the scales were was that some very similar are for sale in an antique/second hand shop in town. I must call in sometime.
Right then. Sitting looking for inspirations pictures on the interweb.... Managed two things.
A: Confused myself
B: concluded that the Wehrmacht camouflage has more twists and turns than a mountain pass.
I figured out that I had the colours I needed for a Tri colour scheme and ended up just going for it. LOL.
So...
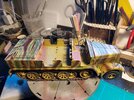
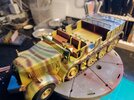
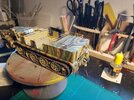
There is a looooong way to go yet. There's also a whole heap of liquid masking over the dark Yellow that should, hopefully make it look like the camo has been chipped/scratched off..
A few bits need adjusting a bit as I thing some of the overspray is just a bit to much.
Thinking of filling the basket with bits and bobs.
A total nube at this German camo lark so any suggestions. (polite ones that is) will be gratefully received.
A: Confused myself
B: concluded that the Wehrmacht camouflage has more twists and turns than a mountain pass.
I figured out that I had the colours I needed for a Tri colour scheme and ended up just going for it. LOL.
So...


There is a looooong way to go yet. There's also a whole heap of liquid masking over the dark Yellow that should, hopefully make it look like the camo has been chipped/scratched off..
A few bits need adjusting a bit as I thing some of the overspray is just a bit to much.
Thinking of filling the basket with bits and bobs.
A total nube at this German camo lark so any suggestions. (polite ones that is) will be gratefully received.
Camo. was most often applied in the field by expedient means in a way to work with the current/expected environment so differed by quite a bit. Thus, almost anything goes, from basic three color to stripes, blotches or "ambush scheme".
Tros was usually the first unit to be absorbed into fighting units to replace losses in personnel & vehicles after normal replacements were exhausted. Therefore remaining vehicles took on the packs, bedrolls, tents & cooking utensils normally carried by that unit. Fuel was always a priority for motorized units so even empty jerry cans were hoarded to take advantage of serendipitous fuel discoveries.
Tros was usually the first unit to be absorbed into fighting units to replace losses in personnel & vehicles after normal replacements were exhausted. Therefore remaining vehicles took on the packs, bedrolls, tents & cooking utensils normally carried by that unit. Fuel was always a priority for motorized units so even empty jerry cans were hoarded to take advantage of serendipitous fuel discoveries.
scottie3158
SMF Supporter
That looks very good indeed. As you say there are hundreds of different applications.Right then. Sitting looking for inspirations pictures on the interweb.... Managed two things.
A: Confused myself
B: concluded that the Wehrmacht camouflage has more twists and turns than a mountain pass.
I figured out that I had the colours I needed for a Tri colour scheme and ended up just going for it. LOL.
So...
View attachment 464111View attachment 464112View attachment 464113
There is a looooong way to go yet. There's also a whole heap of liquid masking over the dark Yellow that should, hopefully make it look like the camo has been chipped/scratched off..
A few bits need adjusting a bit as I thing some of the overspray is just a bit to much.
Thinking of filling the basket with bits and bobs.
A total nube at this German camo lark so any suggestions. (polite ones that is) will be gratefully received.
Jim R
SMF Supporter
Well I think it looks fine. As you've said there were many camo variations so you can't really be wrong.
Panzerwrecker
SMF Supporter
- Joined
- Mar 2, 2022
- Messages
- 362
- Points
- 93
- First Name
- Los
That camo is looking good.
The only advice I would give when airbrushing a camo scheme is to be mindful that this vehicle will almost certainly have received any camo in the field.
Just imagine the reach you could attain with a spray gun yourself over the bodywork. You would constantly have to climb all over it and mate up your existing pattern, often covering tools and other paraphanalia in the process. Add an extra colour and you could see how criss-crossing patterns would likely occur. I know often that is what was demanded but often you see the two colours cross when they were intended only to demarcate the DG basecoat.
Although a decent painter working with a decent gun could regulate the spray pattern the paint thickness could be inconsistant so a rough patch here and there would be likely too.
I think to get a tri-tonal pattern in scale to look good first time is difficult without using ref pics and yours looks good. They often don't look pleasing to the eye because they were never intended to be.
Corners covered to disguise the outline were far more important than to aesthetically please anybody.
I would definately tone the overall appearance with a light misting of the base colour or even a slightly lighter shade. Take the edge of the stark colour contrasts so to speak.
- Joined
- Apr 28, 2018
- Messages
- 10,839
- Points
- 113
- First Name
- Jakko
Like I said in another thread in this GB, a lot of modellers don’t seem to realise this important pointThey often don't look pleasing to the eye because they were never intended to be.
Corners covered to disguise the outline were far more important than to aesthetically please anybody.

Also, I would add to your explanation that most people, whether soldiers or modellers, don’t know the principles of camouflage painting, so when painting without guidance (such as a manual printed for this exact purpose), they just do what seems or looks right — which often isn’t something that will actually camouflage as well as it could. For a model, this can mean that you may want to put yourself into the mind of a soldier who’s just been told to “spray camouflage onto this vehicle using these here paints.”
I often use the camo. 'squint test'. Squint while looking at your result & see if the pattern obscures the the shape of the object making it unidentifiable. Placing it in an example environment usually makes it close to invisible. There are rules for camo application, but I've found this test usually meets the requirements.
So the colour is good the pattern good. Thanks chaps.I would definately tone the overall appearance with a light misting of the base colour or even a slightly lighter shade. Take the edge of the stark colour contrasts so to speak.
Now I can move on to blending and shading...
I can suddenly see why you are so taken by Russian armour. Green paint. Job done. lolInteresting posts to your great build Ian about the camo . From what I can gather you could just throw it on and call it done !
Not forgotten you all. The camouflage in now under a gloss coat and I am contemplating how to weather it. As in a little or a lot I know (sort of) how to, just a question of how much.
Watch this space.
Watch this space.
Right then, Befor I get to carried away slinging mud around:
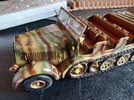
Just a little teaser of where I am at. Its had the liquid masking peeled off and a good coat of gloss.
Question time for all you diorama builders.
Normandy: If memory serves that was summer wasn't it? so would have been more dry and dusty that muddy and wet. Any feed back on that?
Soil colour. Is it the light chalky loam of the Dover straights or the rich red clay soil. Dark rich soil or sticky clay?
I need to figure this out befor Putting dirt on things.
Also another quick tease of the load this has been pulling around. AND NO there are NO BUILD PICTURES


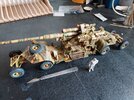
Yes it was 'fun to build' a bugger to paint, has things which could be better. Here is Karl waiting to set the thing up.
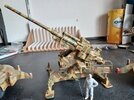
Here is Karl standing in a relaxed pose after having helped get the platform ready to fire.
I wont go into full detail but:
The hard vinyl tyres apart from being a pain to paint are rather loose on the rims. Super-glue just laughs and looses it grip.
The transport wheels boogie sets have no real fixing and will drop the platform at the slightest look. I figured a way to keep the boogie attached to the "body"
Some details are a bit odd Some of the gratings for platforms are done as such, as a grate. The others are just solid. Also the railing on the loaders platform should fold down for transport. It cant. But the platforms can be folded.
Oh there is NO towing connectors at all. Guess they forgot that bit.
Any how. Being towed or ready to fire? Do you think an 88mm crew would work...
Should I just build the Anti tank gun instead? lol

Just a little teaser of where I am at. Its had the liquid masking peeled off and a good coat of gloss.
Question time for all you diorama builders.
Normandy: If memory serves that was summer wasn't it? so would have been more dry and dusty that muddy and wet. Any feed back on that?
Soil colour. Is it the light chalky loam of the Dover straights or the rich red clay soil. Dark rich soil or sticky clay?
I need to figure this out befor Putting dirt on things.
Also another quick tease of the load this has been pulling around. AND NO there are NO BUILD PICTURES


Yes it was 'fun to build' a bugger to paint, has things which could be better. Here is Karl waiting to set the thing up.

Here is Karl standing in a relaxed pose after having helped get the platform ready to fire.
I wont go into full detail but:
The hard vinyl tyres apart from being a pain to paint are rather loose on the rims. Super-glue just laughs and looses it grip.
The transport wheels boogie sets have no real fixing and will drop the platform at the slightest look. I figured a way to keep the boogie attached to the "body"
Some details are a bit odd Some of the gratings for platforms are done as such, as a grate. The others are just solid. Also the railing on the loaders platform should fold down for transport. It cant. But the platforms can be folded.
Oh there is NO towing connectors at all. Guess they forgot that bit.
Any how. Being towed or ready to fire? Do you think an 88mm crew would work...
Should I just build the Anti tank gun instead? lol
scottie3158
SMF Supporter
Looking very nice. I think deployed.

