Looks great Andrew. Glad I’m not the only one using blue tack for this purpose either….
- Home
- Forums
- Military Vehicles
- Military Vehicles Under Construction
- Armoured Vehicles Under Constuction
You are using an out of date browser. It may not display this or other websites correctly.
You should upgrade or use an alternative browser.
You should upgrade or use an alternative browser.
Junior's 3x 1/72 PSC Cromwells
- Thread starter adt70hk
- Start date
- Joined
- Sep 4, 2019
- Messages
- 9,505
- Points
- 113
- First Name
- Andrew
Thanks Tim...... I've still not worked out a better way of holding a vehicle so I can paint it in one go. I normally use something like the stand below with a little bit of blue tack on the end, which is pushed through the turret mounting hole to stick to the base of the hull but in this case it wasn't quite long enough for what I needed hence the Blu-Tack around the hole....Looks great Andrew. Glad I’m not the only one using blue tack for this purpose either….

I’ve got many little blocks like that, differing in some ways, used for various projects over the years. Can’t beat golf tees for small figures though…..
- Joined
- Sep 4, 2019
- Messages
- 9,505
- Points
- 113
- First Name
- Andrew
Agreed.....I just need to stick the magnets I recently bought to the tees I already have.I’ve got many little blocks like that, differing in some ways, used for various projects over the years. Can’t beat golf tees for small figures though…..
- Joined
- Sep 4, 2019
- Messages
- 9,505
- Points
- 113
- First Name
- Andrew
Good morning all
So a bit more progress this week and a bit of a mini-breakthrough on the AB front for me.
Although I've had a compressor and ABs (of varying quality) for three and half years now, because of my set up (and family life), getting consistent use has not always been easy and in some case there are literally months between an AB seeing paint/primer. This means that I'm not as far along as I should be with it and whilst I generally get on ok with general spraying, I have struggled with the really fine stuff in particular.
In the last couple of weeks I've been rereading some online articles and watching a couple of YouTube vids and experimenting again - not quite going back to basics but a definite reworking of my 'technique'. As a result, I feel like I've almost cracked the Holy AB Trinity of needle size, pressure and paint consistency - sPending half hour or more on Wednesday just doodling on a piece of paper working out again how far I could and couldn't push things, and getting some really fine lines even with my 0.4mm needle. Obviously I realise paper is a lot more absorbent than plastic and so it's less likely to run but it's definitely progress and I'm seeing a lot less of the dreaded dry tip!!!
Anyway back to the models.......
I've finished the base coats now to my satisfaction and even started on the tracks (by hand).
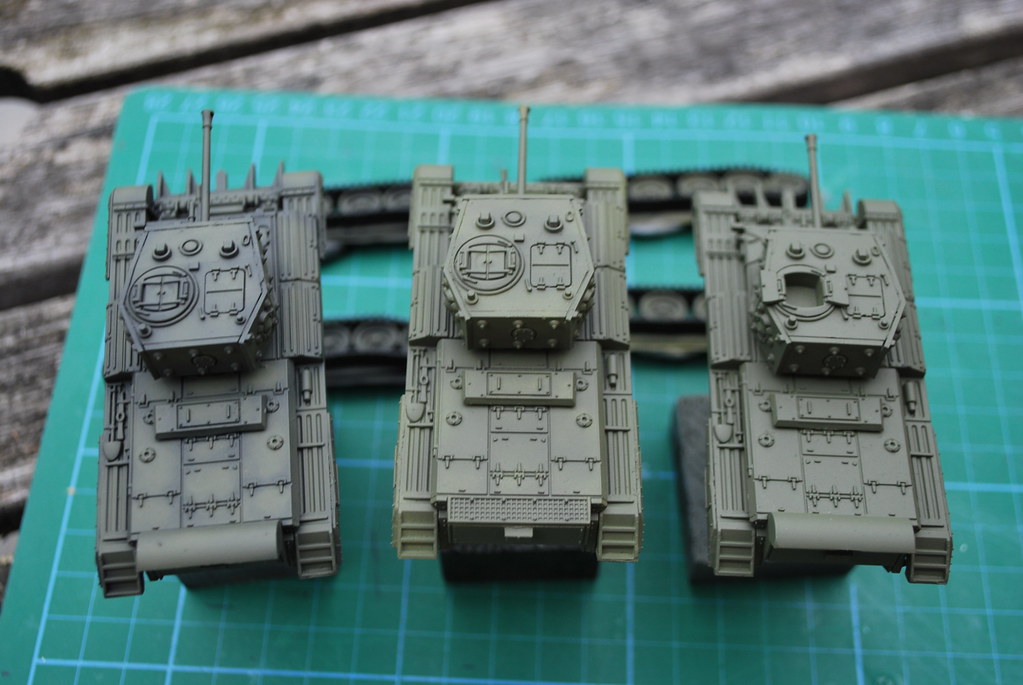
The grey pre-shaded version has not quite worked as I was hoping but you can see some tonal variation, I perhaps wasn't heavy enough with the pre-shade. I'm really pleased with how the black primed version turned out in terms of the effect, although I suspect it's too dark for this scale.
Most of the pictures were taken with our digital SLR outside, so the colours are pretty close but the shading effects didn't come out so well, so I took a final shot under lamplight so you can see the effects - albeit it's a bit washed out.
I was planning to go over all of the areas that see a bit more light in a slightly lightened version of my SCC 15 mix to give a bit more depth before a final light drybrush on the raised areas.
What do you think??? All advice welcomed!
ACW as usual on the progress so far!
ATB.
Andrew
---------------------------------------------------
As before - flat grey primed kit left, grey with pre-shade centre and black primed right.....


Reverse order.....
Usual order but under lamplight......

My doodling....it may be old hat to some of you but it was real progress for me...and even my wife was watching me do it in genuine interest!")

02.mm needle first (green paint was a bit too thin for such close work - another lesson learnt). In some cases I had the end of the AB on the paper as I drew it across....couldn't have done that before......also get a very good idea of how long I could linger in one spot before I started to flood it, even on the paper

0.4mm needle...

So a bit more progress this week and a bit of a mini-breakthrough on the AB front for me.
Although I've had a compressor and ABs (of varying quality) for three and half years now, because of my set up (and family life), getting consistent use has not always been easy and in some case there are literally months between an AB seeing paint/primer. This means that I'm not as far along as I should be with it and whilst I generally get on ok with general spraying, I have struggled with the really fine stuff in particular.
In the last couple of weeks I've been rereading some online articles and watching a couple of YouTube vids and experimenting again - not quite going back to basics but a definite reworking of my 'technique'. As a result, I feel like I've almost cracked the Holy AB Trinity of needle size, pressure and paint consistency - sPending half hour or more on Wednesday just doodling on a piece of paper working out again how far I could and couldn't push things, and getting some really fine lines even with my 0.4mm needle. Obviously I realise paper is a lot more absorbent than plastic and so it's less likely to run but it's definitely progress and I'm seeing a lot less of the dreaded dry tip!!!
Anyway back to the models.......
I've finished the base coats now to my satisfaction and even started on the tracks (by hand).
The grey pre-shaded version has not quite worked as I was hoping but you can see some tonal variation, I perhaps wasn't heavy enough with the pre-shade. I'm really pleased with how the black primed version turned out in terms of the effect, although I suspect it's too dark for this scale.
Most of the pictures were taken with our digital SLR outside, so the colours are pretty close but the shading effects didn't come out so well, so I took a final shot under lamplight so you can see the effects - albeit it's a bit washed out.
I was planning to go over all of the areas that see a bit more light in a slightly lightened version of my SCC 15 mix to give a bit more depth before a final light drybrush on the raised areas.
What do you think??? All advice welcomed!
ACW as usual on the progress so far!
ATB.
Andrew
---------------------------------------------------
As before - flat grey primed kit left, grey with pre-shade centre and black primed right.....
Reverse order.....
Usual order but under lamplight......
My doodling....it may be old hat to some of you but it was real progress for me...and even my wife was watching me do it in genuine interest!
02.mm needle first (green paint was a bit too thin for such close work - another lesson learnt). In some cases I had the end of the AB on the paper as I drew it across....couldn't have done that before......also get a very good idea of how long I could linger in one spot before I started to flood it, even on the paper
0.4mm needle...
Last edited:
Hi Andrew, the black primed is (IMO) too dark for the scale you are working in. I black primed one tank in 1-87 scale and noticed right away it was too dark even after I had cut the color with white. You are just going to have to play around with it to get the effect you are after. I like the effect of the second effort, as it is subtle but still shows the tonal differences quite well without over darkening the base coat........beauty is in the eye of the beholder. Rick H.
Rick H.- Joined
- Sep 4, 2019
- Messages
- 9,505
- Points
- 113
- First Name
- Andrew
RickHi Andrew, the black primed is (IMO) too dark for the scale you are working in. I black primed one tank in 1-87 scale and noticed right away it was too dark even after I had cut the color with white. You are just going to have to play around with it to get the effect you are after. I like the effect of the second effort, as it is subtle but still shows the tonal differences quite well without over darkening the base coat........beauty is in the eye of the beholder.
Thanks for taking the time to comment and you're right, it is too dark isn't it.....shame, as I liked the effect. I'll have a play around with lightening a bit.
Next time I might have a go with a mid-darkish grey base instead to see if I can get a similar effect without it turning out too dark.
Thanks again for your thoughts.
Andrew
Not sure I agree with young Rick there. I just think the paint job isn’t finished yet. If you gave that black primed one Zenitel highlights with a lightened shade of the main colour it would really pop. If you pin washed it and dry brushed high highlights it would really enhance the 3D effect. The least successful is the pre shaded version. The top coat is too opaque for the pre shade effect to work. All three are excellent examples of airbrush finish though. Really smooth tight paint jobs.
Andrew.
Firstly sorry I've not been following this , so apologies.
Junior is doing well as as Mike says nice to see him doing something with out a screen .
Love the kits, bit too small for my eye, but the detail from the photos you could take them for 1/35 .
As to the painting I'm with Tim think the black primer works a treat with the green .
Sorry Rick
- Joined
- Sep 4, 2019
- Messages
- 9,505
- Points
- 113
- First Name
- Andrew
Not sure I agree with young Rick there. I just think the paint job isn’t finished yet. If you gave that black primed one Zenitel highlights with a lightened shade of the main colour it would really pop. If you pin washed it and dry brushed high highlights it would really enhance the 3D effect. The least successful is the pre shaded version. The top coat is too opaque for the pre shade effect to work. All three are excellent examples of airbrush finish though. Really smooth tight paint jobs.
Tim
Thanks for stopping by. In the case of the black primed version, zenithal highlights was what I was talking about when I was said about the lighter highlights but just didn't articulate it properly.
Agree the pre-shaded version is a little bit disappointing, but I think I know where I went wrong, so can try and correct it next time.
I must admit I was pretty pleased with the finish, which was direct result of my AB experiments. I used my 0.2mm AB, rather than my 0.4mm Sparmax as I usually do in very fine layers. It's a Tamiya Spray-Work HG Super Fine but the needle, nozzle and air valve are Iwata. I was put onto it a couple of years ago by someone on another forum that has sadly died a death, as the best he'd ever used (he'd tried about 25 BTW!!) but I had struggled with it. A couple of weekends ago I stumbled across an old article I'd read online and had a semi-eureka moment, which followed by the experimentation, is the end result above.
Thanks again for your thoughts!

Andrew.
Firstly sorry I've not been following this , so apologies.
Junior is doing well as as Mike says nice to see him doing something with out a screen .
Love the kits, bit too small for my eye, but the detail from the photos you could take them for 1/35 .
As to the painting I'm with Tim think the black primer works a treat with the green .
Sorry Rick
John
No problem at all. I know how hard it is to keep up with everything on the forum. Message passed onto Junior!
They're not bad are they for wargaming kits all things considered. Glad you like the black primed version. It was my favourite too.
Thanks again both for stopping by!!
ATB
Andrew
- Joined
- Sep 4, 2019
- Messages
- 9,505
- Points
- 113
- First Name
- Andrew
Good evening all
So I have been plodding on with these this week.
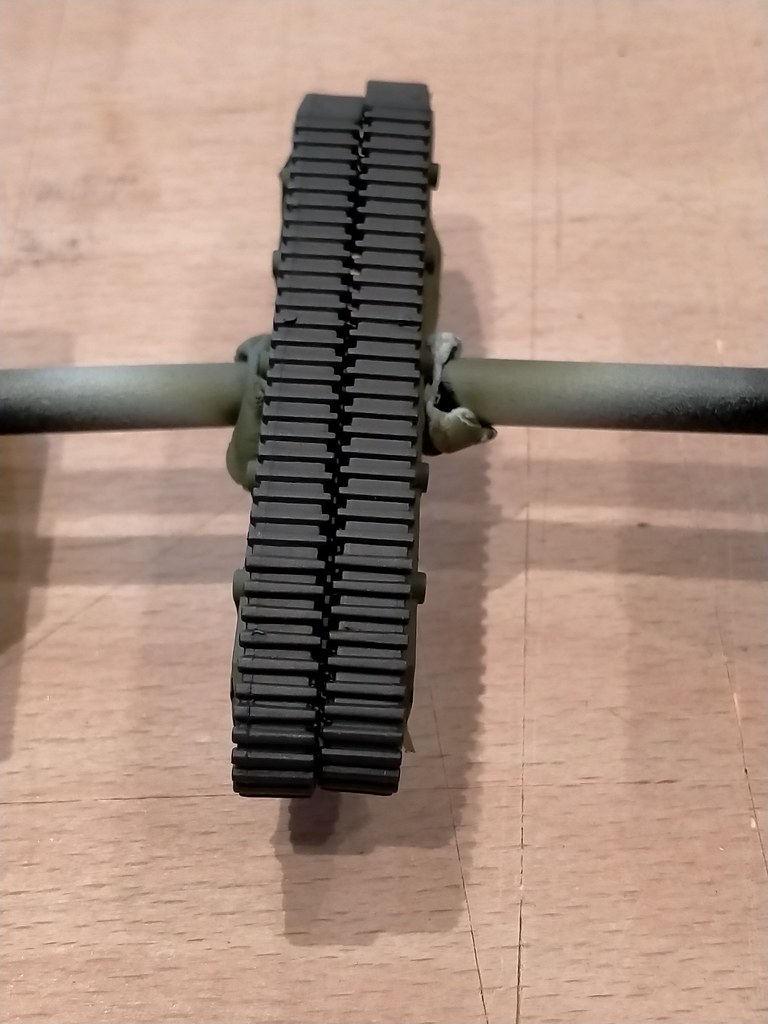
The road wheels have received a paint of specially patented "dark grey that's meant to look like rubber". The tracks have received three different paint jobs, one to represent a new-ish set, one slightly used and one that's seen better days.
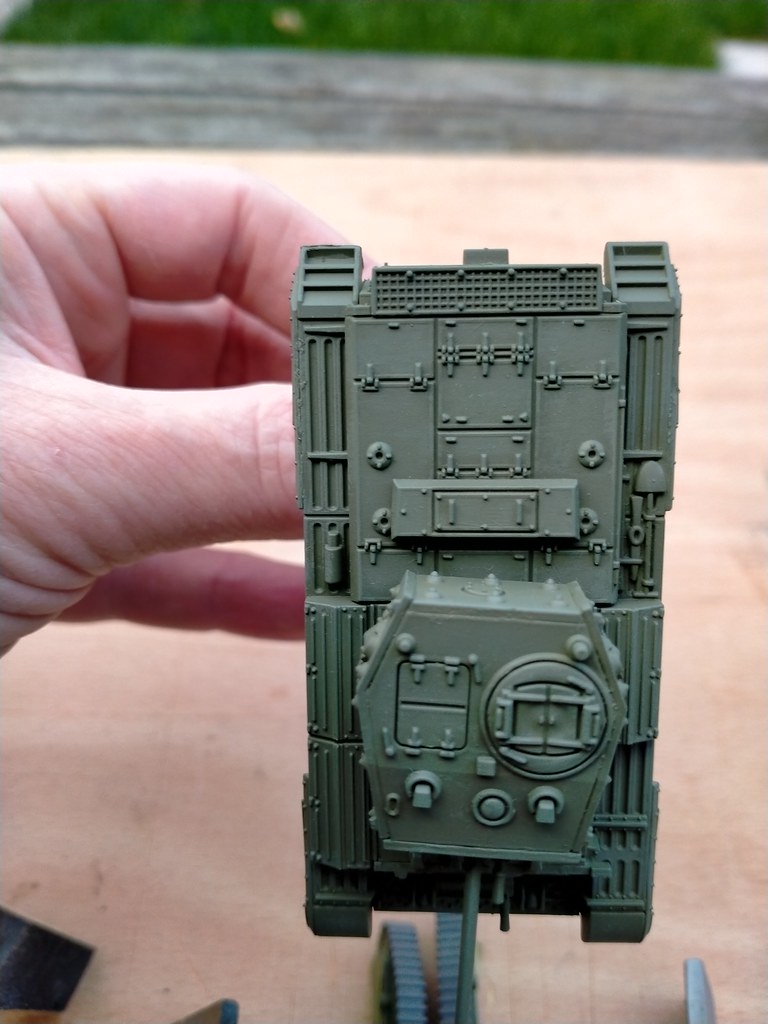
The turrets and hull have received their final top coats and and a dry brush (still learning on that front).
Sorry for the number of pictures below but I've was trying to take some that best reflected the colour and the shading but was struggling to that in one shot - will dig the SLR out next time.
ACW as usual
ATB
Andrew
-------------------------------------------------------------
Tracks
So I've tried three different techniques to see how they compare:
They're below in the above order - the right hand one is the pre-rusted version of the used tracks. It's actually a bit darker in real life.

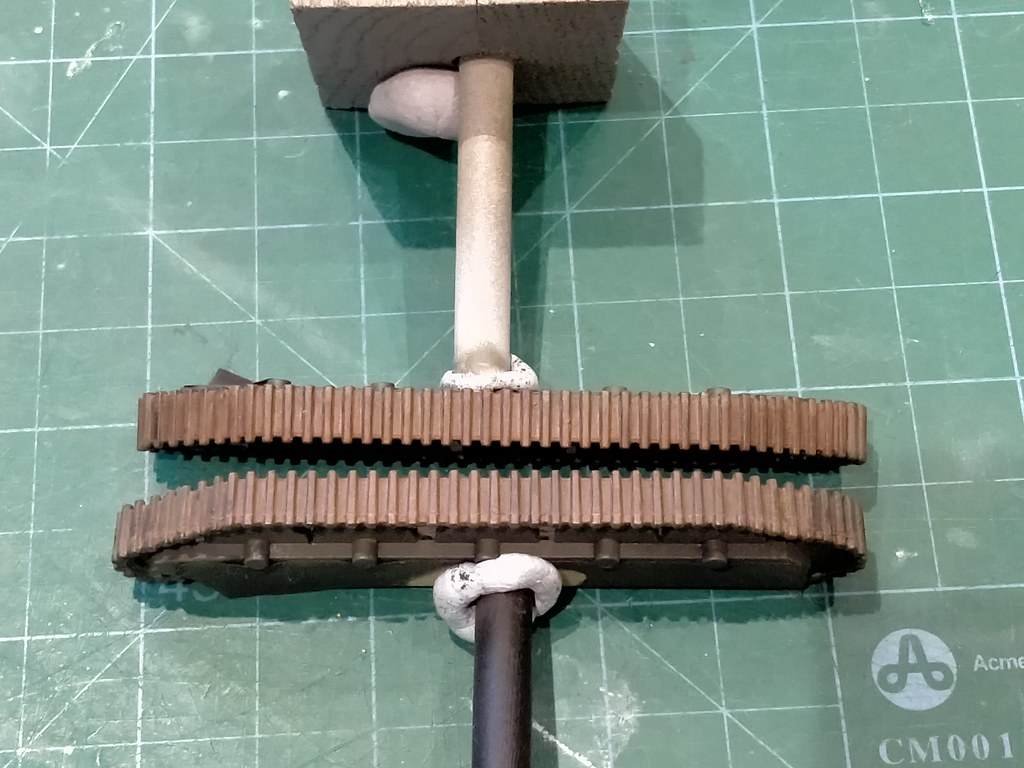
Close ups in the same order but with the rust applied on the 'older' set. In reality it's a little bit redder and with more tonal variation than came out in the picture. Also the 'new-ish' tracks have a very slight metallic sheen that doesn't come out in the picture....

Hulls and turrets
So when I started using this 'official' Mike Starmer SCC 15 mix, made up of Vallejo Model Colour of 70.924 Russian Uniform and 70.888 Olive Grey at a 1:1 ratio, I also played with it a bit to see what I liked and to take account of scale effect. I did this by adding drops of Vallejo Model Colour 886 Grey Green or 70.951 white to see what I liked. This week I also tried mixing 888 and 886 in a 1:1 ratio to see what that looked like.
This is my paint experimentation card (an old cereal box side):

The models with just a base primer and the pre-shading had the panels and raised areas sprayed in the above 3:3:2 (886) mix. It's obviously only made a slight difference on the primer only one but helped to emphasise the pre-shading a bit more. The black based primer got the same treatment using the 3:3:1 (886) mix as I didn't want it to be too light. It was a still a bit dark so I then gave it a couple of light passes with a mix of 888 and 886 at a ratio of 1:1, which I think worked well.
All then received a dry brush of a mixture of 888 and 886 at a rough ration to 1:3. I was worried it would be too light but on the whole I think it worked ok. I've still got to get to grips with dry brushing properly but it might be too heavy in a couple of places.
Apologies again for all the pictures but I struggled to show the effects properly in any one shot.....
This is primer only version:

This is the pre-shaded version:
This is the black primed version:

Left to right - primer only, pre-shade, black primer:
The reverse order:

Colour wise the ones above are closuer to real life but this shot shows the tonal variations best, although the colours are obviously washed out a bit because of the light source coming from above fairly close.

So I have been plodding on with these this week.
The road wheels have received a paint of specially patented "dark grey that's meant to look like rubber". The tracks have received three different paint jobs, one to represent a new-ish set, one slightly used and one that's seen better days.
The turrets and hull have received their final top coats and and a dry brush (still learning on that front).
Sorry for the number of pictures below but I've was trying to take some that best reflected the colour and the shading but was struggling to that in one shot - will dig the SLR out next time.
ACW as usual
ATB
Andrew
-------------------------------------------------------------
Tracks
So I've tried three different techniques to see how they compare:
- All started with a black primer basecoat
- The new-ish set was then painted used Dave Ward's technique of using a mix of black, dark grey, brown & steel (I not have gun metal) Link HERE. It definitely works very well, although for my purposes I was aiming for something a bit darker but a great idea nonetheless - wish I had thought of it!!
- The intermediate set had a very light wash of Humbrol enamel Gunmetal 53, followed by thinnish coat of Vallejo's Track Primer 304 (it's a colour not actual primer)
- The used set received the my usual treatment of a very light wash of Humbrol enamel Gunmetal 53, followed by a couple of washes of my homebrew Revell off black/grey/brown. This give a very nice dark metallic colour over which I gave them a very light washes from the superb Life Color Rust set.
They're below in the above order - the right hand one is the pre-rusted version of the used tracks. It's actually a bit darker in real life.
Close ups in the same order but with the rust applied on the 'older' set. In reality it's a little bit redder and with more tonal variation than came out in the picture. Also the 'new-ish' tracks have a very slight metallic sheen that doesn't come out in the picture....
Hulls and turrets
So when I started using this 'official' Mike Starmer SCC 15 mix, made up of Vallejo Model Colour of 70.924 Russian Uniform and 70.888 Olive Grey at a 1:1 ratio, I also played with it a bit to see what I liked and to take account of scale effect. I did this by adding drops of Vallejo Model Colour 886 Grey Green or 70.951 white to see what I liked. This week I also tried mixing 888 and 886 in a 1:1 ratio to see what that looked like.
This is my paint experimentation card (an old cereal box side):
The models with just a base primer and the pre-shading had the panels and raised areas sprayed in the above 3:3:2 (886) mix. It's obviously only made a slight difference on the primer only one but helped to emphasise the pre-shading a bit more. The black based primer got the same treatment using the 3:3:1 (886) mix as I didn't want it to be too light. It was a still a bit dark so I then gave it a couple of light passes with a mix of 888 and 886 at a ratio of 1:1, which I think worked well.
All then received a dry brush of a mixture of 888 and 886 at a rough ration to 1:3. I was worried it would be too light but on the whole I think it worked ok. I've still got to get to grips with dry brushing properly but it might be too heavy in a couple of places.
Apologies again for all the pictures but I struggled to show the effects properly in any one shot.....
This is primer only version:
This is the pre-shaded version:
This is the black primed version:
Left to right - primer only, pre-shade, black primer:
The reverse order:
Colour wise the ones above are closuer to real life but this shot shows the tonal variations best, although the colours are obviously washed out a bit because of the light source coming from above fairly close.
Nice experimentation Andrew. Another good Vallejo base colour for tracks is model colour German Camo Black brown 822. These look great though. My favourite is the preshaded one.
- Joined
- Sep 4, 2019
- Messages
- 9,505
- Points
- 113
- First Name
- Andrew
Nice experimentation Andrew. Another good Vallejo base colour for tracks is model colour German Camo Black brown 822. These look great though. My favourite is the preshaded one.
Very interesting Andrew, still prefer the preshade to the other two. Although the black primed variant runs a close second. Tracks coming along nicely. Rick H.
Thanks guys for by your honest opinion, I really do value it. It's one of those things were I know what I like best is not perhaps the most realistic - even if it is not far off.
There will plenty more kits to experiment on and I was thinking, if pure black is too much as a primer, maybe a fairly dark grey might be better and of course I want to be practice my pre-shading too.
Tim, it's funny you mention 822. I actually picked up the bottle and thought I wonder..... so it's good to have it confirmed.
A question for both of you - and anyone else who sees this - pin wash is up next. What colour would you recommend?
I was thinking pure black would be too much at this scale. So I was thinking a dark brown or dark grey, or maybe a mix of one of those with a dark green, or maybe even a very dark green on its own.
Thanks again for your thoughts.
ATB.
Andrew
For pin washing I usually go with a fifty fifty mix of black and burnt umber oils on a green vehicle.
- Joined
- Sep 4, 2019
- Messages
- 9,505
- Points
- 113
- First Name
- Andrew
Thanks Tim.For pin washing I usually go with a fifty fifty mix of black and burnt umber oils on a green vehicle.
I don't have any oils - something I want to look at getting - but I do have some Vallejo black and umber washes in the stash.
Much appreciated as always.
Andrew
On the preshade model I would do as Tim suggested......this would go a long way in defining the details in recessed areas and then I would consider drybrushing with ever lighter shades of the base color to "pop" the highest surfaces.........if I understand the "Marlow" method correctly. 
Last edited:
David Lovell
SMF Supporter
Good morning all
So a bit more progress this week and a bit of a mini-breakthrough on the AB front for me.
Although I've had a compressor and ABs (of varying quality) for three and half years now, because of my set up (and family life), getting consistent use has not always been easy and in some case there are literally months between an AB seeing paint/primer. This means that I'm not as far along as I should be with it and whilst I generally get on ok with general spraying, I have struggled with the really fine stuff in particular.
In the last couple of weeks I've been rereading some online articles and watching a couple of YouTube vids and experimenting again - not quite going back to basics but a definite reworking of my 'technique'. As a result, I feel like I've almost cracked the Holy AB Trinity of needle size, pressure and paint consistency - sPending half hour or more on Wednesday just doodling on a piece of paper working out again how far I could and couldn't push things, and getting some really fine lines even with my 0.4mm needle. Obviously I realise paper is a lot more absorbent than plastic and so it's less likely to run but it's definitely progress and I'm seeing a lot less of the dreaded dry tip!!!
Anyway back to the models.......
I've finished the base coats now to my satisfaction and even started on the tracks (by hand).
The grey pre-shaded version has not quite worked as I was hoping but you can see some tonal variation, I perhaps wasn't heavy enough with the pre-shade. I'm really pleased with how the black primed version turned out in terms of the effect, although I suspect it's too dark for this scale.
Most of the pictures were taken with our digital SLR outside, so the colours are pretty close but the shading effects didn't come out so well, so I took a final shot under lamplight so you can see the effects - albeit it's a bit washed out.
I was planning to go over all of the areas that see a bit more light in a slightly lightened version of my SCC 15 mix to give a bit more depth before a final light drybrush on the raised areas.
What do you think??? All advice welcomed!
ACW as usual on the progress so far!
ATB.
Andrew
---------------------------------------------------
As before - flat grey primed kit left, grey with pre-shade centre and black primed right.....
Reverse order.....
Usual order but under lamplight......
My doodling....it may be old hat to some of you but it was real progress for me...and even my wife was watching me do it in genuine interest!
02.mm needle first (green paint was a bit too thin for such close work - another lesson learnt). In some cases I had the end of the AB on the paper as I drew it across....couldn't have done that before......also get a very good idea of how long I could linger in one spot before I started to flood it, even on the paper
0.4mm needle...
Andrew havent looked further down the page yet but great work all round ,if you look at most of my build pics your see corresponding pieces of paper ,when they ask for printer paper in our house I always try and buy better quality stuff not for them but because it takes spray paint better(more closed face and shiny stuff I presume) pressure and mix always tested on paper before I even go near my build ,left over paint in in airbrush cup no good for anything so I use it up practicing òn the paper again ,the only part I struggle with is working distance from target....I never detail paint the underside of afv's but do prime and spray as per the rest of what I'm trying to achieve this leaves a little bit of blank canvas to test diffrent washes filters etc before taking them topside specifically the dreaded varnish which you can't test on paper. Sorry to have prattled on but its the simple little things that can save a lot of spherical shaped ache. Work calling will catch up later as I've said great stuff it shows what a little practice and patience away from the build does to your confidence. DaveGood morning all
So a bit more progress this week and a bit of a mini-breakthrough on the AB front for me.
Although I've had a compressor and ABs (of varying quality) for three and half years now, because of my set up (and family life), getting consistent use has not always been easy and in some case there are literally months between an AB seeing paint/primer. This means that I'm not as far along as I should be with it and whilst I generally get on ok with general spraying, I have struggled with the really fine stuff in particular.
In the last couple of weeks I've been rereading some online articles and watching a couple of YouTube vids and experimenting again - not quite going back to basics but a definite reworking of my 'technique'. As a result, I feel like I've almost cracked the Holy AB Trinity of needle size, pressure and paint consistency - sPending half hour or more on Wednesday just doodling on a piece of paper working out again how far I could and couldn't push things, and getting some really fine lines even with my 0.4mm needle. Obviously I realise paper is a lot more absorbent than plastic and so it's less likely to run but it's definitely progress and I'm seeing a lot less of the dreaded dry tip!!!
Anyway back to the models.......
I've finished the base coats now to my satisfaction and even started on the tracks (by hand).
The grey pre-shaded version has not quite worked as I was hoping but you can see some tonal variation, I perhaps wasn't heavy enough with the pre-shade. I'm really pleased with how the black primed version turned out in terms of the effect, although I suspect it's too dark for this scale.
Most of the pictures were taken with our digital SLR outside, so the colours are pretty close but the shading effects didn't come out so well, so I took a final shot under lamplight so you can see the effects - albeit it's a bit washed out.
I was planning to go over all of the areas that see a bit more light in a slightly lightened version of my SCC 15 mix to give a bit more depth before a final light drybrush on the raised areas.
What do you think??? All advice welcomed!
ACW as usual on the progress so far!
ATB.
Andrew
---------------------------------------------------
As before - flat grey primed kit left, grey with pre-shade centre and black primed right.....
Reverse order.....
Usual order but under lamplight......
My doodling....it may be old hat to some of you but it was real progress for me...and even my wife was watching me do it in genuine interest!
02.mm needle first (green paint was a bit too thin for such close work - another lesson learnt). In some cases I had the end of the AB on the paper as I drew it across....couldn't have done that before......also get a very good idea of how long I could linger in one spot before I started to flood it, even on the paper
0.4mm needle...
- Joined
- Sep 4, 2019
- Messages
- 9,505
- Points
- 113
- First Name
- Andrew
RickOn the preshade model I would do as Tim suggested......this would go a long way in defining the details in recessed areas and then I would consider drybrushing with ever lighter shades of the base color to "pop" the highest surfaces.........if I understand the "Marlow" method correctly.
Thanks for stopping by again. I had thought about doing a lighter dry brush. I was probably being a bit over cautious on how light I made the mix because I didn't want to risk making it too light and over do it, especially on the first two kits.
Thanks again.
Andrew
Last edited:
- Joined
- Sep 4, 2019
- Messages
- 9,505
- Points
- 113
- First Name
- Andrew
Good afternoon all
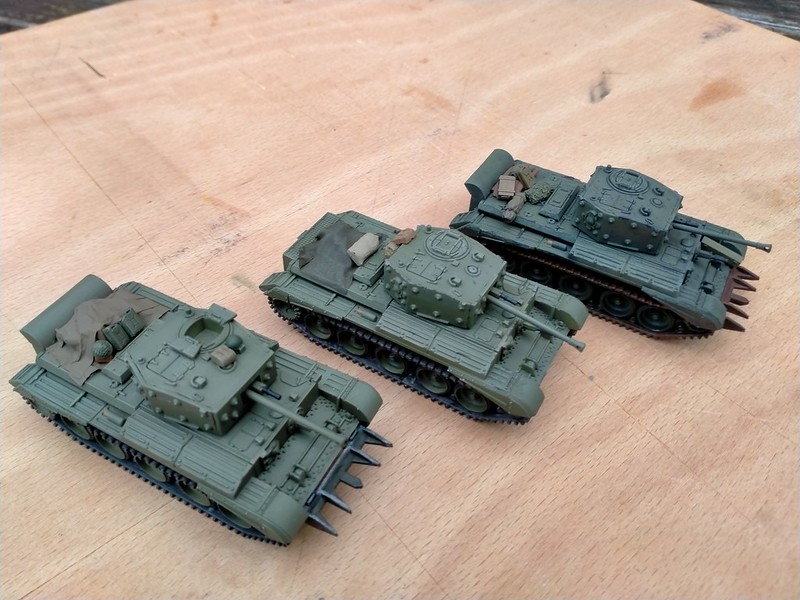
So I'm calling the painting phase finished.
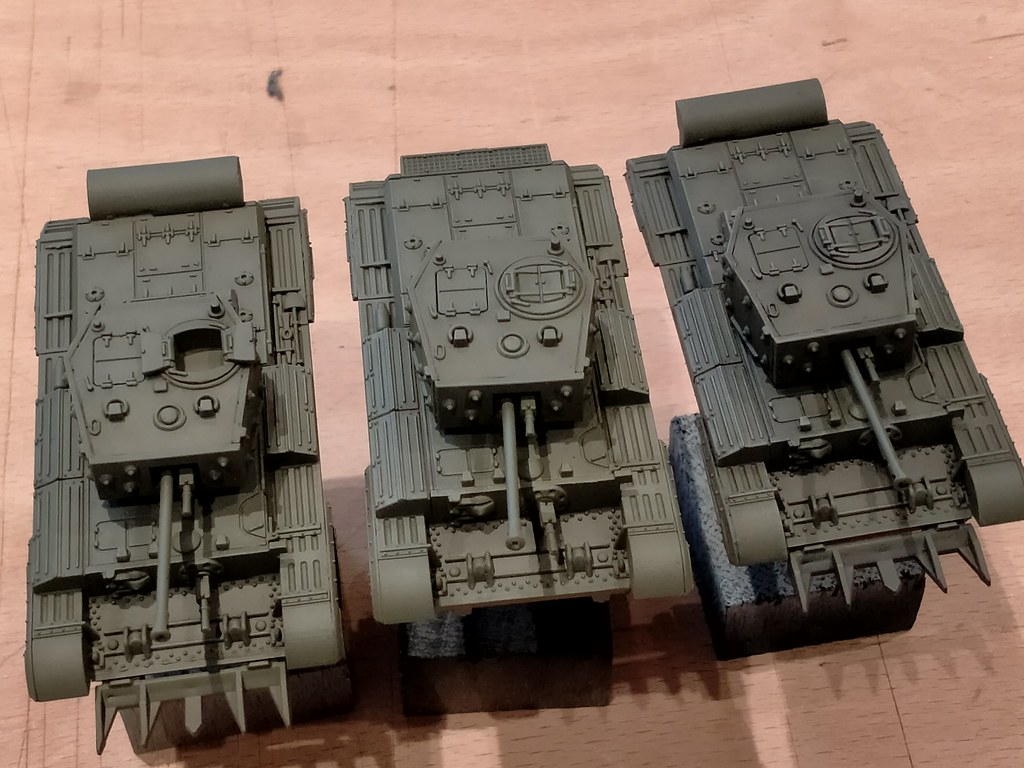
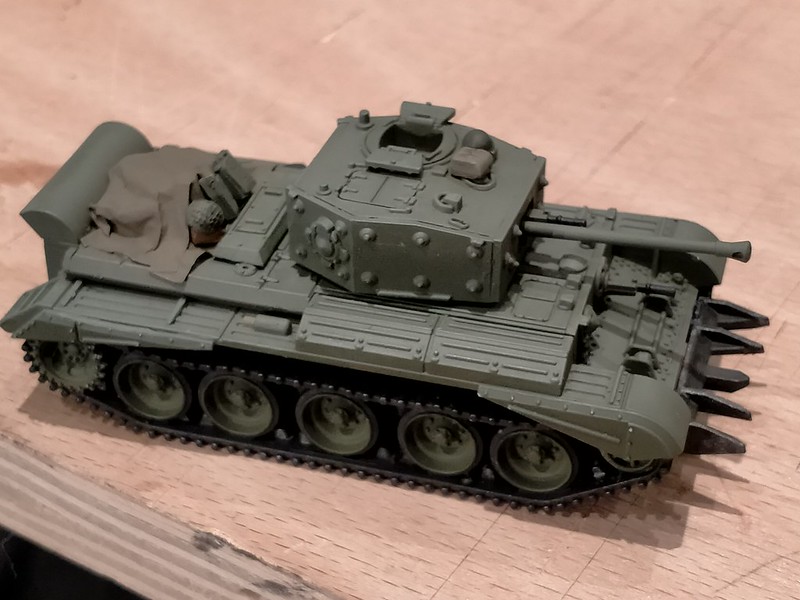
I've add some very random stowage and done a bit chipping on the pre-shaded one and a lot on the black based one. Not done any at this scale and so deliberately tried to see how far I could push on the black based one, as this is going to be a very well used tank - as you'll see it went to far but that was almost the point as having three kits to play with gives me room for experimentation.
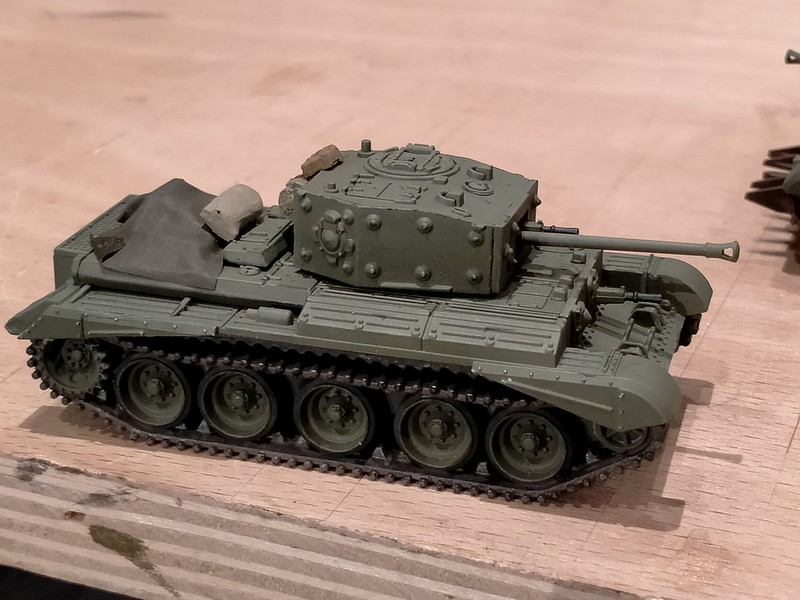
By contrast the plain grey primer base, will represent one that's newly entered service and so will be much cleaner. As a result the hedgerow cutter*** has been painted to (hopefully) represent a newly attached one.
The tarp in the middle (pre-shaded) one, was made using the PVA and paint mix demo'd by Paul aka Scottie. It works really well IMHO and you're left with a square of coloured plastic which is just attached with superglue. The rest of the stowage is obviously looking a bit fresh but I'll calm that down with some weathering.
I really struggled to get the shots to show the right colour green. Inside shots, not quite green enough.....outside too green.....sorry.
Also, as always the dreaded digital camera has picked up more than you can see with the naked eye, especially with the well worn one.


ACW as usual.
ATB
Andrew
***I accept that the chances of them being fitted is pretty remote as we've discussed previously. That said, I was flick through an Osprey/David Fletcher book on the Firefly at Duxford yesterday and that showed a picture of a Firefly with one fitted.
------------------------------------------------------------------------------------
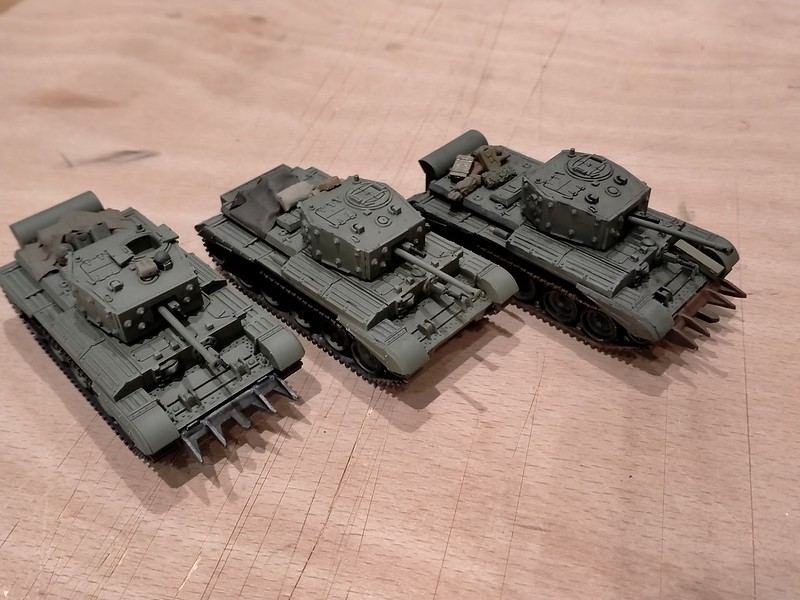


So I'm calling the painting phase finished.
I've add some very random stowage and done a bit chipping on the pre-shaded one and a lot on the black based one. Not done any at this scale and so deliberately tried to see how far I could push on the black based one, as this is going to be a very well used tank - as you'll see it went to far but that was almost the point as having three kits to play with gives me room for experimentation.
By contrast the plain grey primer base, will represent one that's newly entered service and so will be much cleaner. As a result the hedgerow cutter*** has been painted to (hopefully) represent a newly attached one.
The tarp in the middle (pre-shaded) one, was made using the PVA and paint mix demo'd by Paul aka Scottie. It works really well IMHO and you're left with a square of coloured plastic which is just attached with superglue. The rest of the stowage is obviously looking a bit fresh but I'll calm that down with some weathering.
I really struggled to get the shots to show the right colour green. Inside shots, not quite green enough.....outside too green.....sorry.
Also, as always the dreaded digital camera has picked up more than you can see with the naked eye, especially with the well worn one.
ACW as usual.
ATB
Andrew
***I accept that the chances of them being fitted is pretty remote as we've discussed previously. That said, I was flick through an Osprey/David Fletcher book on the Firefly at Duxford yesterday and that showed a picture of a Firefly with one fitted.
------------------------------------------------------------------------------------