Let’s get this Sherman M4A2 out of it’s box

AFC

Joined
Feb 20, 2011
Messages
114
Points
28
First Name
Andre
Long ago I got this one and life got into the way. So I promised that I’d try my best one day. And that day is now. (Slow build so bare with me).

Feedback is welcome.

It is an Academy M4A2 Sherman (1/35). The goal is to have fun while building a nearly as possible version of the mid production

This website is helping me a bit


DBA0695B-8BFB-495A-8AA8-D80C55920020.jpeg

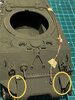
Started by assembling the wheels
27940ABB-9442-41A0-8F8C-C923A7C33106.jpeg

and move on to some of the details

6A244ADD-81B6-457D-A77C-958716C01CEC.jpeg
C26DB535-87C4-4ED0-A181-D9C5B1ACAF05.jpeg
A849004A-7B6B-4DD6-9874-750389702776.jpeg4B8826EA-EB50-4562-98A4-D7E9EC7E2794.jpeg
7A5FBC57-705D-4F9F-A566-2AE2E7F5BFE5.jpeg
94DF3C4A-27F8-4AB6-BB67-937A27547EE9.jpeg

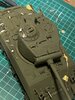
And then an experience I’m making which lets see how it goes. White Tamiya thinned putty to give it some texture. Might have overdone slightly but we shall see...

260B2F7D-F07C-45A2-B48F-166B74B0D72D.jpeg
B4C96173-D622-4241-95CD-5DDCCB3BD4ED.jpeg

next step, is to add more details to the hull before it gets all primed...
 

adt70hk

I know its a bit sad but I like quickbuild kits!!!
SMF Supporter
Joined
Sep 4, 2019
Messages
9,491
Points
113
First Name
Andrew
Cool start!

Andrew
 

Jakko

Way past the mad part
SMF Supporter
Joined
Apr 28, 2018
Messages
10,791
Points
113
First Name
Jakko
It is. The M4A2 had twin diesel engines driving a common propeller shaft.
 

AFC

Joined
Feb 20, 2011
Messages
114
Points
28
First Name
Andre
I said this was going to be a slow one it is progressing though...

After some details have been added, it was time to prime it. This time I’ve used Tamiya Fine Surface Primer.

This is the inside of my “paint station”...a big cardbox converted I‘m in a garage, super well ventilated and wearing a mask, so it’s all good.

54399557-CA5E-45FE-B09B-2B22877D0BE0.jpeg

I let the primer to settle and for the next days I went to do some research... The next step was the one I was more nervous about... airbrushing!!!

I’ve airbrushed the model with Tamiya Olive Drab.

Actually I thought it was going to be way too dark and so, the plan was to first paint it with olive drab out of the box and then apply a second coat of olive drab & dark yellow mix. However, I‘m quite pleased with the olive drab tone, so I might leave it as is.

My first airbrush attempt (the first two pics are more yellow-ish than what it is in reality, the desk lamp was too close).

0C5DE81C-C753-46B4-B28C-1CA0B3625147.jpeg

0905E829-2442-4226-BC8D-3B6F689F0593.jpeg

I’m quite happy with the effect I got on the turret side where I applied thinned tamiya white putty...

0553A175-4969-4547-9664-C29474F86631.jpeg

I didn’t care much about the wheels as I’m planning to put some mud on them anyway....

B69F6BF6-FE46-4DAD-BFC7-4FF8D786D620.jpeg

I ended up painting the tools also in olive drab but the plan is to apply some sort of wooden tone on the handles and metal tones on the metal parts...

Also, I didn’t cement the tools (hammers, shovels, etc) on purpose. I wanted to left them for after painting the model. However, in hindsight, I shouldn’t have done. Next time I’ll assemble the whole thing before any airbrushing...

B0698E55-4B95-473C-93DD-F7B03E0ACA1B.jpeg

The next step will be to give another olive drab coat (please leave comments if you think it should be olive drab & dark yellow mix) and paint the remain parts (wheels, tools, etc). Then comes the decals, mud, and I want to also try some weathering. Lastly will apply the varnish.

And then some more research for something which I’ll be also doing for the first time...washing using some artist oils....
 

Jakko

Way past the mad part
SMF Supporter
Joined
Apr 28, 2018
Messages
10,791
Points
113
First Name
Jakko
You can leave the tools as they are: these were often dip-painted with the same olive drab that went on the vehicles themselves. I tend to paint them like that, with chipped paint where paint would wear off because of using them, like the handles, the pointed ends, etc.

Also: does the commander’s hatch have a working hinge on this model? It seems to be more upright in the first picture than in the others. If it’s glued, then you may want to remove it and open it all the way, as it wouldn’t stay up the way your photos show it now :smiling3:
 

GerryW

Rest In Peace
Joined
Feb 14, 2021
Messages
1,688
Points
113
Location
Suffolk
First Name
Gerry
Also: does the commander’s hatch have a working hinge on this model? It seems to be more upright in the first picture than in the others. If it’s glued, then you may want to remove it and open it all the way, as it wouldn’t stay up the way your photos show it now :smiling3:
Unless, there's an arm opening it ;)
 

JR

Member of the Rabble and Pyromania Consultant
SMF Supporter
Joined
May 26, 2015
Messages
17,275
Points
113
Location
lincs
First Name
John
Very nice build and photos Andre.
 
  • Like
Reactions: AFC

AFC

Joined
Feb 20, 2011
Messages
114
Points
28
First Name
Andre
You can leave the tools as they are: these were often dip-painted with the same olive drab that went on the vehicles themselves. I tend to paint them like that, with chipped paint where paint would wear off because of using them, like the handles, the pointed ends, etc.

Thank you Jakko. I was going to post that question in the forum, so appreciate your feedback. Will leave it then.
 

AFC

Joined
Feb 20, 2011
Messages
114
Points
28
First Name
Andre
Unless, there's an arm opening it ;)

@GerryW got it right .... I’m thinking about having some figures added later so left it as shown... if I decide not to go for it, will fully open it

@Jakko - the hinge is glued....but you just gave me an idea... I can probably make it a “working“ one by replacing the plastic with a bit of electrical cable
 

AFC

Joined
Feb 20, 2011
Messages
114
Points
28
First Name
Andre
So it all went wrong, and I've decided to close it see picture 1. Lesson learned: it would have been much easier to do it before cementing it.

Also, could someone help me with picture 2 below? Is the gap as per the "real tank" or shall they be filled in with putty?
 

Attachments

  • IMG_2315.JPEG
    IMG_2315.JPEG
    153.2 KB · Views: 30
  • IMG_2311.jpg
    IMG_2311.jpg
    132.7 KB · Views: 31

Jakko

Way past the mad part
SMF Supporter
Joined
Apr 28, 2018
Messages
10,791
Points
113
First Name
Jakko
That gap shouldn’t be there. This photo shows both sides of the vertical part of the mudguard fairly well:

m4a276_16.jpg (Sherman Minutia website)

Note that you can see there’s a bit of a forward extension to it, that wasn’t always present.
 

Jakko

Way past the mad part
SMF Supporter
Joined
Apr 28, 2018
Messages
10,791
Points
113
First Name
Jakko
If you’re building Sherman kits, it’s a lifesaver — and shows you what minefield you’ve gotten yourself into :smiling3:
 
  • Like
Reactions: AFC

Isitme

SMF Supporter
Joined
Nov 2, 2020
Messages
707
Points
93
First Name
Mike
Andre,
Keep with it, as far as the front mudguards go, add some filler and then hand paint, it is not uncommon to see slight variations in colour tones.
Mike.
 
  • Like
Reactions: AFC

AFC

Joined
Feb 20, 2011
Messages
114
Points
28
First Name
Andre
If you’re building Sherman kits, it’s a lifesaver — and shows you what minefield you’ve gotten yourself into :smiling3:

My first one and I’m quite enjoying it. My next one might as well be another Sherman we shall see
 

AFC

Joined
Feb 20, 2011
Messages
114
Points
28
First Name
Andre
My goal with this model is to play with it and learn

So today I added some “home made” details (tool straps, cable and its straps, etc) and used the airbrush. Oh the airbrush

Before I had it painted with Tamiya’s olive drab. Today, I’ve mixed OD with dark yellow, and I was very pleased with the outcome. Here some pictures (a bit more yellowish than what it looks like in real life - working on the lights to improve the photos)

Have used putty to simulate welding (photo #5). It didn’t exactly came out as I intended but it is now less boring than what it was previously. So, it’s a win

Speaking of putty, I’m using Tamyia’s white putty and not very impressed with it so far ...

Next steps are for me to apply the decals and airbrush some varnish on it (I’ll use matt varnish).

After that it’ll be time to apply washings, mud and chipping. Never done it before so I’m both excited and nervous... will need to watch some vids before doing it!

Any feedback is as always very welcome.

E7E91F97-BFFD-414C-910C-9BB286C17DDB.jpegC866959E-DE66-4635-94D8-19AEBDD1A894.jpeg3FCD7614-0D66-4C5A-99F1-9F7B1F698C7E.jpeg9B121D60-A4A4-498B-A675-24EA774C9E64.jpeg37AAE386-7310-45CF-9796-956F0D085056.jpeg886BE13D-8918-417D-9E95-CE0A20D9E63C.jpeg471A013C-AA08-495B-8C6A-8B62F745AFC8.jpeg
 

AFC

Joined
Feb 20, 2011
Messages
114
Points
28
First Name
Andre
I’m probably beating the longest ever build of a kit but it’s been a mix of a lot of things happening at same time with me also wanting to experiment with some things for which I need some research.

Anyway… let’s go.

I was quite happy with chipping until I got to the hull, especially to the decal area. Not being patient led me to some avoidable mistakes. Have learned some lessons.

Pictures before & after decals

Now, want to have a go with mud, washings (using oils)… as said, good time to learn and take risks

Feedback always welcome

0AE24D3A-9252-4DFD-A8D5-220A245A12DB.jpeg0A72FA74-3701-4CE6-8913-B33A1C270BBF.jpegEF18A92C-16C6-4657-A876-8163B411AE6D.jpegD6BAF838-AE80-425B-BC87-3A47E9AC3903.jpeg25723B02-8C7E-4916-8C3D-FDDCFA9B6507.jpegAABFED00-5CEB-4106-BC80-6E744F781AB5.jpeg9B6F95C4-7407-4514-950B-C988D5E8D274.jpegA57E4F1A-42A9-4040-9392-528E6FE9D4C5.jpegDC279B39-E3E2-4070-8692-D04635995CD7.jpeg
 

minitnkr

Rabble & escape committee member
SMF Supporter
Joined
Apr 27, 2018
Messages
6,717
Points
113
Location
Dayton, OH
First Name
Paul
Very Russian looking numbers:thumb2::thumb2:. Weathering looks very good. Hint on lights....if you mount them you should make the lenses look like lenses. It's not easy, but any effort is a bonus. PaulE
 
  • Like
Reactions: AFC
Top