Meng 1/35 Whippet

  • Thread starter Deleted member 7181
  • Start date

Jakko

Way past the mad part
SMF Supporter
Joined
Apr 28, 2018
Messages
10,787
Points
113
First Name
Jakko
Quick & dirty test to give me an idea of what issues I'll encounter. Sloping rear deck needs accounting for, as do the original rivets. Also needs something more in-scale for the angle iron as it looks a bit chunky in places (it's just 2mm strip that I had), but given a bit of time and thinning down the angle section I think it could look pretty decent.
That certainly looks right, though as you say the strip is a bit thick. As a tip, it’s probably easier to build this not like the real thing, but by making it as a plastic card box and then adding thin plastic strip (or even paper) to the corners to represent the angle iron.
 
D

Deleted member 7181

Guest
That's pretty much how I did it Jakko, made up the box then added the strips. I would have liked thinner strip but having looked at it again this morning it's close enough for me, so have made and fitted the other. Just the braces going up to the roof to add :smiling3:

EDIT: I mean the braces that go up to the sides near the roof. I know you'll pick me up on that :smiling5:
 
D

Deleted member 7181

Guest
After a mornings gardening for The Outlaws and a shopping trip to pick up a few supplies I got the stowage boxes finished off and got it all in primer. Really happy with the boxes, even added a small bit of reinforcement where the wire braces meet the body (probably not visible on the pictures since my camera won't focus close enough).

A little bit of sanding work to do now that the primer has shown them up, but it's not far off paint. I'm toying with the idea of adding extra fuel cans and tarps, plus I need something to put in the boxes, but all that can be added after.
 

Attachments

  • Cjr2iMC.jpg
    Cjr2iMC.jpg
    89.2 KB · Views: 79
  • qjmYqTM.jpg
    qjmYqTM.jpg
    82.5 KB · Views: 79
Last edited by a moderator:

Jakko

Way past the mad part
SMF Supporter
Joined
Apr 28, 2018
Messages
10,787
Points
113
First Name
Jakko
That's pretty much how I did it Jakko, made up the box then added the strips.
Apologies, I thought you had constructed it like the real thing: angle iron first, followed by the plates :smiling3:

EDIT: I mean the braces that go up to the sides near the roof. I know you'll pick me up on that :smiling5:
I’m not that bad. Usually :smiling3:
 
D

Deleted member 7181

Guest
No worries. The plan was to build the boxes then order some Maquett angle strip for the corners, but I tried the flat strip I had and reckoned it was decent enough.
 
D

Deleted member 7181

Guest
Not much of an update as it's been pretty manic at work. They've decided to put me through my Fire Marshall training again and I'm currently part way through a 3 day First Aid course. It's leaving me very little free time but at least I should be prepared for most scenarios!

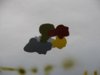
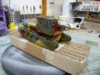
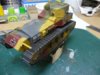
I spent a whole night just deciding on colours, then mixing them up from the limited palette I have. I'm going for something along the lines of the picture simon posted of a captured version, but just for a laugh I've added a red-brown too, so that's 4 colours in to

They'll be less intense on the model of course but all are mixed from Mr Color. The grey is a lightened version of their RLM66, which will also be further lightened for highlights.
Yellow is their C-39 Dark Yellow
Green is a mixture of 4B0 Russian Green and C-12 Olive Drab
Red / Brown is a mixture of those two colours, roughly 50/50, C-3 & C-517

As I say, the picture shows pretty intense blobs (over the top of the grey primer) but they were hard to photograph and look more muted on the tank. I'll also try and add highlights and shadows by mixing yet more versions. Sounds good in theory but we'll see how it goes in practice :smiling5:

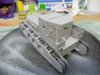
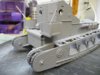
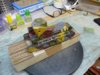
So far I've done an overall coat in the grey and have started adding patches of yellow. Slowly does it :smiling3:
 

Attachments

  • 6k7LUgB.jpg
    6k7LUgB.jpg
    39.4 KB · Views: 62
Last edited by a moderator:
D

Deleted member 7181

Guest
Managed to get some painting done between everything else real life is throwing at me right now. The colours look a bit bright, especially the yellow, but the lighting and gloss coat aren't helping that. Should tone down nicely with washes, a coat of matt varnish and a bit of weathering.


Still a long way to go but the basic foundations are laid at least.
 

Attachments

  • XBqMoOq.jpg
    XBqMoOq.jpg
    136.7 KB · Views: 56
  • qG5MMWk.jpg
    qG5MMWk.jpg
    126.3 KB · Views: 56
  • 3upmMFT.jpg
    3upmMFT.jpg
    113.4 KB · Views: 56
Last edited by a moderator:
D

Deleted member 7181

Guest
Thanks Paul. Can't seem to get the lighting right in the shed, either for working or taking pictures. Will have to look into that when I get around to re-jigging the place.
 

Allen Dewire

Proud Rabble Member
SMF Supporter
Joined
Apr 27, 2018
Messages
4,105
Points
113
Location
Bamberg
First Name
Allen
Evening Scratchy,

I am way too late to the party as usual. Sorry for that Andy...When I saw the title, at first I thought someone was building a model of a racing dog!!! Boy, was I wrong about that. Top work so far and great forethought about saving the little pieces for last so they won't get broken off.

Once again, super scratched additions and a top notch spray job with the hissy stick. I will try to pay more attention from now on. Hope your work eases up and gives you more play time at the bench....

Prost
Allen
 
D

Deleted member 7181

Guest
Hey Allen, great to have you along. Not one of our four legged friends I'm afraid but glad you like it so far.

Slowly working my way through the track links behind the scenes too. Doing a batch at a time seems to work for me as I have the attention span of a 3 year old!
 

Jakko

Way past the mad part
SMF Supporter
Joined
Apr 28, 2018
Messages
10,787
Points
113
First Name
Jakko
The first couple of photos make it look like you painted the intake grilles a bare metal colour, but it turns out that’s just the lighting :smiling3: Looking very good, though.

Oh, one thing I just noticed: the mufflers on the real thing were wrapped in asbestos rope between the attachment rings. It should replicate nicely if you just wrap white thread around it.
 
D

Deleted member 7181

Guest
Oh, one thing I just noticed: the mufflers on the real thing were wrapped in asbestos rope between the attachment rings. It should replicate nicely if you just wrap white thread around it.

I decided not to go with the wrapping after a bit of research. I left the exhausts off initially while I considered it as that would have been the best time to do it, but after reading a few comments and seeing a few images of an extra metal cover over the asbestos heat wrap layer, I figured that look would be easier, even though it appears it was often missing.
 

Si Benson

SMF Supporter
Joined
Apr 27, 2018
Messages
3,322
Points
113
First Name
Si
Hi Andy,
Not looked in for a while and you’ve motored along! That paint will look fabulous once the weathering starts:thumb2:
 

SimonT

Rest in Peace
Rest In Peace
Joined
Apr 27, 2018
Messages
2,448
Points
113
Location
Yorkshire
First Name
Simon
Paint looks good Andy

Good call on the exhaust - there are plenty of photos showing with and without the covers
 
D

Deleted member 7181

Guest
Thanks Si & Simon.

I managed to over-thin a couple of the colours so made life harder than it needed to be. First go with the new airbrush and it behaves very differently to the cheap one I've been using up to now, flowing much better without needing the paint to be so runny, but it's all part of the learning process.
 

Jim R

SMF Supporter
Joined
Apr 27, 2018
Messages
13,722
Points
113
Location
Shropshire
First Name
Jim
Hi Andy
Boxes look good. Paint job is fine and as you say washes will tone down the brightness and pull it all together. You've made great progress with this.
Jim
 
D

Deleted member 7181

Guest
Thanks Jim.

The yellow is my main concern right now but isn't quite so bad in person. It's the same dark Sandy yellow I used on my BTR80 but looks so much brighter here! :cool:

If the washes don't tone it down enough I'll go over it with a tinted clear, which I think is known as a filter in modelling circles.
 
Last edited by a moderator:
D

Deleted member 7181

Guest
Tracks on for a test fit. They only had a quick coat of steel on the sprue so will need further work, but at least the hidden parts are covered in something.

Most of them clipped together pretty well but I think I'll be gluing them when the time comes as the odd weak joint keeps popping. I've substituted the really loose fitting ones already, and with a whole sprue full of spares not touched yet I've got plenty to go at, but still I think long term gluing them might be prudent.

I've also fitted the guns and somehow they still move which is a bonus. Must have done something right.

Tried a light filter coat of dark brown over the lower half to tone down the colours too. It's starting to look better already but the varnish I used to seal the decals is still a bit soft so haven't touched the main body yet. First time using this particular varnish and went a bit heavy I think.
 

Attachments

  • WDATVd2.jpg
    WDATVd2.jpg
    101.3 KB · Views: 29
  • mIInv8C.jpg
    mIInv8C.jpg
    100.6 KB · Views: 29
Last edited by a moderator:
Top