Major surgery Dr Tony. Or do you just like making dust ?
You are using an out of date browser. It may not display this or other websites correctly.
You should upgrade or use an alternative browser.
You should upgrade or use an alternative browser.
Minihobby Mil Mi24 Hind F in 1/48 scale
- Thread starter yak face
- Start date
Major surgery Dr Tony. Or do you just like making dust ?
 The doctor will see you now
Been adding a few more bits to the cockpit. The pedals in the pilots cockpit have been improved and the ones in the WSO s pit added . The WSOs cockpit has basic flight controls but only for emergency and as such the rudder pedals ( ? Or whatever they call them in a helicopter) are just 2 bars that extend out from the sides of the tub if needed which I added from plastic rod . I also cut out a hole in the pilots floor and boxed it in , fitting a lever in there ( dont know what its for , maybe the handbrake!? )
The troop compartment has been primed ready for a splash of colour, still not sure if im going to have the doors open yet but ill paint it anyway .


The troop compartment has been primed ready for a splash of colour, still not sure if im going to have the doors open yet but ill paint it anyway .
- Joined
- Apr 28, 2018
- Messages
- 10,791
- Points
- 113
- First Name
- Jakko
Anti-torque pedals, or usually just pedalsthe rudder pedals ( ? Or whatever they call them in a helicopter)
 In a conventional helicopter they control the pitch of the tail rotor blades, so it produces more or less thrust and therefore pulls or pushes the tail to the side, with the same net effect as the rudder in a fixed-wing aircraft.
Jim R
SMF Supporter
Hi Tony
Bit late in - sorry. I reckon you've had £10.60 worth of mogglin fun already. Great work on the seats, much improved. Cockpit as a whole is looking good. All credit for the canopy replacement. Hope it works ok.
Jim
Bit late in - sorry. I reckon you've had £10.60 worth of mogglin fun already. Great work on the seats, much improved. Cockpit as a whole is looking good. All credit for the canopy replacement. Hope it works ok.
Jim
- Joined
- Apr 28, 2018
- Messages
- 10,791
- Points
- 113
- First Name
- Jakko
Just as long as nobody confuses them for the brake and accelerator, they’ll probably do fineYes , left or right pedals !
")
Been a while since I updated this one so heres a bit of progress. The seats have been painted , Matt black ,weathered frames and gloss black cushions and the etched seat belts fitted. I’ve sprayed the cockpit tub black so it’s now the difficult job of adding all the turquoise green instrument and switch panels ( not provided in the kit !) and bits and bobs . The WSOs cockpit in the Hind F is totally different to the D model and has an instrument panel which isn’t supplied .( the kits simplified D model pit has a weapons sighting rig in this position , correct for a D but not the F ) I made a shroud for the IP from a bit of thin aluminium and glued this to the front coaming .The panel has been made from drilled plastic card which I then stuck onto another piece of card and sprayed black ,which once removed left me with the black circles of the instruments. I’ve got a selection of instrument decals which I can put onto the back section and hopefully will give a nice look once placed behind the front.
Another area I’ve been sorting is the troop compartment , it’s had some paint and a wash , just needs the roof section putting on after I’ve installed the bench which needs some belts also.
Alongside the interior I’ve also been assembling the rotors , which are very nicely detailed, and sprayed the engine exhausts . These were done silver , then a misting of Vallejo Smoke and Transparent blue , finishing off with a dusting of mig black pigment for the sooty interior.
Cracking work Tony keep it up.
Is this one of those builds were you just keep making loads of sub-assemblies, then all of a sudden, stick them all together and its time for paint ?
Eventually yes colin , the trouble is the cockpit is going to take a good while .Is this one of those builds were you just keep making loads of sub-assemblies, then all of a sudden, stick them all together and its time for paint ?
scottie3158
SMF Supporter
Tony,
Coming along nicely.
Coming along nicely.
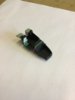
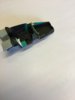
Been quietly doing things on this one . The crew cabin is done , the bench is fitted with four sets of etched belts added from the spares box . The LLTV , FLIR sensor under the nose was a bit simplified and not representative of the Hind F. The later version as fitted to the F has a different retraction system for the sensor armoured covers with twin springs and linkages for the two per side covers. A bit of plastic card and some springs made from guitar string and it’s looking something like. A bulge was also added on the side of the housing. Similarly the teardrop shaped missile sensor on the other side of the nose benefitted from a bit of jazzing up too . 


The cockpit is taking the most time with this build , as I’m having to make most of it from scratch and it’s a complicated pit. The main switch panels have been added with plastic card / rod / strip and wine foil ( embossed with one of those riveters everyone seems to have but doesn’t use) these just needing a careful paint up and possibly some decals here and there. Some heater pipes / cables have been added to the front cockpit . The front IP is done ,the pilots still needs painting up
Theres still a lot of bits to add like the gunsights / weapon aiming sights and the canopy has its fair share of stuff dangling from the inside too . cheers
Attachments
That's a nice few add ons there. Your attention to detail is commendable. I'd of just stuck it together by now.
Cheers colin , the cockpit is so prominent and visible through the large canopies i couldnt leave it as supplied , good thing is for the next mi24 i’m doing , ive got myself a resin cockpit !!That's a nice few add ons there. Your attention to detail is commendable. I'd of just stuck it together by now.
scottie3158
SMF Supporter
Tony,
Some very nice additions they add a great deal of interest to the office.
Some very nice additions they add a great deal of interest to the office.
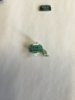
Slowly moving on with the cockpit, the various switch panels have been painted black and the surrounds in the lurid blue green . Next they need to have the details added with a combination of careful painting and random decals from the spares box. I’ve also been working on the WSOs cockpit . The kit supplies a very basic representation of the mi 24 D equipment but the F is a bit different . I’ve already covered scratching the instrument panel and now I’m sorting the various weapon aiming instruments .The kit supplied items are basic to say the least so the FLIR /LLTV scope has been thinned down and spruced up with bits of plastic rod and a bit of aluminium tube for the eyepiece. The bit of equipment beside this isn't supplied so I’ve had to scratch this from bits in the spares box ( a sprue of spare aerials from the Eduard MiG 21 came in very handy!)


scottie3158
SMF Supporter
Tony,
The paint in the office has brought out the great detail.
The paint in the office has brought out the great detail.
Hopefully once I get a bit more on and a few decals it’ll look passable Paul , cheers tonyTony,
The paint in the office has brought out the great detail.