Monogram Panzer IV (Update 3/24/16)

C

CharleyGnarlyP290

Guest
My next project is a nostalgia build: The Monogram 1/32 scale Panzer IV.


20160217_201818_zpspxxzocjb.jpg


Way back when, in those wonderful years known as the '70s, Monogram had their Armor Series kits. There were US, British and German vehicles available. For some crazy reason, these kits were molded in 1/32 scale instead of the more common 1/35.


In the mid-'70s, a friend of mine introduced me to the Monogram armor kits. Up to that point, my model building included cars, ships, and aircraft, with a few motorcycles sprinkled in. But, once I discovered armor, I rarely built anything else. Hence, the "nostalgia build."


The Panzer IV was first molded in 1970. The one I am about to build is a re-box of that kit. Compared to modern kits, this kit is quite simple, with a low parts count, and somewhat soft detail. With that in mind, it should be a rather quick build.


20160217_202037_zpsuz6crdte.jpg


This model has some pretty nifty options available. First, there is an option to model kit supplied battle damage to the side skirts.


20160221_084304-1_zpsart0zmdd.jpg


Next, the kit supplied decals are offered two ways. There is a clean, factory applied look set, and a scuffed up battle damaged set.
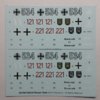

20160221_084400-1_zpsm8pxyxz2.jpg


There are also two figures supplied, and considering they were molded in 1970, they are actually quite good.


20160221_084335_zpspez3nsje.jpg


My plan with this kit is to model it with the damaged side skirts. I am also going to apply zimmerit to this vehicle. It will be only the second time I have applied zimmerit to a model, that being 25+ years ago.
 
A

american

Guest
Nice one. I will be the one to watch your work! I can't wait more pictures.
 

monica

“When there's no more room in hell, the dead will
SMF Supporter
Joined
Oct 30, 2013
Messages
15,111
Points
113
Location
Melbourne
First Name
monica
what a great looking kit,


have done this one,or still working on,the dragon one I think,


I real like the options it give with the damage skirts and the decals,


a few other kit makes should be looking at the options like that as well, ;)
 

flyjoe180

Joe
SMF Supporter
Joined
Jan 18, 2012
Messages
12,419
Points
113
Location
Earth
First Name
Joe
Watching this Brett. I like the option that monogram have given you re the damaged panel.
 
C

CharleyGnarlyP290

Guest
Time for the first update.


First up is the suspension and drive sprockets. Pretty straight forward. Fit was fine and the only tedius part was the clean up.


20160221_150617_zpsfunbdupn.jpg


Next was the front spare track bracket. In looking at photos of the real deal, there seems to be two types of pins that are located in the ends of the brackets. There is one that looks to be a round bar with a flat bar welded on the end. The round part goes through the holes in the bracket end tabs, with the flat part hanging. There is a chain attached to the flat bar which is also attached to the vehicle itself (to keep it from getting lost, I assume).


Then there is a simple pin made with a piece of round bar bent into the shape of an "L". This is the one I will do. I assume the pins were used to aid in towing and some photos also show the pin used to secure the ends of tow cable when not in use.


The kit part comes with no holes for the pins, so I drilled them out with a pin vise.


20160221_155708_zps39pkpdtz.jpg


Since I am going to model zimmerit on this kit, I marked an outline in pencil on the front plate of the hull where the track bracket mounts. I will leave this area clear as I apply the zimmerit.


20160221_155858_zpstba7tvtb.jpg


Next up will be the back plate of the hull and the hull upper.
 

grumpa

SMF Supporter
Joined
Jan 14, 2015
Messages
4,690
Points
113
First Name
Jim
nice kit, will keep an eye on;)
 
Joined
Mar 2, 2015
Messages
3,410
Points
113
First Name
Robert
Love the Panzer and even in this strange scale it is looking very sweet.


Pulled up my chair and got me Pringles ready ( fed up of popcorn )


Regards


Robert
 
C

CharleyGnarlyP290

Guest
A little more progress.


The first thing I did was attach the upper hull parts.


20160226_172004_zpsdtwaecm7.jpg


Before I could go much further, I needed to apply some of the zimmerit. Let me say up front, that this is only the second time I have applied zimmerit to a model. The first time was in '88 or '89, and the method I used was far different than the method I wanted to attempt this time. The method I used before involved drawing the zimm pattern on the vehicle, applying a liberal amount of liquid cement, letting the cement soften the plastic, then scribing the zimm into the softened plastic. It worked really well, but was very time consuming and tedious.


This time, after seeing a Youtube video, I decided to give putty a try. I tried Squadron Green stuff years ago and hated it. The putty skinned over in very short order making it impossible to work with. So, upon the recommendation of the person in the video, I decided to use a water based wood filler. It is nice in that it can be thinned a bit using water, and is easy to clean up. Also, if the zimm doesn't look right, it can be washed off with water leaving perfectly clean plastic. This would be impossible with solvent based putties.


Here is my materials list:


1. Bowl of water for cleanup and/or thinning


2. Wood filler


3. A wide, flat applicator (more on that in a minute).


3 A tool for making the zimmerit pattern.


4. Napkins for clean up.


The wood filler is available at any hardware, or home improvement store and is cheap. The applicator is dependent upon what size the surface is where the zimmerit will be applied. In my case, I used a flat blade for the larger Xacto knife for the vertical hull surfaces. The larger putty knife will be used for doing the zimmerit on the side skirts. The tool I used for the zimmerit pattern is a gauge used for measuring thread sizes on nuts and bolts. It comes with a number of sizes, so you can pick the size you need. It could be used for a few different scales of models. It is set up like a feeler gauge in that you only expose the blade you want, while tucking the rest back into the handle. I could have ordered an actual zimmerit tool (like the Tamiya version, for instance) but had this tool in my tool box, so decided to use it.


20160227_182002_zps1gbcqgqs.jpg


In the above photo you can see the tools and materials, as well as the first application on the upper hull front. I was pretty pleased with the result... especially since this was my first attempt.


Then I moved to the back of the vehicle.


20160227_184730_zpswbfgwlxp.jpg


Next, I took the front track rack and stuck it to the sticky side of some masking tape and cut around the mounting points to make masks for the front of the hull. This way, when I applied the zimmerit to the hull front, I could peel the tape off to leave bare plastic for cementing the rack in place.


20160226_143153_zpsingaqzwj.jpg


Here is the front of the vehicle with the zimmerit applied and the tape removed. (Note that the upper hull is just resting on the lower.)


20160227_184742_zpsfugzchbf.jpg
 

flyjoe180

Joe
SMF Supporter
Joined
Jan 18, 2012
Messages
12,419
Points
113
Location
Earth
First Name
Joe
I like the resources you're using here Brett, got to be satisfying making your own.
 
C

CharleyGnarlyP290

Guest
Step 4 is complete. The upper hull details have been added, and the appropriate zimmerit applied. As far as the zimmerit goes, I am at the point where I need to make some final decisions.


In doing my research on the unit I am portraying, I have found that there is no consistent approach to where the vehicle had zimmerit. Here are some of the combos that I found:


1. Zimm on the vehicle front hull, sides, turret front, turret skirts and side skirts.


2. Zimm on the vehicle front hull, turret front, turret skirts, side skirts, but not on the hull sides.


3. Zimm on the vehicle front hull, turret front, turret skirts, but not the side skirts.


4. Zimm on the vehicle front hull, turret front, but not on the turret skirts, or the side skirts.


and on, and on, and on...


Basically, any combination of the above. As Charlie Brown would say... "ARGH!" So, I settled on the following: Zimm on the hull front vertical surfaces; the turret front; and the rear hull plate. These seem to be pretty consistent through the H series in this unit. In addition, I will be applying zimmerit to the turret skirts as well.


So, at the end of step 4 and the very beginning of step 5, here is what I have. The hull is complete with zimm and the brackets for the side skirts attached.


20160306_142049_zps6f6drhwv.jpg


As you can see, step five starts out with the aforementioned side skirt brackets and side skirts.


20160306_090920_zpsxck6zc9t.jpg


An available option is to cut out segments of the side skirts and replace them with the kit supplied battle-damaged parts. I opted for this, since it will add a little interest to the kit. I took the skirt I wanted to modify, and using the backside of a sturdier blade than I normally use, I scribed the joints a few times, then snapped them apart.


e33b5487-e8d9-4eb4-a4ca-289cb02399f5_zps8cokjooz.jpg


Then, after a bit of sanding to smooth the mating surfaces, I cemented the damaged portion into place. The skirts will be set aside until it is time to paint since I will be not mount them until the vehicle has been painted and weathered.


20160306_090824_zpsu2pjppus.jpg


The final steps of step 5 are to assemble the turret. This was pretty straight forward. The only part I had to really pay attention too as far as fit, were the side hatches. The backside of the hatches had raised ejector pin marks that had to be sanded flush in order to get the hatches to sit flat on the turret sides.


c7dd5404-4242-4224-adca-c348d5a12f71_zpstvyjradf.jpg


And here is the completed turret.


c3072dfa-d4bc-473b-afdb-ec5cd7d2b49d_zpssntddhuw.jpg
 
Joined
Mar 2, 2015
Messages
3,410
Points
113
First Name
Robert
I really do like your approach to the Zimmerit as this put me off when I was building a tiger way back and rally put me off armour but this is an expsy fix now and really does look more realistic.


The wood filler seems great.


Looking god on the turret to.


Regards


Robert
 
C

CharleyGnarlyP290

Guest
On to step 6: Main gun assembly.


20160307_182246_zpsiv2ggzpg.jpg


The main gun was pretty straightforward. Assemble it and snap it into the front of the turret. The turret schurzen (skirts) are a little trickier. I wanted to assemble the skirt halves and brackets first, but leave them off for initial primer/paint. So, I used some tape, sticky-side up, and stuck the turret to it so it wouldn't slide around. Then I used a couple of sanding sticks as lifts to get the skirts to the proper level in relation to the mounting points on the turret. After I cemented the two halves together, I started cementing the brackets to the skirt, but not the turret. That way they would be in place for painting, and then it would just be a matter of super gluing them to the turret later.


20160307_182310_zpse807cosv.jpg


20160307_182255_001_zpsmfmzgidw.jpg


One thing I like to do when I am going to paint sub-assemblies before I put them together, is apply masks to the mating surfaces. This keeps the plastic bare, and negates the need to scrape off paint later. Some people like to paint it all, then let the cement eat through the paint to create a bond. I have not had much luck in that respect.


In this photo, you can see where I have applied masks to the side skirts and mounting points on the hull.


20160307_191720_zpsgif1i5gv.jpg


Next stop... primer/paint!


20160307_191656_zpsmmnpuwd3.jpg
 
F

Fenlander

Guest
You are really bringing this together Brett. Doing a great job, some good hints and tips to be had as well, cheers.
 
C

CharleyGnarlyP290

Guest
Thanks, Graham. So, far it has been a fun kit, and really brings flashbacks from building the Monogram kits in the '70s.
 
Joined
Mar 2, 2015
Messages
3,410
Points
113
First Name
Robert
This is looking fantastic and your making good progress too. Love the armour plates and the Zimmerit round the barrel parts.


Great stuff


Regards


Robert
 
N

noble

Guest
Your making great progress with this, the zimmerit looks great.


scott
 
T

tommy1drop

Guest
Coming along a treat Brett, looking forward to the next update.
 
Top