Sculpting a 1/32 Figure in Polymer Clay from Scratch

Neil Merryweather

SMF Supporter
Joined
Dec 29, 2018
Messages
4,423
Points
113
Location
London
First Name
Neil
Neil,

Just had a catch-up. As others have already said this is truly mind-blowing work. I wouldn't know where to start with something like this. It puts sticking bits of plastic together into perspective.....

Very well done indeed.

Andrew
That's very kind Andrew, thanks.
 

Neil Merryweather

SMF Supporter
Joined
Dec 29, 2018
Messages
4,423
Points
113
Location
London
First Name
Neil
This is looking very good indeed Neil. The SBS is also very informative, making the sculpting process seem far easier than I’m sure it is....
Thanks Tim
Why not give it a try and find out? You like fantasy stuff, there's a lot more latitude in that,- try making up some new kind of monster... you might surprise yourself.
 

boatman

SMF Supporter
Joined
Nov 8, 2018
Messages
12,879
Points
113
Location
NORFOLK UK
First Name
christopher
Ok Mr. Merryweather,

Were you scared??? Seriously Neil, what you are doing here is is utterly, and I do mean utterly unbelievable. I have followed your Fusilier, fuselage, or what they are conversions and am at loss for words. Sorry I haven't commented sooner, but I don't know what to say. Anyone who can make ears or eyeballs on a 54mm figure is a master of the modelling art. Now you are doing the whole figure and again, I have been totally amazed at your craftmanship and the ability to work on something so small....

This has to stop as I am always picking up my jaw off the floor with each update. It has also come to my attention, that you have been taking the wrong dosages of your medication again!!! Please don't don't stop and don't change the dosages. I have learned so much and have enjoyed this tremendously Sir. I may never sculpt a figure, but the knowledge from your SBS will always be there if I try.

With that, I can just say thank you for taking the time to bring this to life and it's a really nice tribute too. Have fun and may the oven always be at the right temp. (and SWMBO doesn't get upset)....................Drive on Neil...........

Prost
Allen

PS, check to the usual off-shore account please
DITTO to what Allen has said Neil i must admit this is not my type of instrest in modeling an this is the first time i think ive looked in an im amazed an what you have been doin here is unbelivable you must have a very steady hand an no shakes like me very well done
chris
 

Neil Merryweather

SMF Supporter
Joined
Dec 29, 2018
Messages
4,423
Points
113
Location
London
First Name
Neil
DITTO to what Allen has said Neil i must admit this is not my type of instrest in modeling an this is the first time i think ive looked in an im amazed an what you have been doin here is unbelivable you must have a very steady hand an no shakes like me very well done
chris
Thanks for that Chris , It's good to know that you find it interesting even though it's not your field. Likewise, I will never build a radio controlled boat(sorry ship) but but I love watching you build yours.
As for shaky hands, I don't suffer from that but I still rest my elbows on the table and brace the fingers of one hand against the other when doing this small stuff.
Cheers
Neil
 

Neil Merryweather

SMF Supporter
Joined
Dec 29, 2018
Messages
4,423
Points
113
Location
London
First Name
Neil
Now that we have the collar sorted we can position his head correctly and then add the shirt collar.

I added some clay to his neck area, blending it in

Neck (1).jpg

I put some Vaseline in the neck socket using an old paintbrush, and then I gently positioned his head to my satisfaction and bunged him in the oven.

Neck (2).jpg

Some of the putty will spill out when you do this but I prefer to get the position correct and then leave well alone until it is set. We can clean any excess away afterwards

Neck (3).jpg

Now we can work on his shirt collar. I rolled a sausage of clay and pressed it around his neck, and I cut it roughly to shape

Neck (4).jpg

I applied more Vaseline to the neck socket and pushed the head gently into position again, I shaped the collar a bit more and then carefully removed it

Neck (5).jpg

It all went a bit astray there but I worked some more on the collar to refine it

Neck (6).jpg

Put it back in place to check

Neck (7).jpg

Took it out and cooked it.
Neck (8).jpg

I could have added hair as well but the collar was so ticklish I didn’t want to risk damaging it. It still looks more like a roll neck sweater, let’s hope I can trim it down without doing any damage.
That's it for now, thanks for watching
Neil
 

Allen Dewire

Proud Rabble Member
SMF Supporter
Joined
Apr 27, 2018
Messages
4,105
Points
113
Location
Bamberg
First Name
Allen
Hi Neil,

Most excellent work Sir!!! I do have a couple of maybe dumb questions though. I understand you using Vaseline to hold the head in place instead of blu-tack or such, but do you have to clean it off before you bake the head again? Does it affect the clay when you don't clean it off? lastly, how many times can you bake the poor fellow with out him becoming maybe too brittle?.....

Mostly, I am worried about your health though. With you using the oven so much, how can the good lady make you something to eat?

Prost
Allen, hoping you can at least order take away for dinner so you don't go hungry.........
 

Neil Merryweather

SMF Supporter
Joined
Dec 29, 2018
Messages
4,423
Points
113
Location
London
First Name
Neil
Cheers Allen
I cleaned the vaseline off the neck with white spirit before trying to add more putty. I don't think it affects the baking. I don't know how many times I can bake him, fortunately we have this record of the process so I can count them up. The boots will have had the most, I expect.
As for your concern over my health I can assure you that I choose my moments very carefully -usually when she is out;)
However, I did mess up the other day as she had asked me to put jacket potatoes in, which I did immediately after a baking session, but I forgot to raise the temperature ...
Amazingly I didn't get too much of a bollocking :upside:
 

Neil Merryweather

SMF Supporter
Joined
Dec 29, 2018
Messages
4,423
Points
113
Location
London
First Name
Neil
I added some clay for his hair, pressing it down all around with the metal tool

Hair (1).jpg

We don’t need to worry about the top of his head. His helmet is at an angle so we want to see some hair at the left front.

I modelled the locks with the chisel edged silicon tool

Hair (2).jpg
Hair (3).jpg

It’s tempting to use a scalpel for hair because you want to represent the fine texture, but in reality all we see is the large waves of the locks, so the bigger tool is better for that.

I vaselined the helmet (steady on chaps!) and positioned it, adding more hair where there were gaps

Hair (4).jpg

Then I modelled the strap at the back, as we have discussed, making sure the hair bunched over the strap

Hair (5).jpg

Then a test fit to see how it looks on the figure

Hair(6).jpg

This helmet is 3D printed in resin (and not very successfully as the brim is a bit wavy) so I am going to remove it before it goes in the oven. I haven’t yet decided whether to mould it in one with the head or separately. If I do include it with the head I will have to make absolutely sure all the gaps are plugged or silicon will leak into the space above his head and eventually cause the mould to tear which, of course, we don’t want.

That's all for now, folks; next we will do the arms
thanks for watching
Neil
 

GerryW

Rest In Peace
Joined
Feb 14, 2021
Messages
1,688
Points
113
Location
Suffolk
First Name
Gerry
I'd say separately - once the mold is made, knock out the other 8 needed, saves modeling 3 times when one is enough!
 

Neil Merryweather

SMF Supporter
Joined
Dec 29, 2018
Messages
4,423
Points
113
Location
London
First Name
Neil
I'd say separately - once the mold is made, knock out the other 8 needed, saves modeling 3 times when one is enough!
Actually I'm going the other way, Gerry.
I will have unlimited helmets for the masters because they are 3D printed(and my brother has the printer.:tongue-out3:..) , but I want this guy's hat to sit at the correct angle as it's part of his character. Remember I still have half an eye on commerciality in the background. When I design a pose for a master figure I want the customer to be able to replicate it without any ambiguity.
I once made a master for someone which was assembled wrongly for the box art and I felt it affected the sales adversely because it actually looked stupid; but the client wouldn't change it. After that I have always tried to make the fit of parts absolutely definitive. If the customer wants to change it, that's fair enough, but they should be able to reproduce my vision (which is presumably the reason they bought it in the first place)with no effort required.
Rant over , sorry!
 
Last edited:

GerryW

Rest In Peace
Joined
Feb 14, 2021
Messages
1,688
Points
113
Location
Suffolk
First Name
Gerry
Actually I'm going the other way, Gerry.
I will have unlimited helmets for the masters because they are 3D printed(and my brother has the printer.:tongue-out3:..) , but I want this guy's hat to sit at the correct angle as it's part of his character. Remember I still have half an eye on commerciality in the background. When I design a pose for a master figure I want the customer to be able to replicate it without any ambiguity.
I once made a master for someone which was assembled wrongly for the box art and I felt it affected the sales adversely because it actually looked stupid; but the client wouldn't change it. After that I have always tried to make the fit of parts absolutely definitive. If the customer wants to change it, that's fair enough, but they should be able to reproduce my vision (which is presumably the reason they bought it in the first place)with no effort required.
Rant over , sorry!
No need to apologize - guess that it's frustrating to put all the work in, only for someone to publicize it wrong.
 

Neil Merryweather

SMF Supporter
Joined
Dec 29, 2018
Messages
4,423
Points
113
Location
London
First Name
Neil
Thanks for the comments, guys.
Right, time to get on with the arms and hands

First we need an armature wire, which will be drilled into the shoulder. As I mentioned in my ‘rant’ to Gerry, I do like the various separate parts to have an unambiguous fit if the figure is for sale, but it’s equally important during the sculpting not to have the armature waving about in space. So the first thing I do is to create a square, tapering hole in the shoulder, which will form a square peg when we apply the Milliput of the armature. This ensures that when the arm goes in and out it can only fit one way. I then drill though the hole and insert my twisted copper wire.

Arms (3).jpg

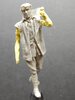
I did the same for the other side and positioned the arms roughly for starters. I have left the wires over length and I will trim them once I am happy with the proportions

Arms (1).jpgArms (2).jpg

As I have already said, hands are the most difficult of all to sculpt, but they are a bit easier if they are gripping something because you can use the object as a base to keep the putty in place. Luckily we need a lovely big chunky 6” shell for our guy’s left hand. I have some shells 3D printed in resin, and because it will be preferable for it to go in the oven when I cook the hand I did a trial (when SWMBO was out ;) ); all my fears of melting or stinking were proved to be groundless, thank goodness.

I need a positive fix of the shell to the arm so I have drilled the end of the shell. I have made sure it is sitting properly on the shoulder – I will probably add some clay to the shoulder afterwards to improve the impression of weight.

Arms (4).jpgArms (5).jpg

I Vaselined the arm sockets then inserted some Milliput, making sure it goes all the way into the plug hole.

Arms (6).jpg

Then I put Milliput all around the armature wire and poked the end of it through the Milliput into the hole.

Arms (7).jpg

I did the same with the other arm and left it overnight to cure

Arms (8).jpg

Once it had cured I carefully wiggled the arms out of their sockets

Arms (10).jpg

I carved away the excess Milliput, in particular at the shoulder joint and the hand area, and I defined the cuff position.

Arms (11).jpg
I've created a sort of spatula shape as a foundation for the hand.

In keeping with my ‘inside out’ approach I am going to work on the hands first and cook them solid before I do the sleeves themselves.

So that will be the next installment, but I've just had my mojo sabotaged by spending a combined 90 minutes on hold to a windscreen replacement company who let us down yesterday and can't give me another appointment until NEXT SATURDAY!
I've come over all Victor Meldrew
I don't BELIEVE it!
 

Attachments

  • Arms (9).jpg
    Arms (9).jpg
    85.3 KB · Views: 1
Top