Sd.kfz.7/1

scottie3158

SMF Supporter
Joined
Apr 27, 2018
Messages
12,760
Points
113
Location
Spalding
First Name
Paul
Can I have a "bicky" too?.......always interested in a good kraut halftrack build! I'll park in the back to keep from getting pelted with popcorn and other projectiles of choice. ;)
Rick,
Of course you can mate but get in quick.
 

scottie3158

SMF Supporter
Joined
Apr 27, 2018
Messages
12,760
Points
113
Location
Spalding
First Name
Paul
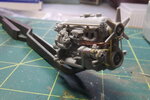
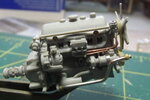
The engine is nearly finished. I haven't added a lot of detail just enough to make it look busy if I decide to have the panels open. This included the fan and generator belts and two pipes from copper wire that wrap around the engine. I presume they are some sort of fuel mixture pre heater as they run around to the exhaust manifold.

DSCF3883.JPG
DSCF3884.JPG

cheers
Scottie
 

Jakko

Way past the mad part
SMF Supporter
Joined
Apr 28, 2018
Messages
10,927
Points
113
First Name
Jakko
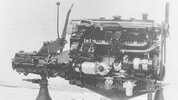
Not a clue what those pipes are for … I missed them when I built the engine for my Dragon kit, but looking at the photos of a restored vehicle I used for that, I see now that they probably should have been on that engine — though side-by-side under the carburetor rather than one above the other like you have them here.

Ah, yes: page 22-4-56 of Panzer Tracts No. 22-4: Mittlerer Zugkraftwagen 8t (Sd.Kfz.7) by Jentz, Doyle and Friedl does show two pipes there, side-by-side. The outer pipe is plain, the inner one is corrugated for most of its length. Both run forward from under the carburetor, bend to the left, then go on to the other side of the engine and bend towards the rear (where they disappear out of sight). If you want I can scan the photo for you.
 
  • Like
Reactions: JR

Andy T

SMF Supporter
Joined
Apr 26, 2021
Messages
2,043
Points
113
Location
Sheffield
First Name
Andy
Possibly to stop the carb' from icing up in cold weather. I was a mechanic back in the days before fuel injection and most cars had a warm air fed back then, diverted from a shield around the exhaust manifold.
 

scottie3158

SMF Supporter
Joined
Apr 27, 2018
Messages
12,760
Points
113
Location
Spalding
First Name
Paul
Not a clue what those pipes are for … I missed them when I built the engine for my Dragon kit, but looking at the photos of a restored vehicle I used for that, I see now that they probably should have been on that engine — though side-by-side under the carburetor rather than one above the other like you have them here.

Ah, yes: page 22-4-56 of Panzer Tracts No. 22-4: Mittlerer Zugkraftwagen 8t (Sd.Kfz.7) by Jentz, Doyle and Friedl does show two pipes there, side-by-side. The outer pipe is plain, the inner one is corrugated for most of its length. Both run forward from under the carburetor, bend to the left, then go on to the other side of the engine and bend towards the rear (where they disappear out of sight). If you want I can scan the photo for you.
That was probably me not looking at the reference pic close enough. I did notice that one was corrugated but I had nothing to replicate that.
Possibly to stop the carb' from icing up in cold weather. I was a mechanic back in the days before fuel injection and most cars had a warm air fed back then, diverted from a shield around the exhaust manifold.
Sounds along the lines I was thinking
 

Jakko

Way past the mad part
SMF Supporter
Joined
Apr 28, 2018
Messages
10,927
Points
113
First Name
Jakko
I can’t think of a good way to replicate the corrugations either, other than wrapping very fine wire around it, which never looks quite right, IMHO.
 

JR

Member of the Rabble and Pyromania Consultant
SMF Supporter
Joined
May 26, 2015
Messages
17,362
Points
113
Location
lincs
First Name
John
Seat please Paul , did Rick bring his Hobnobs or have you any ?
 

scottie3158

SMF Supporter
Joined
Apr 27, 2018
Messages
12,760
Points
113
Location
Spalding
First Name
Paul
I can’t think of a good way to replicate the corrugations either, other than wrapping very fine wire around it, which never looks quite right, IMHO.
Just had a post from Pete who suggested a guitar string which sounds like a good idea.
Perhaps a guitar string?
Pete
Pete, good call I will have to nip into a music shop if there is still such an animal, as I have no idea what I would need if I order on line.
Seat please Paul , did Rick bring his Hobnobs or have you any ?
Always a seat for you mate and don't worry I have a secret stash.
 

scottie3158

SMF Supporter
Joined
Apr 27, 2018
Messages
12,760
Points
113
Location
Spalding
First Name
Paul
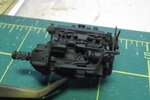
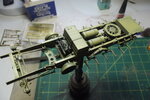
The engine and chassis received a coat of Tamyia Nato Black. The engine will get a bit of detailing but not much unless I leave the hood open, which I am still undecided about.

DSCF3887.JPG

Next the chassis received a coat of Tamyia Dark yellow. This will be weathered later.

DSCF3888.JPG

the only addition to this stage was replacing the kit supplied string for the winch rope with twisted copper wire.

cheers
Scottie
 

Jakko

Way past the mad part
SMF Supporter
Joined
Apr 28, 2018
Messages
10,927
Points
113
First Name
Jakko
don't know why I can't find these pictures when I search
I didn’t bother trying to find this online, it would probably be pointless … I looked at the couple of books I had purchased when building my Sd.Kfz. 7 and leafing through, found that photo in one. I didn’t even realise it was whenI built my model, though …
 

Scratchbuilder

SMF Supporter
Joined
Jul 2, 2022
Messages
2,029
Points
113
Location
Luton
First Name
Mike
Doing the detail dance again and as ever improving the look of the kit.
The two pipes could be diesel return pipes which sent back unused diesel back to the pump and even the fuel tank. We had them on the trucks I drove, it was supposed to make them more efficient and clean.
Looking forward to more of your skills at work.
 
  • Like
Reactions: JR

Jim R

SMF Supporter
Joined
Apr 27, 2018
Messages
13,816
Points
113
Location
Shropshire
First Name
Jim
Looking good Scottie. I seem to remember having issues with the various levers fitting through the floor later in the build. Probably I had something out of true but worth watching.
 
  • Like
Reactions: JR

scottie3158

SMF Supporter
Joined
Apr 27, 2018
Messages
12,760
Points
113
Location
Spalding
First Name
Paul
I didn’t bother trying to find this online, it would probably be pointless … I looked at the couple of books I had purchased when building my Sd.Kfz. 7 and leafing through, found that photo in one. I didn’t even realise it was whenI built my model, though …
Jakko,
I am the same with most builds or find the pictures when I am finished.
Doing the detail dance again and as ever improving the look of the kit.
The two pipes could be diesel return pipes which sent back unused diesel back to the pump and even the fuel tank. We had them on the trucks I drove, it was supposed to make them more efficient and clean.
Looking forward to more of your skills at work.
Michael,
Thanks mate not quite to your standards yet but slowly improving. The fuel lines could be as you said.
Looking good Scottie. I seem to remember having issues with the various levers fitting through the floor later in the build. Probably I had something out of true but worth watching.
Jim,
I think the levers should have been fitted later, but hopefully making them out of wire they can bend a bit.
 

BattleshipBob

Bob, bob, bobing along!
SMF Supporter
Joined
Apr 28, 2018
Messages
6,240
Points
113
First Name
Bob
Very, very late Scottie

Can I grab any available seats ?
 
  • Like
Reactions: JR

Jakko

Way past the mad part
SMF Supporter
Joined
Apr 28, 2018
Messages
10,927
Points
113
First Name
Jakko
I am the same with most builds or find the pictures when I am finished.
Always the case: you find the things you really wanted to know, after the model, article, book, whatever is finished … Oh, well :smiling3:
 

scottie3158

SMF Supporter
Joined
Apr 27, 2018
Messages
12,760
Points
113
Location
Spalding
First Name
Paul
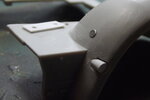
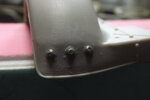
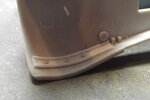
Not a lot done since the last update, as I have been busy decorating. Added a little detail to the front mudguards. The starting handle tube was just a moulded lump so I removed that and added a plastic tube. The air filter moulding was removed as my reference pic shows a gap under the mounting plate. Then the mudguard support was added from plastic strip and punched details inside and out.
DSCF3891.JPG
DSCF3892.JPG
DSCF3893.JPG

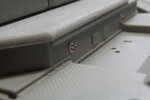
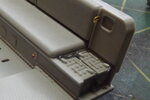
Next the drivers compartment received a little detailing with some eyelets and battery cables not too much as not a lot will be seen when it's all closed up.

DSCF3890.JPG
DSCF3889.JPG

cheers
Scottie
 
Top