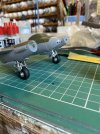
Tony's Airfix Tsetse 1/72

adt70hk

I know its a bit sad but I like quickbuild kits!!!
SMF Supporter
Joined
Sep 4, 2019
Messages
9,513
Points
113
First Name
Andrew
Looking very good indeed Tony!!
 

yak face

Wossupwidee?
Staff member
Moderator
SMF Supporter
Joined
Jun 13, 2009
Messages
12,416
Points
113
Location
sheffield
First Name
tony
Been sorting some bits today . The undercarriage had a little problem in that one of the axles had been broken off in the box. I tried gluing this back with superglue but it just wasn't strong enough. Solution was to drill the u/c leg and put a brass tube in , with another larger tube over the top to make the axle. Ive also painted the white stripe on the spinners , after several failed attempts at masking this I resorted to hand painting it.
The undercarriage is now all assembled , the instructions would have you install this before the nacelle halves are glued together but obviously this would be very prone to damage so I cut the bottom section out of the raised locating holes so I can just slot them in last off.
71F4C365-4AAC-43D7-A3AE-0CB01F6EBCE8.jpegD29487C2-5295-459A-A518-76288AA398B9.jpeg1DB14FC3-4C51-4C67-8349-178F1FBACB2E.jpeg432EA29C-8FEE-4C54-B92F-5609B4C8A2E1.jpegC69AF4A9-79B6-4798-A408-BE8FC65F8E31.jpeg
 

The Smythe Meister

Born to be WILD....... until about 9pm
SMF Supporter
Joined
Jan 30, 2019
Messages
5,761
Points
113
Location
Devon
First Name
Andy
Coming along nicely there Tony :smiling3:
I'm at a similar stage on my build, it's tricky enough for me at 1/48 so can't imagine tackling it at 1/72 ;)
Good stuff mate,
Andy
 
Last edited:

Jim R

SMF Supporter
Joined
Apr 27, 2018
Messages
13,769
Points
113
Location
Shropshire
First Name
Jim
Great stuff Tony. Good fix with the broken axle. Undercarriages are often awkward. Your white stripe looks very neat.
 

yak face

Wossupwidee?
Staff member
Moderator
SMF Supporter
Joined
Jun 13, 2009
Messages
12,416
Points
113
Location
sheffield
First Name
tony
Grey under wings now touched up and the whole airframe has had a coat of Klear to seal everything ready for the decals . I also masked up and sprayed a darker grey patch under the rear fuselage as shown in the photos of this aircraft . General opinion is this dark area was a result of painting over the invasion stripes . The undercarriage has been slotted in and fixed and ive been making the pitot and molins gun barrel from brass tube as the kit one was just a featureless stick !FBACBDE6-D72E-49A9-91B1-197BBAC72D32.jpeg84D9B8E5-995C-4323-8709-38DD05592E05.jpegAB479EA8-92FD-4445-9DED-EA2C977AEA59.jpegE0FF9308-E1AA-4E24-9768-70CE8209D375.jpegF2654736-99F9-48EA-9EA9-C9520D421BE8.jpeg368CF26D-719C-4FF3-877D-DA87A43A7A76.jpeg210C7BA3-E872-4B91-BAFB-C6205B36B6C7.jpeg500A7D81-A8A6-401F-A438-EA54B0FC121C.jpegAA88645C-02F6-40BD-BE4E-5B51875E0300.jpeg6F22992B-D4B4-45B8-8138-0CE563D75A2B.jpeg
 

Attachments

  • 00C802BB-7FDE-4588-9A12-96E00D8BE468.jpeg
    00C802BB-7FDE-4588-9A12-96E00D8BE468.jpeg
    177.8 KB · Views: 4

adt70hk

I know its a bit sad but I like quickbuild kits!!!
SMF Supporter
Joined
Sep 4, 2019
Messages
9,513
Points
113
First Name
Andrew
Coming in beautifully Tony!!!
 

Tim Marlow

Little blokes aficionado
SMF Supporter
Joined
Apr 27, 2018
Messages
16,820
Points
113
Location
Somerset
First Name
Tim
Very, very nice. Interesting about the dark patch over the stripes. Looks like they just used the darker topside grey to overpaint. The notes for the version I’m planning says the Camo overpaint was lighter over the white stripes and darker over the black ones. Not sure if I’m going to try and replicate that yet….
 

yak face

Wossupwidee?
Staff member
Moderator
SMF Supporter
Joined
Jun 13, 2009
Messages
12,416
Points
113
Location
sheffield
First Name
tony
The underside and topside grey was the same tim , medium sea grey ,my guess looking at the photos is that they used whatever was knocking around at the time , probably ocean grey or similar
 

Tim Marlow

Little blokes aficionado
SMF Supporter
Joined
Apr 27, 2018
Messages
16,820
Points
113
Location
Somerset
First Name
Tim
Ocean grey was the one I meant, just couldn’t remember it’s name Tony :smiling5:
 

The Smythe Meister

Born to be WILD....... until about 9pm
SMF Supporter
Joined
Jan 30, 2019
Messages
5,761
Points
113
Location
Devon
First Name
Andy
Gotta agree with the guys on this one Tony....
..That is looking VERY NICE indeed :smiling3:
As an aside,I spied some bottles of "Hataka" paints in the above pics,as It happens I was looking at a couple of their aircraft sets for my future American planes..... What are your thoughts on them please,( I predominantly use VJ and Tamiya, with an increasing amount of Mig thrown in currently).
Cracking build mate.... Love it :smiling3:
 

JR

Member of the Rabble and Pyromania Consultant
SMF Supporter
Joined
May 26, 2015
Messages
17,322
Points
113
Location
lincs
First Name
John
My word that's some build, love the detail going into this Tony.
Afraid I'll never match this level
 

Ian M

Administrator
Staff member
Administrator
Moderator
SMF Supporter
Joined
Dec 14, 2008
Messages
19,761
Points
113
Location
Falster, Denmark
First Name
Ian
You are giving it some Tony. looking very nice.
Nice catch on the canopy and the internal frames.
Paint job looks top shelf too!
 

yak face

Wossupwidee?
Staff member
Moderator
SMF Supporter
Joined
Jun 13, 2009
Messages
12,416
Points
113
Location
sheffield
First Name
tony
Started the decals yesterday , first off the wing roundels . They have a seperate red dot to avoid the problem of misalignment so the main roundel has a large white area in the middle — which was very translucent ! I quickly whipped the decal back off and onto its still wet backing paper and off to the spare decals box for some white to put on first. I found some suitable decal and punched out four white discs ( 2 for the wings and 2 smaller for the fuselage) with the hollow punches .The white discs helped eliminate the see through white areas of the decal .8A9158AD-2786-4679-9752-0D0BF5ABB594.jpegACEAF9E4-0E67-4FFB-BDED-43CB73D2B384.jpeg713DEA37-A9E2-46E6-9A27-C7EB6EAEA659.jpeg65320068-D4FF-4C78-98F0-EA51F749984D.jpegE75191C1-B403-4BE8-8BC4-53DE768A8F7F.jpegE2B3B6B8-7A3B-41E2-880C-08CF40A0F1E1.jpeg6AE3E528-1ACE-4A4C-AE7E-CC6E5455C886.jpeg3E9C7D92-8F69-444A-84C5-A41B487B3F80.jpeg The decals arent brilliant ,with a bit of poor register and slight white outlining in places but im using them anyway. No stencils or other airframe markings are included which at this scale I can get away with , except for the prominent red outline ‘no step’ boxes on the wing tops. A suitable donor was found in the form of some old Academy P47 thunderbolt tail markings with red and white stripes. Several thin strips of the red were cut off and placed one at a time to make the box and diagonals.
here it is , next up a coat of klear to seal everything in then once dry a coat of matt .
 
Top