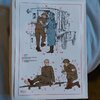
Valerons ICM 1 35 Model T 1917 Ambulance

Valeron

SMF Supporter
Joined
Jan 7, 2022
Messages
621
Points
93
Location
St Albans, Hertfordshire
First Name
Mike
I'm enjoying this build, Mike,. I've just noticed that I haven't commented, only liked, sorry. I have been thinking about converting an Airfix 1/32 Model T Ford for my nurse.... might be biting off more than I can chew!
Carry on the good work sir!
I'm tempted to paint the nurse which came with this kit. There are 4 figures in total.

I think I'll have time as I'm doing quite well with this model so far.

I haven't painted figures properly before, just a few 1/72 scale Airfix pilots last year and boxes of 1/72 Airfix figures in the 1970s. They were painted very crudely and quickly with the main objective of getting them ready to fight my friends troops.

It'll be good practise for me and entertainment value for the forum. Anyway, no promises and let's see how the build goes first
 

Neil Merryweather

SMF Supporter
Joined
Dec 29, 2018
Messages
4,463
Points
113
Location
London
First Name
Neil
I'm tempted to paint the nurse which came with this kit. There are 4 figures in total.

I think I'll have time as I'm doing quite well with this model so far.

I haven't painted figures properly before, just a few 1/72 scale Airfix pilots last year and boxes of 1/72 Airfix figures in the 1970s. They were painted very crudely and quickly with the main objective of getting them ready to fight my friends troops.

It'll be good practise for me and entertainment value for the forum. Anyway, no promises and let's see how the build goes first
I'm pretty sure she's an American nurse, so possibly not the same uniform colours, but you should definitely go for it!
Just checked the box art and definitely American, with arguably a sexier uniform! You need to take one for the team, buddy!
 

Valeron

SMF Supporter
Joined
Jan 7, 2022
Messages
621
Points
93
Location
St Albans, Hertfordshire
First Name
Mike
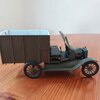
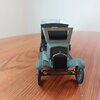
The drivers cabin is now assembled and painted. It is only dry fitted to the chassis.

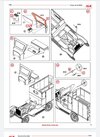
This was pretty easy apart step 34 below which was connecting a very small part which the steering wheel column will then connect into.

If I'd read ahead more and seen this coming I'd have attached this when adding the engine to the chassis which seems more logical than here. The piece was tiny and needed to attach to a part in a very small secluded spot. Tweezers, loads of patience and numerous attempts was the solution.


20230115_092637.jpg

20230115_092631.jpgScreenshot_20230115_094751_Drive.jpg
 

Mini Me

SMF Supporter
Joined
Jun 1, 2018
Messages
10,162
Points
113
First Name
Rick
Yeah, and on top of that they managed to get the steering wheel on the wrong side! :tears-of-joy:.....oh wait , this is a Ford..... we're OK. ;)
 

Valeron

SMF Supporter
Joined
Jan 7, 2022
Messages
621
Points
93
Location
St Albans, Hertfordshire
First Name
Mike
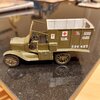
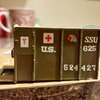
Decals have been added. These are the only ones and are on both sides to be added

I followed the usual steps of gloss coat, vallejo decal faster and then vellejo decal softener which I've used on all my models in the last year.

I've had problems with decals before but these were the first really bad decals I've had.

Nearly every one curled up after even a very light soaking and 8 of them split. Most splits were small which I could resolve with TLC and patience.

One of them disintegrated completely and was unusable. Unfortunately for me this was the penultimate one I applied (The bottom left serial no.) so I made a decision to add one of the other serial numbers meaning this model isn't as accurate as planned but I couldn't face stripping them all off and using one of the other schedules.

Frustrating as the build was going really well but no big problem really.

Mike


20230117_072937.jpg
 

Neil Merryweather

SMF Supporter
Joined
Dec 29, 2018
Messages
4,463
Points
113
Location
London
First Name
Neil
Decals have been added. These are the only ones and are on both sides to be added

I followed the usual steps of gloss coat, vallejo decal faster and then vellejo decal softener which I've used on all my models in the last year.

I've had problems with decals before but these were the first really bad decals I've had.

Nearly every one curled up after even a very light soaking and 8 of them split. Most splits were small which I could resolve with TLC and patience.

One of them disintegrated completely and was unusable. Unfortunately for me this was the penultimate one I applied (The bottom left serial no.) so I made a decision to add one of the other serial numbers meaning this model isn't as accurate as planned but I couldn't face stripping them all off and using one of the other schedules.

Frustrating as the build was going really well but no big problem really.

Mike


View attachment 471996
I doubt anyone would have noticed if you hadn't pointed it out ;)
Oh wait, probably @Tim Marlow would have :tears-of-joy:
 

Valeron

SMF Supporter
Joined
Jan 7, 2022
Messages
621
Points
93
Location
St Albans, Hertfordshire
First Name
Mike
I managed quite a bit today as I didn't fancy going outdoors much as it's turned really cold here again.

Not that much more to add now to the model before I can then start weathering. I've already dirtied the inside of the back cabin up a bit but not done anything else in terms of weathering, washes etc.

I'm really enjoying this build and apart from the decals, it's been a pleasure to build so far.


20230117_183142.jpg
 

JR

Member of the Rabble and Pyromania Consultant
SMF Supporter
Joined
May 26, 2015
Messages
17,375
Points
113
Location
lincs
First Name
John
Looks really good Mike . But what an odd shape with that overhanging body. Looks like something designed by a committee ;)
 

Valeron

SMF Supporter
Joined
Jan 7, 2022
Messages
621
Points
93
Location
St Albans, Hertfordshire
First Name
Mike
I've been starting to look forward at doing a figure or two when I've finished the model.

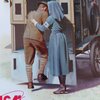
I've been looking at the model box art and the figure's instructions and both cleary show the nurse helping a soldier into the ambulance by means of a step on the back of the ambulance.

There is no piece on the sprues for this step and nothing in the instructions.

Also I can't find any photos on the Internet of such a step. I've looked at photos of original ambulances and other modellers build.

I'm just wondering if ICM have been creative with their artwork as a means of packaging these figure's with ambulance.

Add the step would be within my capabilities but I'd like to see evidence of such a step existing. The ambulance inside is very small and looks to me to designed to put people in on stretchers.

20230118_081818.jpg

20230118_081840.jpg20230118_081840.jpg
 

Tim Marlow

Little blokes aficionado
SMF Supporter
Joined
Apr 27, 2018
Messages
16,874
Points
113
Location
Somerset
First Name
Tim
Don’t know the subject well enough to say if the step should be there or not. However, I would say that if it was there, that step wouldn’t be too clever in use. An injured soldier isn’t going to be that stable on his feet so would struggle to get up it. As shown, that step will swing about because the back door flap will also move backwards and forwards under his weight :surprised:
 
Top