You are using an out of date browser. It may not display this or other websites correctly.
You should upgrade or use an alternative browser.
You should upgrade or use an alternative browser.
What's on the bench 2022
- Thread starter Graeme C.
- Start date
- Status
- Not open for further replies.
It's the new'ish' Airfix 1 /48 anew tool that is right up there regarding fix and quality. Surface details are delicate with both recessed panel lines and raised rivet detail. The motor could use a bit more detail though.Is that the old Matchbox kit? Though judging by the detail inside the nose hatch, probably not
Thanks painted with vallejo air.Beautiful paint work Ian.
Next the rigging...gulp.
I've been at this for a few days....when it's finished It will become part of my Tuskegee Diorama, along with a jeep, some ground crew, pilot and of course, my recently completed P51 "Redtail". As you can see I am not following the proto type entirely but the conversion from water tank truck to fuel tanker will be more than evident. A reasonable facsimile is all I'm after.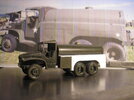

Mark1
SMF Supporter
Looks Great Mark. Just don't forget to grease the drive chains before you're done..........
Prost
Allen
Prost
Allen
....and darken up the winch cable.
Andy the Sheep
SMF Supporter
Centauro build resumed: bottom hull primed (red) an painted (Tamiya NATO green), resin wheels primed (black) and green sprayed on. Rubber black on wheels and some lower hull coating and weathering next time.
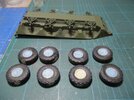
The blue masks are included with the wheels, but there are only 8 while, surprisingly, the wheels have 2 sides each (unbelievable new things are discovered while modelling ) so had to cut 8 new ones (like the yellowish one) which I applied on the internal side of the wheel.
Those resin wheels are really nice.
Andrea

The blue masks are included with the wheels, but there are only 8 while, surprisingly, the wheels have 2 sides each (unbelievable new things are discovered while modelling
 ) so had to cut 8 new ones (like the yellowish one) which I applied on the internal side of the wheel.
Those resin wheels are really nice.
Andrea
Looking very clean & neat. You going to change the front bumper?
Neil Merryweather
SMF Supporter
Bead polisher? And to what effect?Construction complete, paint drying and tomorrow I'll spin the tires on my bead polisher and get the rubber painted. Then It's a clear coat for decal work and last it 's a bit of fine detail painting and some weather......look for this in completed soft skins in the not too distant future.View attachment 467364
Picture please
Nice colour
+1 on that…..not sure what a bead polisher actually is, so I’m all eyes and ears…..Bead polisher? And to what effect?
Picture please
Nice colour
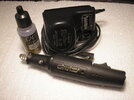
Hi guys.....it's actually a "reamer" . I got it years ago from a jewelers supply shop . Comes with various size collets, one of which, is just right to chuck up on the small diameter axles for Mini tanks and other 1/87 scale models. Anyway, this mini tool is variable speed as well as reversible polarity. So l put a wheel/rire assembly on the axle and spin it slowly while applying paint to the tire with a brush, and it very neatly allows me to brush right up to the rim without mucking up the wheel. I'll post up a pic. Next time I get near the bench.......sorry if I mislead you.
Mostly look like rock polishers to me Jakko…….
Here's the pic. I promised.........note the flesh wash is for scale purposes only. As you can see, it is quite small and it is extremely quiet. There is a six position speed control switch and next to that is the polarity switch on the A/C adaptor. It is in no way as powerful as a Dremel or that type of tool. It came with a couple of different size tapered diamond reamers that I have no use for.....I suspect they would work rather well if you were making a pearl necklace and needed to size the holes to the material you are stringing them on. Again, sorry if I confused anyone with my lack of a proper description. 

- Joined
- Apr 28, 2018
- Messages
- 11,036
- Points
- 113
- First Name
- Jakko
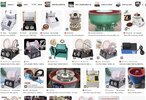
Yes, I had that impression too. I searched for “bead polisher” and got those images out of it. Like I said, it didn’t help me much … Rick’s photo is much more usefulMostly look like rock polishers to me Jakko…….

Neil Merryweather
SMF Supporter
Thank youHere's the pic. I promised.........note the flesh wash is for scale purposes only. As you can see, it is quite small and it is extremely quiet. There is a six position speed control switch and next to that is the polarity switch on the A/C adaptor. It is in no way as powerful as a Dremel or that type of tool. It came with a couple of different size tapered diamond reamers that I have no use for.....I suspect they would work rather well if you were making a pearl necklace and needed to size the holes to the material you are stringing them on. Again, sorry if I confused anyone with my lack of a proper description.View attachment 467404
- Status
- Not open for further replies.

 still plenty to do but the end is in site.
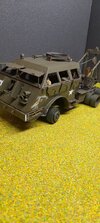
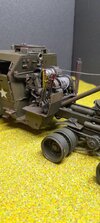
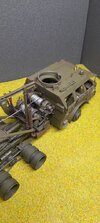
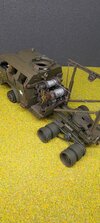
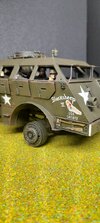
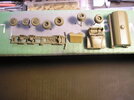
 Just going for the appearance of a fuel truck......Water truck with flammable