Ancientmariner
SMF Supporter
Seems now the max I can upload is 2M from my device, used to be 12M.
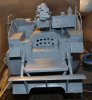
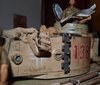
I would swap your Chally for the one I am attempting do at the moment...a 3D printed M41 155mm howitzer, the chassis is a bulldog, should be a Chaffee but, they don't do one. It will be my first and last, pain in the bum.
Anyway, James, I wouldn't worry about the colour too much, the paint used would fade with weathering. I am using Tamiya olive drab and has used a light olive drab to give that sort of effect. Saying that, you do not see many snow camo Challies, so might work rather well.
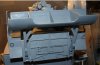
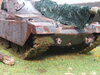
The challenger is actually desert, though it looks very light, probably compounded as it's sprayed over black undercoat.
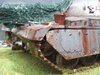
The KT is going to be the snow one but I want to be able to see the camo through the snow top coat if that makes sense?
Did you do the 3D printing yourself? Looked at that a lot recently and would like to try and get I to doing some bits.
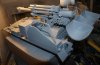
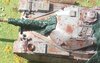
I am not sure whether to put another line on the right side, where it comes down the turret. It goes under across the back but from the side looks like a lines missing if you know what I mean?
That looks amazing!!! How hard is it to scan/design models to print? Is that solid?
Oh and what scale is that?
I think another set of lines would look better.I am not sure whether to put another line on the right side, where it comes down the turret. It goes under across the back but from the side looks like a lines missing if you know what I mean?


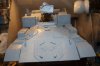
I'm still learning in the chipping front too. I adopt the 'less is more' approach and when I think I could carry on and do a bit more, stop and put it to one side for a few hours. It's easy enough to add more but virtually impossible to undo....
Keep up the great work.
Andrew
JamesAs for the challenger not sure it's worth it with the light surface colour or maybe chip with red oxide?
For FULL Forum access you can upgrade your account here UPGRADE