Italeri 1/9 Manx Norton.

JayCee

SMF Supporter
Joined
Aug 13, 2019
Messages
1,001
Points
113
First Name
John
This is my first build of 2023. I have built this before. Way back in the mists of time in the original ProTar boxing. It was originally built OOB the same as the rest of the bikes I built (I had 10 in the cabinet ). I was working on the assumption that because the owner of the firm was an ex world champion who had raced some of the bikes they produced that they would be accurate and detailed. I was wrong, they were simplified and sometimes completely wrong but I intend to try and upgrade this model.
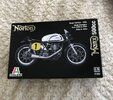
IMG_0678A.JPG
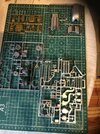
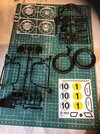
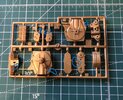
Firstly here be sprue shots.
IMG_0679.JPG
IMG_0680.JPG
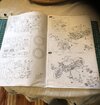
and a sample of the destructions.
IMG_0681A.JPG
Before I actually start on the build I feel I should point out an important thing about this kit. If anyone buys the kit to specifically build what it says on the box ( Geoff Duke's 1951 bike ) they would be disappointed. I am not by any stretch an expert on the Manx but I have picked up info over the years plus I also have a copy of Mick Walker's book on the subject. I therefore feel confident to say that it is impossible to build a 1951 bike with what is in the box. There are 3 main faults.
1. The engine. The cylinder barrel on the model is the large finned type where the fins enclose the camshaft drive tube. This type of barrel was introduced in 1954.
2. The oil tank. The model depicts the rectangular type that was introduced in 1961.
3. The front brakes. The model has the 2 Leading Shoe/Double sided brakes that were introduced in 1962 the last full year of production.

After this marathon of waffle I will close for now, until I start the build proper.
Cheers, John.
 

JayCee

SMF Supporter
Joined
Aug 13, 2019
Messages
1,001
Points
113
First Name
John
I have actually started to work on his bike. I decided to start with a simple piece like the oil tank. Possibly a mistake as it turns out that it needs as much altering and cleaning up as any other part. Most of the week spent on it to get to the stage it is at now. The weekend brought a halt to proceedings as , of course, it was Orthodox Easter. Most of Saturday is taken up with church services and then, as the 40 day Lenten Fast ends at midnight on Saturday, all of Sunday is given over to the eating of meat in huge quantities. Now I am completely replete I can get back to modelling.
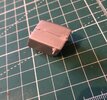
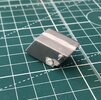
This is the oil tank built as per the box.
IMG_0693A.JPG

You can see the seam down the centre that should not be there. There is also a little pip at the base of the seam line to accommodate the oil return pipe. This is in completely the wrong place so needs moving.
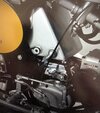
This next picture is for information only, and is of the real item.
IMG_0684A.JPG
You can see the correct placement of the oil return at the bottom corner by the oil feed union. There are also the "bobbins" on the sides of the tank for the retaining rubber bands.

This is where I am up to now. The seam has been removed (hopefully) and a first attempt at the "bobbins. I still have to move the oil pipes which will be done with wire for a more secure joint. the whole lot will then need a good prime, gloss black for the paint I will be using ( vallejo metal colour).
IMG_0695A.JPG

So much for picking the easiest piece first. All C& Cs welcome.
John.
 

tigersteve

SMF Supporter
Joined
Jan 29, 2018
Messages
511
Points
93
First Name
Steve
Good attention to detail - this will look fine when completed, I can feel it in me bones ;)
 
Joined
Apr 12, 2019
Messages
2,215
Points
113
Location
Selkirk
First Name
Andy
Seems like you have a lot of work there to make the model as it should but I am sure you will pull it off, good start by the way. Must be some case for contravention of the trade descriptions act, to quote Mr Spock, "it's a Manx Jim, but not as we know it. ;)

Andy.

.
 

JayCee

SMF Supporter
Joined
Aug 13, 2019
Messages
1,001
Points
113
First Name
John
Thank you Steve and Andy. Quite a bit of extra work to get it accurate, but I hope it will be worth it.
John.
 

JayCee

SMF Supporter
Joined
Aug 13, 2019
Messages
1,001
Points
113
First Name
John
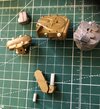
I have made a start on the engine. Beginning with the nice shiny gold sprue! Why this sprue is gold I have no idea, because unless I am mistaken all the parts on it were cast in Magnesium, machined to final spec and then given a protective chromate coating, which was a dull black colour. The plastic of this sprue feels very hard. I don't know if this is general across the model or something to do with the colour. The oil tank didn't feel this hard. Once each item is removed from the sprue and cleaned up I will have to remove all the pips that are there for the various oil pipes to attach to. These are all in the wrong places. They are the bits outlined in blue in the photo.
IMG_0707A.JPG
The first piece I have started is the cam box( top right and bottom left, above). First jobs are to clean up the unwanted seam line and then try to fabricate the missing hold down bolts. After that will be valve springs (the kit ones are unusable) and various oil line. Much fun to come. All for one small piece partly hidden under the fuel tank. All comments and/or abuse welcome.
John.
 

simontie

SMF Supporter
Joined
Jan 13, 2010
Messages
997
Points
93
Location
Morayshire Scotland
First Name
simon
Well i will pull up a seat if i can, i have this kit and to be fair I'm probably going to build out of the box when i get round to it. How ever i found your attention to detail along with you work so far to be very interesting and will watch with pleasure
simon
 

JayCee

SMF Supporter
Joined
Aug 13, 2019
Messages
1,001
Points
113
First Name
John
Hi Simon, glad to have you along. This could well be a masterclass in how not to build a bike. I have got a small amount of work done, as per photo.
IMG_0749A.JPG
Some parts getting ready to go together for a whole. The piece on the left is the camshaft housing. The white "fungus" will be the retaining bolts (on top) The others are for the oil pipes to the valve gear and the main camshaft oil feed. These are not 100% accurate, but they will mostly be hidden under the fuel tank. The crankcases have been altered to show the oil feed and return pipe locations. The bottom union( to the right in the photo) is the feed from the tank. The oil pipe actually goes underneath the gearbox not above it as per kit. The more I work on this kit the more I realise it would have been ideal for the late Simon T. He would have loved all the cutting and shutting needed. Unfortunately I do not have 100th (make that 1000th) of Simon's skill or patience. This is not an excuse, just a plain statement of fact. I will persevere and do my best, but it will be a long haul.
All C&Cs and abuse welcome.
John.
 

Jim R

SMF Supporter
Joined
Apr 27, 2018
Messages
13,726
Points
113
Location
Shropshire
First Name
Jim
Well John I'll bet you didn't go to this amount of trouble first time around :smiling: It will all be worth it. So far your build is thoughtful and neat.
 

simontie

SMF Supporter
Joined
Jan 13, 2010
Messages
997
Points
93
Location
Morayshire Scotland
First Name
simon
Well i think she is coming along great, and you shouldn't put your self down we can do that for you :smiling6::tears-of-joy:, at the end of the day its your build it‘s just nice to see your work and how you over come the challenges
simon
 
Joined
Apr 12, 2019
Messages
2,215
Points
113
Location
Selkirk
First Name
Andy
It,s a shame there is so much wrong with the kit but I am sure you will manage to get it as near the real thing as possible.

Andy.
 

JayCee

SMF Supporter
Joined
Aug 13, 2019
Messages
1,001
Points
113
First Name
John
Steve, yes one of the most beautiful bikes ever built. The '60s would have been the best era to have one, but I was never in the UK long enough to buy one. I kept getting sent from one country to another all through it.

Jim, first time was strictly OOB. Thanks for the nice comment.

Simon, you can put me down all you like it won't bother me. I am trying to make it better.

Andy, the kit is just so far off it is untrue. It can be made good, but not 100% .

Paul, thanks for your confidence in me.

I am doing a bit more to the bike, but not worth a photo yet. Trying to assemble the gearbox and remove the unwanted seam so it looks like the solid casting it should be. Also going to prime some parts already glued to see if they are up to scratch or need more seam work.

Cheers for now,
John.
 

simontie

SMF Supporter
Joined
Jan 13, 2010
Messages
997
Points
93
Location
Morayshire Scotland
First Name
simon
Steve, yes one of the most beautiful bikes ever built. The '60s would have been the best era to have one, but I was never in the UK long enough to buy one. I kept getting sent from one country to another all through it.

Jim, first time was strictly OOB. Thanks for the nice comment.

Simon, you can put me down all you like it won't bother me. I am trying to make it better.

Andy, the kit is just so far off it is untrue. It can be made good, but not 100% .

Paul, thanks for your confidence in me.

I am doing a bit more to the bike, but not worth a photo yet. Trying to assemble the gearbox and remove the unwanted seam so it looks like the solid casting it should be. Also going to prime some parts already glued to see if they are up to scratch or need more seam work.

Cheers for now,
John.
No put downs intended sorry if you took that the wrong way (my dry humour)
simon
 
  • Like
Reactions: JR

JayCee

SMF Supporter
Joined
Aug 13, 2019
Messages
1,001
Points
113
First Name
John
Simon, I never took your comment the wrong way. I saw the emoji's and laughed. Sorry for any misunderstanding.
John.
 

JayCee

SMF Supporter
Joined
Aug 13, 2019
Messages
1,001
Points
113
First Name
John
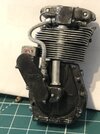
So, after a short hiatus while I took my wife away for a few days R&R, I have managed to get a modicum of progress done. Carrying on from the last instalment I primed all the engine and gearbox pieces and lo and behold more seam work was definitely needed. These were attended to and re primed/undercoated. Now being fairly happy I moved on to the next issue. The valve springs. The kit ones are, in my estimation, unusable. Wire and a cocktail stick to the rescue. The cocktail stick proved to be just the right diameter. These did not go as easily as I had hoped. The fourth attempt proved okay, so I went with that one. Then there were the oil lines to the valves and the main oil feed to the bevel housing and the cams. Here be pictures of the engine so far.
The first one is for information purposes only and is of an engine built OOB.
IMG_0732A.JPG
You can plainly see the poor valve springs, also the wrongly placed oil feed. The second photo is of my engine and hopefully looks more like the real thing.
My main oil feed pipe is slightly too long, the loop in it should not be quite as pronounced but this is my second attempt, the first one was too short. I can put up with it, and it is built to please me.
IMG_0753.JPG
The crankcases and bevel housing were painted with Vallejo Metal Color- Magnesium and then given a black wash to represent the chromate coating they were given.
The cylinder barrel and head were painted with the same make-dull aluminium. It is the first time I have used these paints and am very impressed. It says on the bottles for airbrush use, but they brush perfectly. Now onto the gearbox.
As usual all comments/abuse welcome.
John.
 

JayCee

SMF Supporter
Joined
Aug 13, 2019
Messages
1,001
Points
113
First Name
John
Thanks, Paul. I have jut noticed a seam down the camshaft drive tube. This whole bottom piece of the drive tube may have to be replaced. It is approx 2mm too short and in consequence lists like a drunken matelot. Will nothing ever fit right ?
John.
 

scottie3158

SMF Supporter
Joined
Apr 27, 2018
Messages
12,694
Points
113
Location
Spalding
First Name
Paul
Thanks, Paul. I have jut noticed a seam down the camshaft drive tube. This whole bottom piece of the drive tube may have to be replaced. It is approx 2mm too short and in consequence lists like a drunken matelot. Will nothing ever fit right ?
John.
Oh the joys of modelling
 
Top