- Home
- Forums
- Civilian Vehicles
- Civilian vehicles Under Construction
- Civilian Motorcycles under construction
You are using an out of date browser. It may not display this or other websites correctly.
You should upgrade or use an alternative browser.
You should upgrade or use an alternative browser.
Italeri 1/9 Manx Norton.
- Thread starter JayCee
- Start date
Hello folks. Yes, I am still here. I haven't departed for pastures new. After an exceptionally long summer hiatus brought on by my love of Sun, Sea and Sand, caused by spending the first 26 years of my life in these sunny climes, compounded by a complete lack of mojo, I have finally got my 2 remaining brain cells lined up and working almost in unison. The first job tackled was to strip the chrome parts. I was dubious about this after reading the trials some of you guys had been through. Luckily it was easier than I expected. I put the sprues in a poly bag with a good few squirts of Mr Muscle oven cleaner (other brands are available) and after about 10 minutes the chrome just dissolved away. After a soapy wash and a good rinse I was left with this.
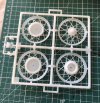
The plastic looks soapy but feels just as hard as all the rest. I have painted a few pieces on these sprues, mainly the engine plates for the moment.
I have assembled the gearbox and filled the unwanted seams. It is not perfect but when it is between the engine plates not much of it will be on view.
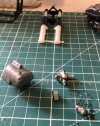
Gearbox on the left, of course. The end cover is meant to be separate. The carburettor is to the right. The main body of the carb is marred by 3 knockout pin marks. These are partially hidden by the choke tube I have retrofitted. This is the white piece running from top to bottom on the carb body. I have also bodged the mixture screw that was missing and the securing nuts to hold the carb to the inlet tract. Also the float chamber will help hide any shoddy work on this side when I get it completed. There are numerous photos of this GP2 carb on the tinterweb but I am mostly working from memory. The same carb was fitted on my Goldie, so I have experienced the real thing.
At the top of the photo you can see the front forks (just dry fitted together) which are going to be a problem. The sliders (the bottom pieces that hold the wheel) are supposed to be hollow to allow the stanchions to fit inside them. Unfortunately one of them has been cast solid, so the razor saw has been at work and now the final measuring will need to be done so both legs are the same length.
Hopefully some more progress over the weekend.
All comments, good, bad or indifferent welcome along with plain old abuse.
Cheers for now.
John.

The plastic looks soapy but feels just as hard as all the rest. I have painted a few pieces on these sprues, mainly the engine plates for the moment.
I have assembled the gearbox and filled the unwanted seams. It is not perfect but when it is between the engine plates not much of it will be on view.

Gearbox on the left, of course. The end cover is meant to be separate. The carburettor is to the right. The main body of the carb is marred by 3 knockout pin marks. These are partially hidden by the choke tube I have retrofitted. This is the white piece running from top to bottom on the carb body. I have also bodged the mixture screw that was missing and the securing nuts to hold the carb to the inlet tract. Also the float chamber will help hide any shoddy work on this side when I get it completed. There are numerous photos of this GP2 carb on the tinterweb but I am mostly working from memory. The same carb was fitted on my Goldie, so I have experienced the real thing.
At the top of the photo you can see the front forks (just dry fitted together) which are going to be a problem. The sliders (the bottom pieces that hold the wheel) are supposed to be hollow to allow the stanchions to fit inside them. Unfortunately one of them has been cast solid, so the razor saw has been at work and now the final measuring will need to be done so both legs are the same length.
Hopefully some more progress over the weekend.
All comments, good, bad or indifferent welcome along with plain old abuse.
Cheers for now.
John.
Glad you picked this up again. Looks an OK kit.
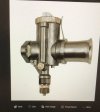
Finally a miniscule amount more done to the Manx. Continuing from my last post I have finished the carburettor. This first picture is of the real thing and is for information purposes only.
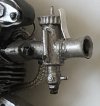
The next picture is my attempt at the same thing. Blown up like this it looks absolutely abysmal, but in real life and using the 2 foot viewing rule it is not too bad.
I have also gone back a step and done some remedial work on the engine. Previously I mentioned that the camshaft drive tube was too short. I decided that it needed fixing so off it came. Luckily it wasn't glued too firmly. A shim of plastic card underneath did the trick. It now stands more or less straight instead of looking like the well known Italian bell tower. Once this was done I mounted the engine in the frame. This was when I found out just how brittle the plastic really is. I made the mistake of cementing the front engine plates in place on both the engine and the frame, to hold it in position while I manouvered the rear plates into position. The twisting motion needed for this snapped both front down tubes of the frame. I think this can be repaired fairly easily, but it is fighting me all the way. This is where I am now.
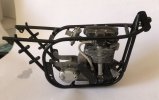 I am presently painting pieces on the sprue before attaching them. Cheers for now, all C&Cs welcome.
John.

The next picture is my attempt at the same thing. Blown up like this it looks absolutely abysmal, but in real life and using the 2 foot viewing rule it is not too bad.

I have also gone back a step and done some remedial work on the engine. Previously I mentioned that the camshaft drive tube was too short. I decided that it needed fixing so off it came. Luckily it wasn't glued too firmly. A shim of plastic card underneath did the trick. It now stands more or less straight instead of looking like the well known Italian bell tower. Once this was done I mounted the engine in the frame. This was when I found out just how brittle the plastic really is. I made the mistake of cementing the front engine plates in place on both the engine and the frame, to hold it in position while I manouvered the rear plates into position. The twisting motion needed for this snapped both front down tubes of the frame. I think this can be repaired fairly easily, but it is fighting me all the way. This is where I am now.
 I am presently painting pieces on the sprue before attaching them. Cheers for now, all C&Cs welcome.
John.
scottie3158
SMF Supporter
John,
Very nicely done mate great skills on show.
Very nicely done mate great skills on show.
Airborne01
SMF Supporter
Is that an Amal monobloc I see before me ... ?Finally a miniscule amount more done to the Manx. Continuing from my last post I have finished the carburettor. This first picture is of the real thing and is for information purposes only.
View attachment 496012
The next picture is my attempt at the same thing. Blown up like this it looks absolutely abysmal, but in real life and using the 2 foot viewing rule it is not too bad.
View attachment 496013
I have also gone back a step and done some remedial work on the engine. Previously I mentioned that the camshaft drive tube was too short. I decided that it needed fixing so off it came. Luckily it wasn't glued too firmly. A shim of plastic card underneath did the trick. It now stands more or less straight instead of looking like the well known Italian bell tower. Once this was done I mounted the engine in the frame. This was when I found out just how brittle the plastic really is. I made the mistake of cementing the front engine plates in place on both the engine and the frame, to hold it in position while I manouvered the rear plates into position. The twisting motion needed for this snapped both front down tubes of the frame. I think this can be repaired fairly easily, but it is fighting me all the way. This is where I am now.
View attachment 496015I am presently painting pieces on the sprue before attaching them. Cheers for now, all C&Cs welcome.
John.
Steve
Hi, Steve. No not a monobloc. It is a GP2. The racing carb. They can be a bugger to tune, but when done right they work fantastic. Only problem with fitting one to a road bike is there is no tickover. Found that out the hard way when I had a Goldie.
John
John
Well now that the engine/gearbox is mounted in the frame I can progress with the drive side of the engine. The first thing I did was to install the HT lead to the spark plug. This is where I found out that, as is common with most of these kind of kits, the tubing supplied is actually too small to fit on the "pips" it is supposed to. The answer was to cut off the "pip", carefully drill a hole in its place and cement in a suitable size piece of wire. The end going into the magneto was straightforward as the connector is in a straight line with the lead. The spark plug end was different. Firstly, the kit has the spark plug in completely the wrong place. Where they have it, it would be sparking in the open air between the cylinder head top fins. I chopped off the lead fixing "pip" as per the other end and once again drilled and cemented in a wire. This wire was then bent where it entered the spark plug, so the lead and plug ended up at 90 degrees to one another. The pin on the other end of the plug was then removed and sanded flat. A blob of CA in approximately the correct position and job done. Now looking a whole lot better. At this time I also cemented on the rev counter drive. Unfortunately this is as far as I can go with correcting the top end ( the valve springs were done when I did the other side). The reason being that the cam box is completely the wrong shape and size, so there is nowhere to place all the fixing bolts. As it will mostly be hidden by the top frame tubes and petrol tank I am reasonably happy with how it is. After this I started on the primary drive. Engine sprocket, primary chain and gearbox sprocket are all one piece, so a bit of gentle persuasion (SWMBO said it was brute strength and ignorance) and it fit in place. Glued on the clutch end plate and this is how she looks.
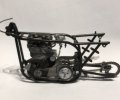
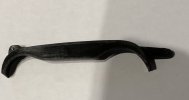
The main thing left to do on this side is the primary chain guard. Morebodging work needed on this piece. The forward fixing bracket is okay, if a little chunky. However the rear one will need some work. The kit has it bolted to the outside of the frame gusset, however the real one bolts to the inside of the gusset I will firstly try to thin down the outside of the bracket to see if I can get it to slide inside the gusset. Failing this I think I will have to remove the bracket and replace with a thin plastic card one. This is the part in question. The offending bracket is on the right.
That's all for the moment. Please excuse the rubbish photo's. As usual all C&Cs more than welcome.
John.

The main thing left to do on this side is the primary chain guard. More

That's all for the moment. Please excuse the rubbish photo's. As usual all C&Cs more than welcome.
John.
Four months now. Sometimes, we've all come across a project where the amount of sheer hard work and frustration make it just not worth carrying on. I hope this isn't in the bin, and that JayCee might one day come back to it, but when it ceases to be enjoyable it's maybe best to just move on.
'Tis I. The reason nothing has been done on the bike I can only put down to some kind of mojo loss. I can spend plenty of time working out what needs doing and how to do it, but actually getting started is something else entirely. Having operations and chemo for skin cancer hasn't helped either. To top it all an unexpected and enforced visit to the UK really stopped me from being at the bench. All being well I should be back home in a week or so. I really want to get some more work done on the bike and see if I can get it up to my expectations. See you guys soon.
John.
John.
