JPK 120 in 1:35

Jakko

Way past the mad part
SMF Supporter
Joined
Apr 28, 2018
Messages
10,954
Points
113
First Name
Jakko
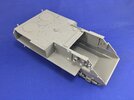
After cleaning up the edges of the hole I cut, I glued in the side walls for the crew compartment:
64005A42-5AC5-4CAF-9E94-FD38F37B67B6.jpeg

Note the ejector pin marks on the outsides of those side walls, which you need to fill because I suspect a fair number of them remain visible. Please mould parts like these the other way round next time, Takom?

The upper hull is still loose on the lower here, by the way. Also, don’t make the mistake I did at first, and glue the front mudguards to the lower hull when the instructions say to glue them to the side walls that form part of the upper. If you do stick them on the lower hull, you cannot fit the upper hull anymore, because it goes both over and under the mudguard on both sides. Luckily I tested the fit right after glueing the mudguards to the hull, so I could easily pull them off again.
 

Jakko

Way past the mad part
SMF Supporter
Joined
Apr 28, 2018
Messages
10,954
Points
113
First Name
Jakko
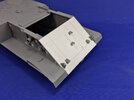
The glacis plate is now in:

AE7A774A-74BA-431F-AE12-3BD11B905DFE.jpeg

This is 1.5 mm plastic card, which equates to about 50 mm in real life, equivalent to the Jagdpanzer Kanone’s front armour but by the looks of it, thicker than the VT 1-2 had (which, BTW, was unarmoured).

The details are from the Takom kit, fitted where they also go on the original front plate. I only moved the step that is now near the top, from where it originally was near the bottom of the plate (where there is a vertical pencil line with a crossbar) because I felt the one in the middle was now far too low to use it to get onto the roof. I’ll add spare track links that will serve as the bottom step.

The vertical pencil lines along the sides are where the ice grousers will be fitted later.
 

Jakko

Way past the mad part
SMF Supporter
Joined
Apr 28, 2018
Messages
10,954
Points
113
First Name
Jakko
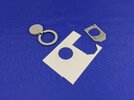
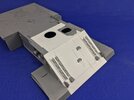
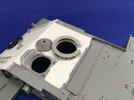
Here is the replacement roof:

A1B57704-9947-4FAA-8634-33A43B044260.jpeg

The round hole was the usual chore to make. I first tried using compass cutters, but that gave the normal problem of not wanting to cut a proper circle all the way through, so I there it back into the miscellaneous tools box and finished the job with a regular hobby knife, then filed it out with a semi-round file until it looks properly circular.

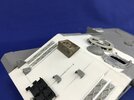
In the hull:

5AA3B077-13B4-477A-A8F6-E6EDF4A33527.jpeg

Also note the ice cleats from the Hobby Boss kit, with racks made from a few different widths of plastic strip.

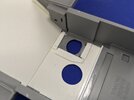
On the inside of the roof, I had to add some plastic strip to get the Takom commander’s hatch (now driver’s hatch) at the right height and have something to glue it to:

B382C97C-6B0C-492D-BE08-69139ECFB327.jpeg

Because I made the replacement roof from 0.75 mm card, but the Takom roof that I cut the hatch from is 1 mm thick, I had to glue some 0.25 mm card to the inside of the roof first, and then some thicker scrap plastic to support the kit hatch.

The guns are very nicely moulded:

CC50BCEE-2AC6-4AB1-8AA7-7610350248EB.jpegB3FA4B63-E83F-4CBA-98F6-34D7C1CE0A63.jpeg

The fume extractor is hollow all the way through so that the front and rear ends of the barrel slide into both ends of it. Fit is a little loose, though, so you would need to line everything out carefully.

However …

1DF77E8F-7695-44E6-A369-0C86B20DBD53.jpeg

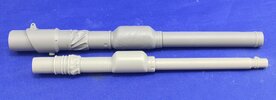
Top is a Takom barrel from the VT 1-2 kit, bottom the Hobby Boss barrel from the Leopard 2 kit. What has gone wrong here, then?

Well, nothing :smiling3: Looking at photos showed that early Rheinmetall 120 mm gun barrels had much thicker thermal sleeves around them than the production guns that went into the Leopard 2 and other vehicles. So both are correct. However, I will be replacing the kit parts with “production” type barrels, the one shown above and another that someone has kindly donated (but I’m still waiting for in the mail).
 

Scratchbuilder

SMF Supporter
Joined
Jul 2, 2022
Messages
2,046
Points
113
Location
Luton
First Name
Mike
Jakko,
Just caught up on your build, interesting subject and alterations.
Compass cutter.... I agree with you about them wandering off to do their own thing, and one day by mistake I started to gently scribe the marked out circle in reverse and not cut straight away. This then gave me a good guide groove for the sharp blade to then follow...
Will keep an eye on this interesting build.
Mike.
 

adt70hk

I know its a bit sad but I like quickbuild kits!!!
SMF Supporter
Joined
Sep 4, 2019
Messages
9,526
Points
113
First Name
Andrew
Really liking this 'what-if' idea Jakko. And of course gives you quite a bit of freedom on how to approach it, within reasonable limits of course.

It does beg one question though given your amazing attention to detail and the fact you often seem to do slightly unusual/less common builds - when was the last time up built something out of the box? Generally curious.

Keep up the great work.

ATB.

Andrew
 

Jakko

Way past the mad part
SMF Supporter
Joined
Apr 28, 2018
Messages
10,954
Points
113
First Name
Jakko
Just caught up on your build, interesting subject and alterations.
The more I look at the model, the more I see that needs removing or replacing … I hope you’ll keep finding it interesting :smiling3:

Compass cutter.... I agree with you about them wandering off to do their own thing, and one day by mistake I started to gently scribe the marked out circle in reverse and not cut straight away. This then gave me a good guide groove for the sharp blade to then follow...
I’ll need to remember to try that next time I need to cut a circle. With this one, once I started cutting I remembered reading that some people have more luck when using the cutter in reverse, but by that time I already had a circle I had gone through with the tool the right way round a couple of times, so it didn’t want to go backwards at all.

Really liking this 'what-if' idea Jakko. And of course gives you quite a bit of freedom on how to approach it, within reasonable limits of course.
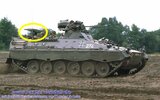
True, though what I always do my best to avoid with models like this, is to stick things on because they look good or cool :smiling3: I have to find a justification for why it would be there rather than the original kit part. For example, in my spares boxes I found a remote-controlled machine gun from a Tamiya kit of the Schützenpanzer Marder. That is, this bit:

Marder remote MG 1.jpegMarder remote MG 2.jpeg

… and my first thought, of course, was “Could I stick this on?” But even a little bit of thought said it would be a silly addition from a realism point of view. Yes, it would look cool and “what-if” but it really falls firmly into the category of what-iffy ;) I mean, that kind of system wasn’t used on anything else at the time,* and even on the Marder itself was removed with the A1 upgrade because it must have been a complex and expensive way to give some extra firepower that probably turned out to be mostly pointless once it reached the real world.

This kind of reasoning is why I am replacing the guns, for example, because if this vehicle had really gone into production, why would it not use the exact same gun as on the Leopard 2? Even if the fume extractor would be pointless (the guns are not in the crew compartment), it wouldlikely be simpler and cheaper to manufacture and maintain one type of gun and its thermal sleeves rather than two.

* Except some MOWAG experimental vehicles and prototypes that were never adopted, either in general or in versions with a similar remote-controlled mount.

you often seem to do slightly unusual/less common builds
Oh, you noticed that too? ;)

when was the last time up built something out of the box? Generally curious.
I was thinking about that too the other day … The last one I can remember offhand, where AFV models are concerned anyway, is probably the Trumpeter Rooikat that I consciously decided to build SFTB. In general, it would be 1:72 scale aircraft models that I do occasionally, and hardly ever change anything about — largely exactly because I build them for a quick change of pace.
 

adt70hk

I know its a bit sad but I like quickbuild kits!!!
SMF Supporter
Joined
Sep 4, 2019
Messages
9,526
Points
113
First Name
Andrew
The more I look at the model, the more I see that needs removing or replacing … I hope you’ll keep finding it interesting :smiling3:


I’ll need to remember to try that next time I need to cut a circle. With this one, once I started cutting I remembered reading that some people have more luck when using the cutter in reverse, but by that time I already had a circle I had gone through with the tool the right way round a couple of times, so it didn’t want to go backwards at all.


True, though what I always do my best to avoid with models like this, is to stick things on because they look good or cool :smiling3: I have to find a justification for why it would be there rather than the original kit part. For example, in my spares boxes I found a remote-controlled machine gun from a Tamiya kit of the Schützenpanzer Marder. That is, this bit:

View attachment 466271View attachment 466272

… and my first thought, of course, was “Could I stick this on?” But even a little bit of thought said it would be a silly addition from a realism point of view. Yes, it would look cool and “what-if” but it really falls firmly into the category of what-iffy ;) I mean, that kind of system wasn’t used on anything else at the time,* and even on the Marder itself was removed with the A1 upgrade because it must have been a complex and expensive way to give some extra firepower that probably turned out to be mostly pointless once it reached the real world.

This kind of reasoning is why I am replacing the guns, for example, because if this vehicle had really gone into production, why would it not use the exact same gun as on the Leopard 2? Even if the fume extractor would be pointless (the guns are not in the crew compartment), it wouldlikely be simpler and cheaper to manufacture and maintain one type of gun and its thermal sleeves rather than two.

* Except some MOWAG experimental vehicles and prototypes that were never adopted, either in general or in versions with a similar remote-controlled mount.


Oh, you noticed that too? ;)


I was thinking about that too the other day … The last one I can remember offhand, where AFV models are concerned anyway, is probably the Trumpeter Rooikat that I consciously decided to build SFTB. In general, it would be 1:72 scale aircraft models that I do occasionally, and hardly ever change anything about — largely exactly because I build them for a quick change of pace.
Jakko

Thanks very much for informative reply. Much appreciated!!

ATB.

Andrew
 

Gern

'Stashitis' victim
SMF Supporter
Joined
May 17, 2009
Messages
9,714
Points
113
Location
Stourbridge
First Name
Dave
As I intend to have the suspension in its upper position (hull lowest to the ground), I need to adapt the idler wheel mounts to push the idler further forward, but I’m not yet sure how to best do that. Also, I need to find a way to thicken the axles so that the Hobby Boss wheels will go onto them: they’re made for axles 3 mm thick, while Takom’s are 2 mm.

Any chance you could wrap a piece of 0.5mm card (or maybe two pieces of 0.25mm would be easier) around the axle? That would give you the extra 1mm you need on the diameter.
 

JR

Member of the Rabble and Pyromania Consultant
SMF Supporter
Joined
May 26, 2015
Messages
17,375
Points
113
Location
lincs
First Name
John
Have to hand it to you, your research is top rate, along with your scratchery skills. Always interesting to follow .
 

Jakko

Way past the mad part
SMF Supporter
Joined
Apr 28, 2018
Messages
10,954
Points
113
First Name
Jakko
Any chance you could wrap a piece of 0.5mm card (or maybe two pieces of 0.25mm would be easier) around the axle? That would give you the extra 1mm you need on the diameter.
Good idea — I had had the same thought and would probably have used it, except that I did some checking yesterday and found that the Hobby Boss Leopard wheels will sit about 0.5 mm too far out. This may not seem like much, but it noticeably puts the track at an angle, so I will need to modify the insides of the wheels to move them in by that amount.

These wheels are Tamiya-style, with a poly cap trapped between the two halves, and it turns out that the section of the wheel that actually holds the poly cap in, is about 0.5 mm thick … Of course, that means that moving the wheel closer to the hull results in the poly cap not being trapped anymore :sad: I’ve been looking for material of about the right thickness that can be turned and drilled on a lathe to make inserts for the wheels so they will fit on the axles, but I haven’t found any suitable scrap yet.
That's what makes your threads so interesting :tongue-out3:
Just carry on as usual
Thanks, will do :smiling3:

Have to hand it to you, your research is top rate, along with your scratchery skills. Always interesting to follow .
Thanks :smiling3: Though I must add that the research here is more, “what’s on other vehicles of the era” than looking into the actual VT 1-2.
 
  • Haha
Reactions: JR

Jakko

Way past the mad part
SMF Supporter
Joined
Apr 28, 2018
Messages
10,954
Points
113
First Name
Jakko
I moved the idler wheel arm and hydraulic piston:

D8ECDFA5-C943-418D-99C0-F22CB7D527EC.jpeg

The reason is because when I held the Leopard 2 idler wheel in front of the idler arm in its original position, it hardly reached beyond the bow plate. That can’t be good for cross-country movement, so I thought it needs to go forward.

This was done by carefully sawing off the idler wheel arm mounting from the hull with a razorblade saw, then glueing a disc of 0.25 mm plastic card behind it to make up for the lost material. Using a paper punch produced exactly the right diameter, though curved because of the shape of the punches, so I clamped it and the mounting to the wheel arm after adding glue to stick those three pieces together.

In the mean time while that dried, I filed the hull sides flat to get rid of the remains of the mountings and filled the half-round holes in the hull. Once that had dried, more filing and sanding made it flat again and I could glue the arm and piston further forward.

(For those interested in real-world details: Takom gives roadwheels and idlers that are a scale 660 mm in diameter. This is the size that the American MBT 70 and early German KPz 70 prototypes used, while the later German ones had roadwheels of 700 mm and idlers of 600 mm, which are also the ones in Dragon’s KPz 70 kit (and correct for the version portrayed in that). I’m not sure, but I think the Leopard 2’s wheels also have these diameters. The VT 1 probably — I haven’t checked — had old, leftover wheels of the original size.)
 

Andy the Sheep

SMF Supporter
Joined
Apr 7, 2019
Messages
1,553
Points
113
Location
North Eastern Italy
First Name
Andrea
Just discovered your new build (maybe "project" is more appropriate :cool:), Jakko and, as always, I'll follow it with interest.
The prototype of that weird tank hunter have been stuck in my mind since I saw it the first time on a defence magazine.
By the way: I was a reader of the Italian edition of "Armies and Weapons": it belonged to the same editorial group, had the same name just translated into Italian and used the same layout but was run by Italian journalists.
I still remember I used the infos about the ALCM and the MRCA (a.k.a. Tornado) terrain following systems I read on it in a school composition in '79:nerd:. The teacher was ... :astonished: let's say puzzled, to use an understatement.:smiling4:

Andrea
 

Jakko

Way past the mad part
SMF Supporter
Joined
Apr 28, 2018
Messages
10,954
Points
113
First Name
Jakko
typically bold stuff
Nah, just a fun, quick, no-complications build as usual ;)

Just discovered your new build (maybe "project" is more appropriate :cool:), Jakko and, as always, I'll follow it with interest.
Great :smiling3:

The prototype of that weird tank hunter have been stuck in my mind since I saw it the first time on a defence magazine.
Exactly the same for me, though probably about 35 years later …

By the way: I was a reader of the Italian edition of "Armies and Weapons": it belonged to the same editorial group, had the same name just translated into Italian and used the same layout but was run by Italian journalists.
So is this, by the looks of it. The front cover of issue 47, that has the actual VT 1 article, says it’s the issue for “15 Ottobre - 15 Novembre 1978” :smiling3: And I thought those kinds of mistakes were only made in the digital age, because someone forgot to type the translated text into a text box … Looking inside, it says the publisher was Interconair Tecnomedia AG while the editorial offices were SORECOM S.A.M./INTERINFO, both located in Monaco. Oh, but the address for Interconair Tecnomedia’s parent company, Interconair AG, is in Switzerland … Let’s just say this definitely seems to be the defence industry at work here :smiling3: (The magazine was printed in Italy, BTW, in Gorle, Bergamo.)

I still remember I used the infos about the ALCM and the MRCA (a.k.a. Tornado) terrain following systems I read on it in a school composition in '79:nerd:.
About ten years after that, a schoolfriend and I had to do a class presentation together about a subject of our own choice. Him being an aircraft geek (and Top Gun fan), we decided to do it about the military. I don’t really remember too much of it, though I do remember him ending up explaining how fighter jets are launched from aircraft carriers, including a drawing on the blackboard of how you can tell a carrier plane from a non-carrier plane by looking at the nose gear strut :smiling3:
 

Jakko

Way past the mad part
SMF Supporter
Joined
Apr 28, 2018
Messages
10,954
Points
113
First Name
Jakko
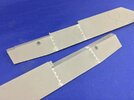
The VT 1-2’s sides apparently had a removable panel held in place with socket bolts:

A97F1303-941D-4A29-8512-60A0C7397526.jpeg

Most likely, these were for access to the autoloader, but they seem an unlikely thing for a combat vehicle to have due to the weak area this would create in the side armour, so I filled it all in:

6F285769-FC4E-42C3-BB29-328345D4294A.jpeg

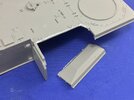
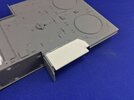
As for the autoloaders themselves, the VT 1-2 appears to have had one on the left-hand side only, with the right gun probably (is my guess) being loaded by hand from outside before each shot. The model has a hatch with some vents in the roof behind the right gun, while on the left is what seems to be some kind of protective cover that has no hinges or bolts. I think that if there is an autoloader on both sides, the roof would likely be much the same on each side, and it would have a hatch through which to refill the autoloader. Out with the saw and knife again:

24797E29-1291-460C-8D32-D4CE2B0E96FA.jpeg91FD72CC-59E7-45AE-A80E-323B3393272D.jpeg

I also cut a piece from the sloping upper part of the left side plate, so I can extend the vertical part upwards to meet this new roof section, like on the right. Once the glue is dry I can fill some seams and then build a hatch on top like on the right.
 

Jakko

Way past the mad part
SMF Supporter
Joined
Apr 28, 2018
Messages
10,954
Points
113
First Name
Jakko
More progress but elsewhere on the model:

B9CD35EC-66DC-42BE-86A3-18208DFA1799.jpeg

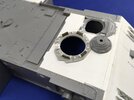
I had intended to put the commander’s periscopes straight onto the roof, but the height of the driver’s hatch convinced me I needed to add something below them. This is the plate that should go over the periscopes on the Leopard 2A4, but glued upside-down to the roof around the hatch opening I cut. That also showed the opening to be too small and not quite as round as it seemed in isolation, so I reamed it out with a sharp knife using the hole in the kit part as a guide.

The periscopes are the tops and bottoms from Asuka Sherman periscopes, of which I have tons spare because you always get at least twice as many as you need in one of those kits. The white bits around them are just plastic strip, and then I added some discs with bolt heads between them, all just punched from thin card.

With the machine gun ring on:

B96366B4-EEB4-44BA-987C-777189C90D34.jpeg

The grey cone is from the Takom roof, and will now be the base for the commander’s viewer. I also started making the gunner’s sight:

5294FCAF-85EE-4134-B40D-4B3F612902F5.jpeg

These are leftover bits from the Ironside M67 flamethrower tank, whose plastic parts are a poorly moulded copy of the Tamiya M48A3 kit. These particular bits are for motorisation, so I didn’t need them for that model, and 20 years on, I cut them down and filed them flat so two side-by-side can form the basis of the gunner’s sight. No idea yet how I’ll detail it — we’ll see :smiling3:
 

adt70hk

I know its a bit sad but I like quickbuild kits!!!
SMF Supporter
Joined
Sep 4, 2019
Messages
9,526
Points
113
First Name
Andrew
Again Jakko, great work and detail.

Andrew
 

Jim R

SMF Supporter
Joined
Apr 27, 2018
Messages
13,841
Points
113
Location
Shropshire
First Name
Jim
Certainly using up the contents of the spares box. Work looks very neat. A lot of thought as to what was likely - your ideas on the autoloader access makes total sense.
 

Tim Marlow

Little blokes aficionado
SMF Supporter
Joined
Apr 27, 2018
Messages
16,874
Points
113
Location
Somerset
First Name
Tim
The usual well thought out construction going on here Jakko. Nice one.
 
Top