Excellent work Tim.. the building and shed are beautifully done
You are using an out of date browser. It may not display this or other websites correctly.
You should upgrade or use an alternative browser.
You should upgrade or use an alternative browser.
Not a Moment to Lose… Battle of the Bulge, Ardennes, December 1944
- Thread starter TIM FORSTER
- Start date
TIM FORSTER
SMF Supporter
Thanks guys.
I thought it was time to start looking at the composition of figures and vehicles. The idea I had from the start was that of the German recce group having just arrived at the farmhouse… out of sight is a broken down jeep and a group of GIs who have just realised their predicament. As one of the Kampfgruppe rounds the corner he spots the rear of the jeep and at that moment one of the Americans makes a break for it.
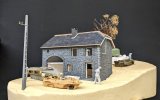
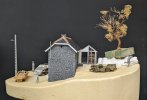
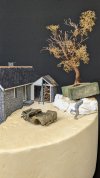
You can also see some of the other work I have done lately…
The tree is work in progress and I will deal with that in another post when I have finished it. However, it is the first leafless tree I have ever had to make and it is being constructed from all-natural materials.
The rocky outcrop which wraps around the base of the hill is made from plaster pieces cast from a Woodland Scenics mould.
Other details are the telegraph insulators added from brass and the rear step for the farmhouse.
Anyway, I’m happy with the way it’s turning out and can hardly wait to get stuck into the actual terrain…
I thought it was time to start looking at the composition of figures and vehicles. The idea I had from the start was that of the German recce group having just arrived at the farmhouse… out of sight is a broken down jeep and a group of GIs who have just realised their predicament. As one of the Kampfgruppe rounds the corner he spots the rear of the jeep and at that moment one of the Americans makes a break for it.


You can also see some of the other work I have done lately…
The tree is work in progress and I will deal with that in another post when I have finished it. However, it is the first leafless tree I have ever had to make and it is being constructed from all-natural materials.
The rocky outcrop which wraps around the base of the hill is made from plaster pieces cast from a Woodland Scenics mould.
Other details are the telegraph insulators added from brass and the rear step for the farmhouse.
Anyway, I’m happy with the way it’s turning out and can hardly wait to get stuck into the actual terrain…
TIM FORSTER
SMF Supporter
THE CORRUGATION MACHINE!
(AKA the most innocent fun I have had in ages)
To add some more variety and break up the monotony of laying tiles I decided that my shed should have a corrugated roof. So I started to look at the options…
I had some embossed ‘corrugated’ metal sheeting in my stash that I bought years ago from an architectural model shop (4AD in London) which I thought would work, but I soon decided that a) the ripples were too small and b) they weren’t very well defined.
Then I looked on line. My first choice seemed ideal: Juweela ‘Corrugated Iron Sheets’ 1:32 / 1:35 scale. These come moulded in hard plastic in a variety of colours and they actually look pretty good. However, although I have no idea if there is some sort of international standard for this sort of sheeting, to my eye they just look out of scale for 1:35 - especially for a small building like mine.
So I looked again and came across the wonderful ‘Greenstuff World Corrugator’.
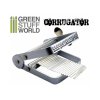
This rather medieval-looking contraption is as simple and effective as it looks. You just run some thin metal sheet through the serrated rollers using the key handle and - voila! - you suddenly have some realistic looking currugated sheet. And it’s so much fun!
However, I learnt the hard way one limitation with this method. Once the metal is corrugated, although it is easy to cut sheets vertically, it is impossible to cut across the bumps (either horizontally or on the diagonal) without crimping the sheet and thus ruining the effect. So you need to cut your sheet to size first and then run it through the machine.
My first (failed) attempt was made using thin pewter sheet (which I generally use for making rivets by punching with a pin vice onto a pencil eraser). For the second go I followed a tip I have read somewhere and simply cut up a coke can (other fizzy drinks are available). This is cheaper and actually works better because the metal is slightly thinner but also stiffer.
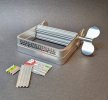
Anyway, I was very happy with the outcome. The sheets were then glued to a false roof made from card - which helped to keep the whole structure rigid - and capped with a strip of pewter sheet bent at an angle.
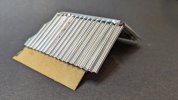
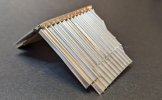
Meanwhile, I have already primed my farmhouse and shed using black Mr Surfacer from a spray can. So, painting is going to commence very shortly.
Here is the roof united with the rather dark looking shed…
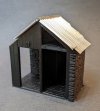
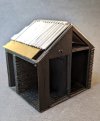 I couldn’t resist adding a horseshoe (from an old Historex sprue) above the workshop door. I couldn’t remember if it should be facing up or down. It turns out either will do, depending on your superstition!
(AKA the most innocent fun I have had in ages)
To add some more variety and break up the monotony of laying tiles I decided that my shed should have a corrugated roof. So I started to look at the options…
I had some embossed ‘corrugated’ metal sheeting in my stash that I bought years ago from an architectural model shop (4AD in London) which I thought would work, but I soon decided that a) the ripples were too small and b) they weren’t very well defined.
Then I looked on line. My first choice seemed ideal: Juweela ‘Corrugated Iron Sheets’ 1:32 / 1:35 scale. These come moulded in hard plastic in a variety of colours and they actually look pretty good. However, although I have no idea if there is some sort of international standard for this sort of sheeting, to my eye they just look out of scale for 1:35 - especially for a small building like mine.
So I looked again and came across the wonderful ‘Greenstuff World Corrugator’.

This rather medieval-looking contraption is as simple and effective as it looks. You just run some thin metal sheet through the serrated rollers using the key handle and - voila! - you suddenly have some realistic looking currugated sheet. And it’s so much fun!
However, I learnt the hard way one limitation with this method. Once the metal is corrugated, although it is easy to cut sheets vertically, it is impossible to cut across the bumps (either horizontally or on the diagonal) without crimping the sheet and thus ruining the effect. So you need to cut your sheet to size first and then run it through the machine.
My first (failed) attempt was made using thin pewter sheet (which I generally use for making rivets by punching with a pin vice onto a pencil eraser). For the second go I followed a tip I have read somewhere and simply cut up a coke can (other fizzy drinks are available). This is cheaper and actually works better because the metal is slightly thinner but also stiffer.

Anyway, I was very happy with the outcome. The sheets were then glued to a false roof made from card - which helped to keep the whole structure rigid - and capped with a strip of pewter sheet bent at an angle.


Meanwhile, I have already primed my farmhouse and shed using black Mr Surfacer from a spray can. So, painting is going to commence very shortly.
Here is the roof united with the rather dark looking shed…

 I couldn’t resist adding a horseshoe (from an old Historex sprue) above the workshop door. I couldn’t remember if it should be facing up or down. It turns out either will do, depending on your superstition!
Miko
SMF Supporter
Bravo!! So impressive
Miko (appreciating quality)
Miko (appreciating quality)
- Joined
- Apr 28, 2018
- Messages
- 10,797
- Points
- 113
- First Name
- Jakko
If I’m honest, the corrugations are too sharp … You’ve got zig-zag corrugations there rather than curved ones. The other day I saw a picture of a home-made corrugating device someone had made from cocktail sticks glued at regular intervals on two bits of plywood or something, which worked by putting a sheet of thin metal between them and pressing them together, and gave much smoother curves.
Other than that, the shed looks good
Other than that, the shed looks good

Many years ago I saw a similar device which was a wooden antique, made for crimping gentlemens' starched shirt cuffs!
As Jakko says, the corrugations are a bit too sharp. How about a piece of thin card each side of the metal when you roll it through the machine?
I think the horseshoe should be the other way up so as to catch any good luck that's flying about rather than letting it fall out!
Pete
As Jakko says, the corrugations are a bit too sharp. How about a piece of thin card each side of the metal when you roll it through the machine?
I think the horseshoe should be the other way up so as to catch any good luck that's flying about rather than letting it fall out!
Pete
TIM FORSTER
SMF Supporter
Thanks Miko!Bravo!! So impressive
Miko (appreciating quality)
TIM FORSTER
SMF Supporter
Jakko, I want honest appreciation!If I’m honest, the corrugations are too sharp … You’ve got zig-zag corrugations there rather than curved ones. The other day I saw a picture of a home-made corrugating device someone had made from cocktail sticks glued at regular intervals on two bits of plywood or something, which worked by putting a sheet of thin metal between them and pressing them together, and gave much smoother curves.
Other than that, the shed looks good
I do take your point and I suspect that the cocktail stick method is probably the most accurate. However, these sheets are at the back of the diorama and they will mostly be viewed from the side - so I am confident that with paint, moss and a bit of melting snow they will look the part!
TIM FORSTER
SMF Supporter
Hi Pete,Many years ago I saw a similar device which was a wooden antique, made for crimping gentlemens' starched shirt cuffs!
As Jakko says, the corrugations are a bit too sharp. How about a piece of thin card each side of the metal when you roll it through the machine?
I think the horseshoe should be the other way up so as to catch any good luck that's flying about rather than letting it fall out!
Pete
I knew that the horseshoe would prove controversial. From my meagre research it seems that there are two schools of thought (or superstition) and depending on how you look at it, the shoe is either trapping the good luck or preventiong it from escaping.
Besides, these Belgian farmers weren't exactly lucky were they? First overrun by the Germans in 1940, then liberated by the Allies in 1944, only to be overrun by the Germans again!
TIM FORSTER
SMF Supporter
Bring on the black and let the pre-shading commence!
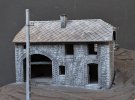
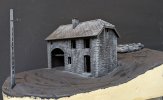
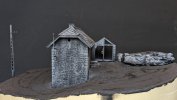
So, as I said, I decided to give the buildings a coat of Mr Surfacer black. This was from a spray can (which is expensive - I have now bought several jars of the stuff).
The rest of the base was then covered in a slurry of PVA and cheap acrylic paint. This is NOT intended to provide any texture for the groundwork but a) to seal in the surface of the ceilng foam board (which is very good at creating annoying dust) and b) to get rid of the bright glare of it’s original colour - which tends to make everything else look too dark.
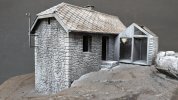
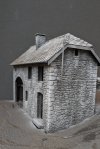
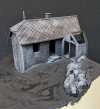
Then I hit the buildings with a mixture of Mr Surfacer black and grey, progessively lightening the mixture and adding rough highlights. Frankly, I didn’t take a whole lot of care over this because everything is going to be painted again anyway, but it’s nice to see some of the details pop out…


Nice progress Tim, looking good.
- Joined
- Apr 28, 2018
- Messages
- 10,797
- Points
- 113
- First Name
- Jakko
Also, those are the British lines of reasoning behind horseshoes. You would need to find out what the prevailing thought in Wallonia is/was for it to be accurate. Chances are that what matters is putting up the horseshoe at all, regardless of orientation, for example.I knew that the horseshoe would prove controversial. From my meagre research it seems that there are two schools of thought (or superstition) and depending on how you look at it, the shoe is either trapping the good luck or preventiong it from escaping.
TIM FORSTER
SMF Supporter
Thanks for all the lovely comments / horseshoe theories guys.
More Shed Shennigans
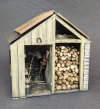
I achieved the wood texture by using various shades of MIG wood paints (they come in the Weapons and Tools sets) and wet-blending them over the black base colour, then applying washes. Everything here is painted using acrylics because I am still paranoid about damaging my foam.
Next I tackled to interior...
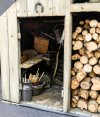
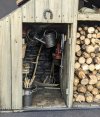
OK, so some may say that I have got a little carried away... But there's something about a small, cluttered interior that just gets my creative juices flowing.
The idea is to show a shed that's crowded but not completely chaotic: this is a farmer who likes to look after his tools and keep his bits and pieces in reasonable order...
One set, in particular, has been of great use here: MiniArt's Gardening Tools MIN35641. The detailing is just exquisite, although for my money it's the watering can that steals the show.
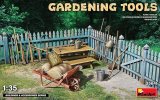
Apart from the watering can I used a scythe, fork, spade, hammer, sickle from the set, as well as the table, which was cut down to makwe the work bench. There are also a few bits and pieces from other MinArt kits: the red oil lamp came from their Office Furniture set and buckets and a wash tub from their Water Pumps set.
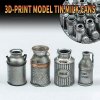
The milk churn in near the door is a beautiful 3D printed item from LIANG.
The table vice is real golden oldie - it's from Italeri's Field Tool Shop. Oh dear, I have only just realised that it's supposed to be positioned at a 90 degree angle from where I have put it. Let's just say that this guy had some unusual project in mind.
To help fill out the space I also made a length of 'rope' from copper wire and a roll of wire from... well, thin wire. Plus a hanging bag of some sort made from Magisculpt and masking tape for the strap. Other anonymous sacks and a hanging rag were also made from Magicsculpt. There's a few other bits and pieces from the spares box. Lastly a few bits and pieces of wood and an appropriate beer sign from Reality in Scale.
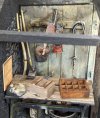
Once the roof is on and the shed set against the side of the house, the light is going to be limited, so I made sure to paint everything in a slightly less subtle manner than I might have done if these objects were to be sitting outside.
There are also the doors to go on, although these are only for the workshop on the left-hand side and they will be open to make sure all of this lovely detail pops out.
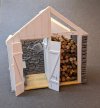
This shed was also a bit of a test bed for some techniques that I had not used before.
The corrugated roof has really come up nicely thanks to the LifeColor Rust paints. I bought mine years ago, but it's still going strong. It seems this is the best way to buy them now:
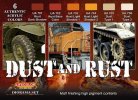
The beauty of these acrylic paints is that they are very diluted straight from the jar, so they can be layered in glazes over any surface. I started with the darks and worked up to lights, then used the paintbrush spatter technique to add a more textured feel. Finally I spattered a little Vallejo Concrete over as well.
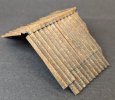
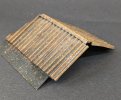
I'm happy with how this turned out, although this is by no means the end of the weathering, because there's going to be moss and then a little melting snow - but this will do for now.
The final challenge was the stone work. This was a bit of a step into the unknown for me. I was happy with the actual carving of the styrofoam and the way the stonework looked after the my initial pre-shading with grey over the black, but brush painting was going to take things to another level.
My reference image for the colours came from this building I found on Google Steetview.
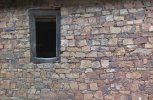
I think it's from a place called Warche, which is on the outskirts of Malmedy. This image is useful, because it reminded me that stone is seldom grey. In fact, the dominant shade here here is a sandy brown, although there are plenty of other colours ranging from blues to reds and very pale brown.
I have begun to assemble a pallet of colours to use on the house and this bit of shed wall was my first attempt.
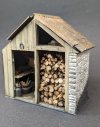
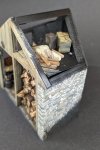
I was worried that it looked a little toy-like once I had painted the stones various different colours, but the secret weapon was this acrylic paste recommended by Night Shift:
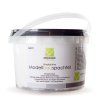
It's full name on ebay is: BERGSWERK Ultra Light Model Building Spatula New Generation. I had to order it from Germany, but it came very fast. It has an almost foam-like texture and it's easy to push into the cracks between the stones using a cocktail stick before smoothing with a wetted paint brush. There may be a little too much white showing at this stage, but I have yet to apply any washes or other weathering, so I will wait and see how these work when I move onto the main building...
More Shed Shennigans

I achieved the wood texture by using various shades of MIG wood paints (they come in the Weapons and Tools sets) and wet-blending them over the black base colour, then applying washes. Everything here is painted using acrylics because I am still paranoid about damaging my foam.
Next I tackled to interior...


OK, so some may say that I have got a little carried away... But there's something about a small, cluttered interior that just gets my creative juices flowing.
The idea is to show a shed that's crowded but not completely chaotic: this is a farmer who likes to look after his tools and keep his bits and pieces in reasonable order...
One set, in particular, has been of great use here: MiniArt's Gardening Tools MIN35641. The detailing is just exquisite, although for my money it's the watering can that steals the show.

Apart from the watering can I used a scythe, fork, spade, hammer, sickle from the set, as well as the table, which was cut down to makwe the work bench. There are also a few bits and pieces from other MinArt kits: the red oil lamp came from their Office Furniture set and buckets and a wash tub from their Water Pumps set.
The milk churn in near the door is a beautiful 3D printed item from LIANG.

The table vice is real golden oldie - it's from Italeri's Field Tool Shop. Oh dear, I have only just realised that it's supposed to be positioned at a 90 degree angle from where I have put it. Let's just say that this guy had some unusual project in mind.
To help fill out the space I also made a length of 'rope' from copper wire and a roll of wire from... well, thin wire. Plus a hanging bag of some sort made from Magisculpt and masking tape for the strap. Other anonymous sacks and a hanging rag were also made from Magicsculpt. There's a few other bits and pieces from the spares box. Lastly a few bits and pieces of wood and an appropriate beer sign from Reality in Scale.

Once the roof is on and the shed set against the side of the house, the light is going to be limited, so I made sure to paint everything in a slightly less subtle manner than I might have done if these objects were to be sitting outside.
There are also the doors to go on, although these are only for the workshop on the left-hand side and they will be open to make sure all of this lovely detail pops out.

This shed was also a bit of a test bed for some techniques that I had not used before.
The corrugated roof has really come up nicely thanks to the LifeColor Rust paints. I bought mine years ago, but it's still going strong. It seems this is the best way to buy them now:

The beauty of these acrylic paints is that they are very diluted straight from the jar, so they can be layered in glazes over any surface. I started with the darks and worked up to lights, then used the paintbrush spatter technique to add a more textured feel. Finally I spattered a little Vallejo Concrete over as well.


I'm happy with how this turned out, although this is by no means the end of the weathering, because there's going to be moss and then a little melting snow - but this will do for now.
The final challenge was the stone work. This was a bit of a step into the unknown for me. I was happy with the actual carving of the styrofoam and the way the stonework looked after the my initial pre-shading with grey over the black, but brush painting was going to take things to another level.
My reference image for the colours came from this building I found on Google Steetview.

I think it's from a place called Warche, which is on the outskirts of Malmedy. This image is useful, because it reminded me that stone is seldom grey. In fact, the dominant shade here here is a sandy brown, although there are plenty of other colours ranging from blues to reds and very pale brown.
I have begun to assemble a pallet of colours to use on the house and this bit of shed wall was my first attempt.


I was worried that it looked a little toy-like once I had painted the stones various different colours, but the secret weapon was this acrylic paste recommended by Night Shift:

It's full name on ebay is: BERGSWERK Ultra Light Model Building Spatula New Generation. I had to order it from Germany, but it came very fast. It has an almost foam-like texture and it's easy to push into the cracks between the stones using a cocktail stick before smoothing with a wetted paint brush. There may be a little too much white showing at this stage, but I have yet to apply any washes or other weathering, so I will wait and see how these work when I move onto the main building...
scottie3158
SMF Supporter
Tim,
Superb mate the details you have added are excellent, and the tin roof is outstanding. How did you achieve the effect?
Superb mate the details you have added are excellent, and the tin roof is outstanding. How did you achieve the effect?
Andy the Sheep
SMF Supporter
I really like your approach to diorama building and the results are outstanding.
TIM FORSTER
SMF Supporter
Thanks Scottie.Tim,
Superb mate the details you have added are excellent, and the tin roof is outstanding. How did you achieve the effect?
The key to the effect is to use the speckle method - so lots of back and forth with the various shades of rust using a cocktail stick to flick a loaded paintbrush. But it helps to have the underlying pre-shading done with an airbrush first.
TIM FORSTER
SMF Supporter
Thanks Andy!I really like your approach to diorama building and the results are outstanding.
