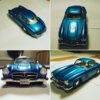
Tamiya Mercedes Benz 300sl 1/24

What colour?

  • Black

    Votes: 0 0.0%
  • Red

    Votes: 0 0.0%
  • Silver

    Votes: 0 0.0%
  • Cream Gloss

    Votes: 0 0.0%
  • Yellow

    Votes: 0 0.0%

  • Total voters
    0
S

Ssasho0

Guest
Today I got the 300Sl and this will be my next build, so I read the whole build log and was surprised to see that your next build will be my just finished one - the 250 GTO!


Back on the 300SL, great build, I will be using it as a refference! I really like the colour, but I'm probably going with the red one myself, I will keep the silver for the Ulenhaut coupe.


best regards,


Sasho
 
Joined
Jan 3, 2015
Messages
588
Points
63
First Name
Marc
Haha that's good. Is it the same brand kit? Anything I need to look out for? Looking at the gto I can see a couple of challenges. One in particular is the headlight lenses there is a chrome binnicle that needs picking out with silver. Any suggestions on that one without messing up the plastic?


Welcome to our forum by the way.
 
Last edited by a moderator:
S

Ssasho0

Guest
\ said:
Haha that's good. Is it the same brand kit? Anything I need to look out for? Looking at the gto I can see a couple of challenges. One in particular is the headlight lenses there is a chrome binnicle that needs picking out with silver. Any suggestions on that one without messing up the plastic?
Welcome to our forum by the way.
Yes, absolutely the same kit with the spoked wheels addition. Those are the best spokes for a civilian car that I have used so far! I just got the Hobby Design PE frets, a resin engine (which was an overkill and I don't reccomend getting it for this kit. For Revell's offering yes, but not for Fujimi), exhaust tips and engine (forgot the english word) things that are on top of the engine also from hobby design if I remember correctly. The last two additions are something that can be ommitted, but still looks better than the original part. The most usefull were the PE fret and the spokes that are in the kit anyway.


I can't remember having any issues with the headlights, I used the PE metal lining for the headlights and it looks way better than using Alclad. Still it was a bit fiddly and not easy to execute. Something to beware - there is a nasty mould line going from the doors to the headlights, exactly on the top of the bumper (not sure for the english word again). This thing was visible after sanding it smooth and thorough the white primer and the paint, so I had to repaint with thick gray primer, then white and then the yellow paint.


Overall absolutely enjoyable build, nearly no flash, good chrome parts, perfect fit, detailed engine, good enough hinge on the engine cover so I can actually be opened and closed, no issues others than created by myself. The biggest downfall of the kit are the side windows, which are 100% not correct and doesn't even remotely remind of the actual side window. So I just cut them out and using a piece of clear plastic (from a keyboard wrapping) cut out new ones and glued them on the inside. It will be better if you vacuuform them, but I can't do it by myself and had to use another solution.


I'm sure you will have a blast building it!


Best regards,


Sasho


PS: here is a picture of the end result to get you in the 250 GTO mood :smiling3: If you want me to remove it, as it is not relevant to the current build, just let me know!


SAM_5146_zpsvl8it7i2.jpg
 
Joined
Jan 3, 2015
Messages
588
Points
63
First Name
Marc
Very nice model. Thanks for the tips. Yes I agree with the moulding lines, you did the right thing grey primer then white and colour on top.
 
Joined
Oct 12, 2015
Messages
608
Points
43
First Name
Dave
I was going to mention to you to have quick butchers at sasho's GTO. .........it's awesome but I see he's got there before me.......talking of awesomeness, your merc is looking fantastic, your bmf is very very good. Top marks. ............ummmmmm Marc! :smiling3: :cool:
 
Joined
Jan 3, 2015
Messages
588
Points
63
First Name
Marc
Okay so we are near the end on this build. Bmf now done just got the wing mirror to do and rear number plate. This thread is complete i will post up the final pictures on another thread under completed section.

20151206_201140.jpg

20151206_201215.jpg
 
Joined
Jan 3, 2015
Messages
588
Points
63
First Name
Marc
Poop pooop pooooooooop


The numberplate decal just came away a moment ago. Grrrrrr.


Why????? Oh why do i have to drag this build to the finish line with so much rectification work yet again????


any ideas on what to do? I could find some german plates of the same era but i have no idea where yo get them.

20151209_095616.jpg
 
Joined
Mar 2, 2015
Messages
3,410
Points
113
First Name
Robert
Hi Marc do t know if this company can help with your Number plate decal issue. It says they do 1/24- scale plates etc


Maritime Models 39 Chequers Close, Grandstand Road, Hereford, Herefordshire, HR4 9HY, UK.


Regards


Robert
 
Joined
Jan 3, 2015
Messages
588
Points
63
First Name
Marc
Well the number plate guy is getting me a price for a custom german plate.


Did some research on plates from Germany. Historic cars have the prefix 'H' on the end of the plate. Since the car was built in stuttgart im starting with prefix S And combining two plates to form a fictional plate that is accurate in layout for use on todays roads.


Its going to be SAR 55H. With the crests from the 1st plate and font and style of the 2nd.

Screenshot_2015-12-10-22-16-43.png

Screenshot_2015-12-10-22-00-58.png
 
Joined
Jan 3, 2015
Messages
588
Points
63
First Name
Marc
Ok for now im just making this model complete..i will probably add the german plates later on but im itching to get on with the aston Martin build next. So thanks everyone..

IMG_20151213_230549.jpg
 
Top