1/35 Sd.Ah 56/57 Flak ammunition trailer (3D printed)

Panzerwrecker

SMF Supporter
Joined
Mar 2, 2022
Messages
362
Points
93
First Name
Los
Anyone wishing to model a 1/35 mobile German Flak 3.7cm 18/36/37/43 will find it difficult finding one of the Sd.Ah 56/57 ammunition trailers commonly towed by these vehicles. When it came to trailers the Germans made many http://www.kfzderwehrmacht.de/Homepage_english/Trailers/Special_trailers/special_trailers.html and the smaller 2cm Flak trailer like the Sd.Ah 51 for example can be found as additions to the Flak gun kits made by Dragon and Tamiya and even as a standalone kit by Bronco. Finding an accurate Sd.Ah 56/57 is a little trickier.

Discounting the trailer that Trumpeter includes in many of its mobile Flak kits (more on that later), the only option from a model company is Wiener Modellbau's resin kit. https://www.scalemates.com/kits/wie...05-munitions-sonderanhaenger-sdah-57--1168423 This is getting harder to find these days and although it is a close overall rendition it is very simplified and has some very noticeable and obvious errors.

This is what the real thing looked like. There are a few variations in the box design and wheels, but all were built on the same single axle 1.5T chassis. The earlier models have a curved roof and later models appear to have been simplified and come with a flat roof with less locker door hinges (material savings no doubt)

145083534_10158333411654086_4696119795566487152_n.jpg273686422_7524669894240497_6619091072406219172_n.jpg

Sd.Ah 57 trailer pic2.jpgb9dcbc7738f4fbeee2232f6efbb5ff7d_162558.jpg

As already mentioned Trumpeter includes a trailer in many if not all their Sd.Kfz 7 Flak variants and although they call it an Sd.Ah 52 the actual model is nothing like the real thing. The chassis is a close enough resemblance, but the box structure is pure make believe!

Compare Trumpeter's offering below and Bronco's Sd.Ah 52 which is a much more accurate of the real thing.

1557_rd.jpg1887_rd.jpg

So what if scratch building is not your thing and you want to depict an Sd.Ah 56/57? Well if you have access to a 3D printer you are in luck. Download the 3D file from fellow modeller Darius Stucinskas online at https://cults3d.com/en/3d-model/various/1-35-scale-sd-ah-56-57-ammunition-trailer

The kit is exquisite and although there is a lot of support material clean up involved once that is out of the way you are left with a beautifully accurate scale model.

Check out these CAD images

fa022268b99aa80f40234d29791628d4_162164.jpg

fa022268b99aa80f40234d29791628d4_162163.jpg

03b0e9c46890dca3b8e5e5df678a8e1e_161465.jpg

70ff66a22c8e976f75667be1d82ed529_161742.jpg

33a654d9f42a95c12b0493f13c40ae71_160992.jpg

33a654d9f42a95c12b0493f13c40ae71_160994.jpg

cf9d0593d524bc14592e32a8a0a8beb1_161134.jpg

b9dcbc7738f4fbeee2232f6efbb5ff7d_162565.jpg

Now whilst I really wanted to portray this Sd.Ah trailer I was a little intimidated by the clean-up process that a 3D print would involve. The number of tiny parts would also be a challenge, not to mention hoping the design work would mean the kit was engineering to all fit together well. Well, there really is nothing to worry about folks, this is the future. Darius has done a fabulous job in all his research and design work. Admittedly he acknowledges there are a few areas that he cannot be 100% sure about. Whether the box floor had wooden slats or whether the sliding dividers were a standard feature for example. What he can be sure of, is the kit is dimensionally accurate and all the parts will fit flawlessly together. Right down to the working and sliding support stands, the handbrake assembly and all the nuts and bolt you install just like the real thing. It is advisable to clean up the parts whilst they are supported and clean up all the holes with micro drills as this will make for a much more pleasurable and straight forward build. There are two rear chassis frame designs each with their own leg supports style and different tyre and wheel options can be had. Likewise, ammunition and ammo cases for both the 2cm Flak 38, Flakvierling 38 and 3.7cm Flak 36/37/43 are available.

I will be building two trailers. One I will model as being towed and one which will be sat on its own stands with the locker doors open displaying all the stowed ammo and crew paraphernalia

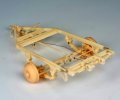
Work in progress has started on the towed trailer and although there are a few areas that could be improved upon (my fault and not the kit) I aim to remedy these issues on the second build. One of them is the wire I used to make the handbrake cable. I didn't have any 0.3mm as recommended and therefore it doesn’t look straight and stretched enough. I also had difficulty winding down the ends on the rear adjustable bar. Secondly was the amount of CA I used constructing the body. Even with the fine applicator that the Colle21 rubber CA came with, I still managed to apply a little too much. This meant I didn't get quite as tight a fit as I would have liked, and it just knocked the alignment out a touch.

Onwards and upwards though.

Excuse the image quality.

20220626_210626.jpg

20220627_163627.jpg

20220627_163839.jpg

20220627_164151.jpg

20220627_203103.jpg
 

Attachments

  • 20220627_202257.jpg
    20220627_202257.jpg
    112.7 KB · Views: 6

JR

Member of the Rabble and Pyromania Consultant
SMF Supporter
Joined
May 26, 2015
Messages
17,275
Points
113
Location
lincs
First Name
John
Hi Los, plenty of research done and some interesting photos from the war and of the build.
This 3 D printing is the shape of things to come with out doubt in producing niche models and parts. All a bit of a black art to many including me !
Will follow and hopefully learn more .
 

Mini Me

SMF Supporter
Joined
Jun 1, 2018
Messages
10,160
Points
113
First Name
Rick
Nice start.......love the Flak Truck L4500........I'd love to do one of these in 1-87 scale. Excellent ref. photos! Keep us posted of your progress.
 

Tim Marlow

Little blokes aficionado
SMF Supporter
Joined
Apr 27, 2018
Messages
16,781
Points
113
Location
Somerset
First Name
Tim
Cool build Los. Great to see the future in action as well as how insanely cheap this is once you have the hardware to produce it. 3.5 UKP for files of this quality seems an absolute steal. I assume that’s a resin print?
 

Panzerwrecker

SMF Supporter
Joined
Mar 2, 2022
Messages
362
Points
93
First Name
Los
Hi Los, plenty of research done and some interesting photos from the war and of the build.
This 3 D printing is the shape of things to come with out doubt in producing niche models and parts. All a bit of a black art to many including me !
Will follow and hopefully learn more .
It is indeed the future John so it’s never too late to embrace it. Apart from the extremely tiny nubs where the supports are attached to the parts there is no other clean up involved. It all looks a bit daunting but using a sharp hobby knife they are extremely easy to remove. No seam lines, no sprue gates, and no misaligned mouldings. The scale appearance and detail are incredible but difficult to see in photographs due to the translucent nature of the thin parts. I should have this in primer soon so we will see how incredibly well detailed it is.
 

Panzerwrecker

SMF Supporter
Joined
Mar 2, 2022
Messages
362
Points
93
First Name
Los
Nice start.......love the Flak Truck L4500........I'd love to do one of these in 1-87 scale. Excellent ref. photos! Keep us posted of your progress.
FUGLY but I love em too :tongue-out3: The L4500 armoured truck is not a model that has been well served in 1/35. There have been a few resin conversions. Trumpeter have recently released a rook of armored Flak versions in plastic.
 

Panzerwrecker

SMF Supporter
Joined
Mar 2, 2022
Messages
362
Points
93
First Name
Los
Cool build Los. Great to see the future in action as well as how insanely cheap this is once you have the hardware to produce it. 3.5 UKP for files of this quality seems an absolute steal. I assume that’s a resin print?
Yes a resin print Tim. Insanely good value if you already have a quality printer.
 

Panzerwrecker

SMF Supporter
Joined
Mar 2, 2022
Messages
362
Points
93
First Name
Los
Work continues on building up the first of the two little trailers. Lots of small, fine 3D printed details like door locks, clasps and padlocks will be added at the very end of the build to avoid damage.

The body and chassis are connected and the mudguards/fenders have been added.

Opting to leave the doors open just on one side and the rear meant filling the compartment with gear.

The ammo boxes were stored over the axle and the movable partitioning grills seperate each row so as to avoid anything sliding forward or rearward in transit. All the ammo is therefore accessable from both sides. Other equipment and crew gear is stored either end and is also accessible from the lower front or rear doors. I have opted to add the additional roof tray to store more gear. A spare wheel and a large camo net/tarpaulin will take up most of that space.

So as not to waste valuable 3D printed ammo boxes, spare plastic stock has been used to bulk out the hidden from view lower row of ammo boxes. Contents that are visable through the open rear door have been added. Loose upper row ammo boxes are dry fitted so as to aid painting. More crew gear similar to those items in the very first reference image above are yet to be made and added.

The roof panel is also dry fitted so the interior can be painted and weathered.

So far it has all fitted together without major incident and I am looking forward to hooking this up to an Sd.Kfz 7/2 Flak 43 on a little North Italian mountain road base.20220703_015942.jpg20220703_015853.jpg20220703_015915.jpg20220703_015937.jpg20220703_015931.jpg
 

Mini Me

SMF Supporter
Joined
Jun 1, 2018
Messages
10,160
Points
113
First Name
Rick
The detailing on this model is superb.....what fun it will be to paint and weather into a most realistic creation. :thumb2:
 

Panzerwrecker

SMF Supporter
Joined
Mar 2, 2022
Messages
362
Points
93
First Name
Los
Work has continued populating the roof box with scratchbuilt tarps, a spare wheel and other crew paraphanalia. Along with the interior gear, most items will need painting seperatly as decals need to be added to many of them.

20220706_203952.jpg

20220706_203501.jpg

The very last step is to add all the tiny delicate items and TBH this was extremely challenging. Not only was the small trailer difficult to handle without knocking stuff off, but the parts are so incredibly small it really was difficult to position them accurately. I found again that micro drilling out the small, recessed witness marks for all the wingnuts gave a stonger bond. The padlock loops were difficult to clean up so they sat flush on the bodywork, and I did manage to waste far too many of these! Even with a new modelling knife the padlocks and chains were nye on impossible to remove from the supports without damage so apart from one I almost managed to remove complete, I admitted defeat in this area and will now look at how some photoetch examples compare.

20220706_203735.jpg

20220706_2038567.jpg

20220706_203813.jpg

Given there is quite a bit of weight in the roof box now, I am really hoping it doesn’t adversely affect the fit to the body or put too much strain on the axle hubs once the wheels are fitted:dizzy:

So, what can I report reference working with this newly engineered material? Firstly, it is very different to building either resin or plastic kits. The nature of this small trailer is that even the largest parts are extremely thin and fragile. I have really enjoyed the challenge and I'm really looking forward to building the second trailer. There are so many things that I have learned and will address second time around.

How is it different to traditional resin and plastic kits? This kit was one of the best engineered kits I have ever built. The fit of every part was perfect. There are none of the traditional issue like cleaning up seam lines and there are no mis-aligned mouldings. I also didn’t find any warped parts. However, there are several new clean up steps which you are presented with. Number one is to ensure careful removal of all the support material as many of the tiniest detail is easily broken if care is not taken in this first step. Secondly, once separated from the supports, assuring the best clean-up of each part. This is especially important regards to any location holes. The very nature of the printing process will flatten the hole edges, so it is important to open these up with a micro drill. It pays huge dividends when it comes to fitting pins and bolts. especially if you want the option to portray them as moveable. It has been particularly difficult to see all the detail in this colour resin so I'm thinking of laying down a thin coat of primer to many of the larger flat panel parts before assembly on the next trailer. The frugal use of CA glue connecting all the main body panels will aid a much tighter fit such are the fine tolerances and bonding the tiniest parts requires careful application. As for the wire work on this kit. although much of it is hidden, I should have waited until the correct 0.3mm wire arrived so I made a bit of a hash with the material I used. It really deserves to be better represented next time around. Lastly, I would advise with this kit, that any large parts that are added be as clean as possible before attaching them to the main assembly because prepping this for paint will be virtually impossible due to the amount of small delicate parts. I'm hoping a quick blast with the airbrush is all that is needed to 'dust off' before I lay down a coat of primer.
 

Panzerwrecker

SMF Supporter
Joined
Mar 2, 2022
Messages
362
Points
93
First Name
Los
So, how does it look under paint? Well not great TBH. The finish has not at all been helped by the rattle can primer, drying in places before it hit the model, I guess that must be the heat as the Halfords stuff usually lays down nice and smooth. As for the printed material there are a few printing line marks in places but only a few that will be obvious under the base coat. Mainly the vertical lines below the hinges on the nearside doors. There are a few horizontal ones on the lower panel, but these could easily be disguised as dents. The worst issues by far are self-inflicted. I haven’t cleaned up the support location nubs in far too many prominent places and I have damaged way too much fine detail. The front and rear panels have gaps where they meet the side panels and the body hinges on the nearside are nearly all missing detail, there are little bits on the edges of the ends of the roof that have also come away.

This is going to be a massive learning curve and I will now endeavour not to make the same mistakes with the second trailer. Laying down some primer on the outside of the main panels before assembly will be a priority. For now, all I can do is clean up what I can without further damaging detail and small parts and make the surface flatter for further paint layers. As for the damaged detail like the hinges that is going to be difficult to replace convincingly so maybe a few strategically places items will make them 'disappear'

Red circles are support nubs not cleaned up. Yellow circle shows how grainy the primer has dried. Orange circles are the holes for the padlock hoops that I have somehow missed to line up!
20220706_2144432.jpg

Yellow circles show hinge detail missing. Red circles show support nubs required more clean up.
20220706_21400013.jpg

Yellow circles highlight some vertical printing lines. Red circles show support nubs not cleaned up. I have started to sand and flatten the grainy surface. The horizontal print lines will be disguised as dents and scrapes. I'm not sure how i will address the vertical anomalies.
20220706_23051772.jpg

Some strange goings on with the paper shaper tarp material and a prominent chip out of the end of the curved roof.
20220706_2144736.jpg

The detail on the front chassis is looking good. Unlike the box panel connection gaps, I've ended up with:unamused:
20220706_214tt427.jpg
20220706_23099600.jpg

Fortunately, the small details have thankfully remained attached.
20220706_23220628.jpg


TBH I'm a little disappointed it has turned out like this and I'm really itching to make good on the second trailer. I will persevere with more clean up and hope that I can get the surface smoother to get a decent base coat laid down. Levelling thinner will be required me thinks.
 
Last edited:

JR

Member of the Rabble and Pyromania Consultant
SMF Supporter
Joined
May 26, 2015
Messages
17,275
Points
113
Location
lincs
First Name
John
Still exceptional work Los, pity about the paint problems as you say. Don't know where you are but here the temperature has been much higher than normal , so may be that is the problem.
 

scottie3158

SMF Supporter
Joined
Apr 27, 2018
Messages
12,707
Points
113
Location
Spalding
First Name
Paul
Los,
That is outstanding work mate. I am always impressed with the detail that can be achieved with 3d printing. Particularly impressive is the fine cross bracing in the interior.
 

Panzerwrecker

SMF Supporter
Joined
Mar 2, 2022
Messages
362
Points
93
First Name
Los
Still exceptional work Los, pity about the paint problems as you say. Don't know where you are but here the temperature has been much higher than normal , so may be that is the problem.
Sunny Anglesey John and yes, I fear that is the isuue as rarely do I have an issue with Halfords primer auto rattle cans
 
Top