Outstanding masonry work thus far. Bravo.
You are using an out of date browser. It may not display this or other websites correctly.
You should upgrade or use an alternative browser.
You should upgrade or use an alternative browser.
1/35 Sd.Ah 56/57 Flak ammunition trailer (3D printed)
- Thread starter Panzerwrecker
- Start date
Andy the Sheep
SMF Supporter
I mean different grades of stones and sand, wetted and then pressed. Some roads had some tar to hold them together, but not those in the mountains.With that, do you mean true macadam roads that consist only of different grades of stones, or do you mean the type that includes tar to hold them together? (I ask because in Belgium, it means the latter, but not everyone might realise that — or that it can also mean a road of loose stones, for that matter.)
Panzerwrecker
SMF Supporter
Cheers PaulLos,
Outstanding work mate the detail on the trailer is superb. The base will really set this great build off.
Panzerwrecker
SMF Supporter
Thanks Richard. Plenty more work to doBase really looking good, Los.
Cheers,
Richard
")
Panzerwrecker
SMF Supporter
A google search result: A metalled road has a level surface made of small pieces of stone; used especially of country roads and tracks. [mainly British] Take the metalled path running between the church and the fort.I mean different grades of stones and sand, wetted and then pressed. Some roads had some tar to hold them together, but not those in the mountains.
I don't suppose any of these smaller mountain pass roads would have been anything other than the above type in 1945....would they?
Andy the Sheep
SMF Supporter
I believe those roads were just well maintained dirt roads; you can still find the "case cantoniere", sturdy houses, always painted in "Pompeian Red" and white with green roof, scattered along the National Roads every 5 - 10 km where the personnel in charge of National Roads maintenance lived- often with their family - and stored the maintenance materials and tools (see pic below).A google search result: A metalled road has a level surface made of small pieces of stone; used especially of country roads and tracks. [mainly British] Take the metalled path running between the church and the fort.
I don't suppose any of these smaller mountain pass roads would have been anything other than the above type in 1945....would they?

Most of them have been dismissed during the last 30 years, some have been demolished, some have been auctioned (one is now a fine restaurant in the Dolomites, above Cortina) and some passed to local institutions for different public use. Some of them are really beautiful as they are located in wonderful locations.
Back to the main topic: the roads, in 1945, would have been metalled only when crossing a town and tarred only in the main towns and cities.
Andrea
Panzerwrecker
SMF Supporter
Thanks for confirming AndreaI believe those roads were just well maintained dirt roads; you can still find the "case cantoniere", sturdy houses, always painted in "Pompeian Red" and white with green roof, scattered along the National Roads every 5 - 10 km where the personnel in charge of National Roads maintenance lived- often with their family - and stored the maintenance materials and tools (see pic below).
View attachment 461183
Most of them have been dismissed during the last 30 years, some have been demolished, some have been auctioned (one is now a fine restaurant in the Dolomites, above Cortina) and some passed to local institutions for different public use. Some of them are really beautiful as they are located in wonderful locations.
Back to the main topic: the roads, in 1945, would have been metalled only when crossing a town and tarred only in the main towns and cities.
Andrea

Airborne01
SMF Supporter
Been following this with deep interest, admiration, and more than a little awe - absolutely excellent!
Steve
Steve
Panzerwrecker
SMF Supporter
Thanks Steve. Glad you like itBeen following this with deep interest, admiration, and more than a little awe - absolutely excellent!
Steve
Panzerwrecker
SMF Supporter
Managed a little more time at the bench over the last week and although the trailer hasn't been touched, I did manage to progress with the mountain road base. Styrofoam is a great sculpting material and a medium I have starting dabbling in a whole lot more recently. I’ve made a few small simple bases already, but this project is the most ambitious and largest I have attempted to date and I’m really enjoying what can be achieved. Regular polystyrene can be used to fill in sections that don’t require carving but as this base was to be set on a slope, I figured that it would be easier to build it entirely out of Styrofoam. I didn’t have pieces tall or wide enough to complete it out of one block, so it was a mission to match and mate all the pieces up. For this reason, I decided I would purchase a foam cutter for future projects. I don’t have any room for it other than the floor, but messy sawing by hand makes straight edges difficult and joining pieces together more so, so I will have to make room. It will also give me the opportunity to cut thin slices to make items like roof tiles etc.

The basic structure built out of many slices of Styrofoam. As I could not achieve perfectly straight edges with my blades or saw, the main blocks were glued together with UHU POR glue to give a stronger bond than PVA.

After hacking out the basic contours it was time to scribe out the stonework. For some strange reason I made this process a whole lot more difficult than it needed to be! Having the foam cutter would have made it much easier but I still could have cut out the wall sections and scribed them all on a flat surface but nope…… I scribed them in situ! I did use reference pictures and worked slowly scribing in the pattern lightly before committing to making the deep stonework recesses once I was happy.
Another issue which I won’t be repeating and yet another reason a foam cutter makes things a whole lot easier is to start with a suitably flat surface to scribe into. I sanded my curved wall sections but looking closely you can still see the sanding lines in places. I hid the worst joint lines with some filler but again it would have been a whole lot easier if a thin strip for each wall section had been cut out, scribed, and then attached to the basic contours. All good fun and a giant learning curve.

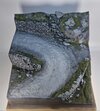
I did start off with the idea of making one section with real stones but soon realised it just didn’t work. This section was re-built and this time a thin section was cut, the stonework scribed and then added. It is most defiantly the most authentic looking section of wall IMO and the one I am most satisfied with. Constructing it this way allowed me to build an undercut into it where it simulated water breaking it open internally and a much more realistic damaged section that had collapsed.
Old wall

Re-built section

Once the basic stonework was complete, I sealed the Styrofoam from future painting and weathering steps with a few diluted mixes of PVA glue. Although I will be mainly using acrylic paint this will prevent any unforeseen melting of the foam should I decide to try out any enamel washes for example.
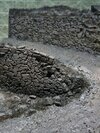
Sculptamold was used to bulk out the slopes and the road surface. Whilst still wet PVA glue was laid down on the upper sections and allowed to run down the road surface to cut out small contours and channels in the surface. Small stones were also added so they ended up being deposited along the routes. A messy job but it did look convincing and far more obvious once the first layers of paint went down.

Some tips for using Sculptamold is to work in small sections and lay it down thin. This prevents cracking and it dries much faster. Also, mix in a little ground colour. This way you won’t have to spend an eternity hiding all the white areas if you lay grass or foliage down before any paint. I completely forgot with this first mix but proceeding layers covered it up. Whilst the groundwork was wet, large sculpted pieces of Styrofoam were added to the slopes to simulate fallen rocks and boulders. Thin pieces of Styrofoam were also cut out and placed as coping/capstones on top of the walls. Many of them displaced. I then framed the whole thing in Balsa Wood
The groundwork on my first few bases were painted first then the grasses and foliage were added after. After watching Mr Nightshifts excellent videos and his first few Styrofoam buildings and base projects, I decided to employ his technique of adding most of the scenic accessories before painting. This method sounds like far more work, but the result is far more realistic IMO. Check his vids out.
Using my reference pics static grass was added using an applicator and once dry the whole base was given a primer coat of Tamiya Grey and Flat Earth. The whole thing now looked like a hairy portion of a certain Lord of the Rings characters skin!


As my refence pic showed a very grey road and wall surface colour I started picking out individual stones in various Vallejo acrylic grey tones. Gradually getting lighter to almost white with some very diluted washes. The road surface was also treated to some lighter greys through the airbrush. I think the process of colouring these stones will continue as more colour is added to the whole base.


It was now time to add a little splash of colour so I could see how all those grey wall colours stood out. To start things off a few mixes of Tamiya Nato Green and Flat Yellow were airbrushed onto the static grass. This will be gradually lightened as progress continues. To get more contrast I also started adding some lighter coloured natural stones. As more foilage is added I will likely pick out a few selected wall stones in similar tones.


Next up is to add some more foilage bling and start adding earth tones to the groundwork on the upper slopes.
I might even complete the little trailer too
The basic structure built out of many slices of Styrofoam. As I could not achieve perfectly straight edges with my blades or saw, the main blocks were glued together with UHU POR glue to give a stronger bond than PVA.
After hacking out the basic contours it was time to scribe out the stonework. For some strange reason I made this process a whole lot more difficult than it needed to be! Having the foam cutter would have made it much easier but I still could have cut out the wall sections and scribed them all on a flat surface but nope…… I scribed them in situ! I did use reference pictures and worked slowly scribing in the pattern lightly before committing to making the deep stonework recesses once I was happy.
Another issue which I won’t be repeating and yet another reason a foam cutter makes things a whole lot easier is to start with a suitably flat surface to scribe into. I sanded my curved wall sections but looking closely you can still see the sanding lines in places. I hid the worst joint lines with some filler but again it would have been a whole lot easier if a thin strip for each wall section had been cut out, scribed, and then attached to the basic contours. All good fun and a giant learning curve.
I did start off with the idea of making one section with real stones but soon realised it just didn’t work. This section was re-built and this time a thin section was cut, the stonework scribed and then added. It is most defiantly the most authentic looking section of wall IMO and the one I am most satisfied with. Constructing it this way allowed me to build an undercut into it where it simulated water breaking it open internally and a much more realistic damaged section that had collapsed.
Old wall
Re-built section
Once the basic stonework was complete, I sealed the Styrofoam from future painting and weathering steps with a few diluted mixes of PVA glue. Although I will be mainly using acrylic paint this will prevent any unforeseen melting of the foam should I decide to try out any enamel washes for example.
Sculptamold was used to bulk out the slopes and the road surface. Whilst still wet PVA glue was laid down on the upper sections and allowed to run down the road surface to cut out small contours and channels in the surface. Small stones were also added so they ended up being deposited along the routes. A messy job but it did look convincing and far more obvious once the first layers of paint went down.
Some tips for using Sculptamold is to work in small sections and lay it down thin. This prevents cracking and it dries much faster. Also, mix in a little ground colour. This way you won’t have to spend an eternity hiding all the white areas if you lay grass or foliage down before any paint. I completely forgot with this first mix but proceeding layers covered it up. Whilst the groundwork was wet, large sculpted pieces of Styrofoam were added to the slopes to simulate fallen rocks and boulders. Thin pieces of Styrofoam were also cut out and placed as coping/capstones on top of the walls. Many of them displaced. I then framed the whole thing in Balsa Wood
The groundwork on my first few bases were painted first then the grasses and foliage were added after. After watching Mr Nightshifts excellent videos and his first few Styrofoam buildings and base projects, I decided to employ his technique of adding most of the scenic accessories before painting. This method sounds like far more work, but the result is far more realistic IMO. Check his vids out.
Using my reference pics static grass was added using an applicator and once dry the whole base was given a primer coat of Tamiya Grey and Flat Earth. The whole thing now looked like a hairy portion of a certain Lord of the Rings characters skin!
As my refence pic showed a very grey road and wall surface colour I started picking out individual stones in various Vallejo acrylic grey tones. Gradually getting lighter to almost white with some very diluted washes. The road surface was also treated to some lighter greys through the airbrush. I think the process of colouring these stones will continue as more colour is added to the whole base.
It was now time to add a little splash of colour so I could see how all those grey wall colours stood out. To start things off a few mixes of Tamiya Nato Green and Flat Yellow were airbrushed onto the static grass. This will be gradually lightened as progress continues. To get more contrast I also started adding some lighter coloured natural stones. As more foilage is added I will likely pick out a few selected wall stones in similar tones.
Next up is to add some more foilage bling and start adding earth tones to the groundwork on the upper slopes.
I might even complete the little trailer too
Attachments
Last edited:
Neil Merryweather
SMF Supporter
Cracking Job, Los!
scottie3158
SMF Supporter
Los,
Coming on nicely mate.
Coming on nicely mate.
The gardening compliments the excellent masonry perfectly.
Panzerwrecker
SMF Supporter
Cracking Job, Los!
Los,
Coming on nicely mate.
The gardening compliments the excellent masonry perfectly.
Cheers guys, really enjoying this

Andy the Sheep
SMF Supporter
A very convincing diorama base, Los. It looks absolutely real and your patience and technique are first class!
Looking forward to some B/W pics: I'm pretty sure that with the correct light it will be very difficult to tell the difference between your dio and the real 1945 thing.
Andrea
Looking forward to some B/W pics: I'm pretty sure that with the correct light it will be very difficult to tell the difference between your dio and the real 1945 thing.
Andrea
Panzerwrecker
SMF Supporter
Thanks for the kind words Andrea. I will give the B/W photos a go once I place the vehicles on.A very convincing diorama base, Los. It looks absolutely real and your patience and technique are first class!
Looking forward to some B/W pics: I'm pretty sure that with the correct light it will be very difficult to tell the difference between your dio and the real 1945 thing.
Andrea
Panzerwrecker
SMF Supporter
Little catch up on progress with the little trailer. It's not good news. Sadly the whole project has all gone a little pear shaped
First up, after careful consideration and advice from fellow modellers the two vehicles just look too big sat on the base. They look good from some angles, from others, Meh! The base can be re-used no problem so I looked at another solution so I could still enter both vehicles into SMW in Telford. I found a suitably sized wooden plinth and set about getting to work on that 5% of work required to finish both vehicles.
Unfortunately, whilst working on the hitch and hydraulics hose to connect both vehicles together, the trailer took an involuntary dive off the workbench!
So p~**ed was I that I just couldn’t deal with looking at the aftermath for a few days. I had been working on it since February so you can imagine the frustration of it almost nearly making the finishing line.
Although I had started on building the second trailer, it still required too much work to make the deadline so, last night I gathered the remnants together to look over what the damage was. It wasn’t a pleasant sight! There are some nasty cracks in the main box and the roof laden with heavy resin parts had come away completely but, remarkably all but two of the many tiny items like door stays and hooks had remained attached!. Both wheels had come off, one hub had detached from the frame, the ‘C’ shaped lifting handles near the towing eye were damaged, one split and one had completely detached. A few other linkages had come unglued but connecting wires had kept them from detaching altogether. The towing eye had also come off which will require pinning to hold the weight of the trailer in a towing position. All in all, considering it had dropped from a height of around one metre onto an oil radiator then direct to the floor it held up admirably.


So, with the horrors of my carelessness clear to see, its evident I just wont have enough benchtime to make repairs in time for SMW!
However, the challenge of making it presentable would be my next goal. There will be hairline cracks to hide, and I have also noticed small hinges and edges of panels have either snapped off or have been distorted. The worst issue by far is that the axle now appears bent. It could be that it warped before it was painted, I hadn't noticed, and the weight of the box kept it all in shape. My second trailer build, although kept away from strong light, has a nice straight axle Another issue is that, although all the individual wheel nuts amazingly all remained on the wheel face, whilst dry fitting one back to the hub, the face cracked around 50% of the wheel. This too will have to be covered up or replaced with another 3D printed wheel although, without looking, I doubt I will have enough spare 3D printed wheel nuts! . Looking at it, a strategically placed tarp hanging from the roof rack could hide quite a multitude of the repairs in one go. So that’s the next plan.
Onwards and upwards
First up, after careful consideration and advice from fellow modellers the two vehicles just look too big sat on the base. They look good from some angles, from others, Meh! The base can be re-used no problem so I looked at another solution so I could still enter both vehicles into SMW in Telford. I found a suitably sized wooden plinth and set about getting to work on that 5% of work required to finish both vehicles.
Unfortunately, whilst working on the hitch and hydraulics hose to connect both vehicles together, the trailer took an involuntary dive off the workbench!
So p~**ed was I that I just couldn’t deal with looking at the aftermath for a few days. I had been working on it since February so you can imagine the frustration of it almost nearly making the finishing line.
Although I had started on building the second trailer, it still required too much work to make the deadline so, last night I gathered the remnants together to look over what the damage was. It wasn’t a pleasant sight! There are some nasty cracks in the main box and the roof laden with heavy resin parts had come away completely but, remarkably all but two of the many tiny items like door stays and hooks had remained attached!. Both wheels had come off, one hub had detached from the frame, the ‘C’ shaped lifting handles near the towing eye were damaged, one split and one had completely detached. A few other linkages had come unglued but connecting wires had kept them from detaching altogether. The towing eye had also come off which will require pinning to hold the weight of the trailer in a towing position. All in all, considering it had dropped from a height of around one metre onto an oil radiator then direct to the floor it held up admirably.
So, with the horrors of my carelessness clear to see, its evident I just wont have enough benchtime to make repairs in time for SMW!
However, the challenge of making it presentable would be my next goal. There will be hairline cracks to hide, and I have also noticed small hinges and edges of panels have either snapped off or have been distorted. The worst issue by far is that the axle now appears bent. It could be that it warped before it was painted, I hadn't noticed, and the weight of the box kept it all in shape. My second trailer build, although kept away from strong light, has a nice straight axle
Another issue is that, although all the individual wheel nuts amazingly all remained on the wheel face, whilst dry fitting one back to the hub, the face cracked around 50% of the wheel. This too will have to be covered up or replaced with another 3D printed wheel although, without looking, I doubt I will have enough spare 3D printed wheel nuts! . Looking at it, a strategically placed tarp hanging from the roof rack could hide quite a multitude of the repairs in one go. So that’s the next plan.Onwards and upwards
Last edited: